Tag Archives: c sharp

Considerations for SQL Server on Linux

Introduction and Background

SQL Server has been released for Linux environments too, and after ASP.NET we can now use SQL Server to actually workout our servers on Linux using Microsoft technologies without having to purchase the licenses and pay a fortune. But that is not the case, at least for a while… Why? I will walk you through these critical aspects of the SQL Server and Linux continuum in this post, I am really looking forward to exploring a lot of things right here with you, by reading this post, you will be able to go through many areas of SQL Server on Linux and see if you really need to try it out at the moment or if you need to wait a while before diving any deeper in the platform.

I personally enjoy trying new things out… There are many out there who just try things out, I F… no, no, I dissect things up to share the in-depths of what everything has, what everything says and really is and finally, should you consider it or not. That is the most important part. After all, it is you, who is the main focus of my attention I want to tell you, share with you, what I find. Thus, by reading my post, you will get idea about many things — SQL Server is in its initial versions on Linux so, this post is primarily a feedback, overview of SQL Server and not a rant on the product in anyway.

SQL Server 2016 available on Linux

Now starts the fun part, I believe almost all of you are aware of the fact that SQL Server 2016 is available on Linux after serving Windows only since a great time, plus .NET Core is available on Linux too, and if you have been reading my past articles and blogs you are aware of fact that I am a huge fan of .NET Core framework and how it helps Microsoft to ship their products to other platforms too.

Microsoft announced SQL Server availability on Linux quite a while ago, and many have started downloading and using the product.

sql-loves-linux_2_twitter-002-640x358
Figure 1: SQL Server “heart” Linux. No pun intended. 

Of course the benefit is for Linux users and developers because they now have more options, whether they like SQL Server or not is a different thing in itself. I personally enjoy the tools, such as SQL Server Management Studio, which is a free software to manage databases using SQL Server. The tool can be used for most of the database engines, however Microsoft only engines.

There are many posts that give a good overview and introduction to SQL Server on Linux, and I am not going to dive deeper into them… As I have an exam of Database Systems tomorrow. So, help yourself with a few of,

  1. https://www.microsoft.com/en-us/sql-server/sql-server-vnext-including-Linux
  2. https://docs.microsoft.com/en-us/sql/linux/sql-server-linux-get-started-tutorial
  3. https://blogs.technet.microsoft.com/dataplatforminsider/2016/11/16/announcing-sql-server-on-linux-public-preview-first-preview-of-next-release-of-sql-server/ (This is a must read!)

Without further delay, let us go on to the installation of SQL Server on Linux section, and see how we can get our hands on those binaries.

Installation of SQL Server engine

SQL Server, like on Windows, comes separately from tools. You have to install SQL Server and then you later install the tools required to connect to the engine itself — Note: If you can use .NET Core application, then chances are that you do not even need the SQL Server Tools for Linux at the moment. You can just straight away execute the commands in the terminal, I will show you how… And in my experience I found this method really agile and as per demand.

So, fire up your machines and add the keys for packages that you are going to access, download and install.

$ curl https://packages.microsoft.com/keys/microsoft.asc | sudo apt-key add -
$ curl https://packages.microsoft.com/config/ubuntu/16.04/mssql-server.list | sudo tee /etc/apt/sources.list.d/mssql-server.list

These will set up the repositories to your machine that you can then use to start downloading the packages.

screenshot-7008
Figure 2: curl executing.

Finally, refresh the sources and start the installation,

$ sudo apt-get update
$ sudo apt-get install mssql-server

You will be prompted to enter “y” and press “Enter” key to continue the installation. This process will download and install the binaries in your system. It downloads the files and scripts that will later on set up the system for your instance, Once the setup finishes, you may execute the following script to start “installation” of SQL Server 2016 on your machine.

screenshot-7010
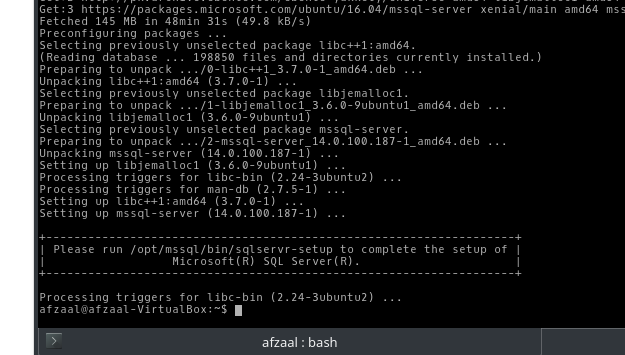
Figure 3: SQL Server installed on Ubuntu. 

$ sudo /opt/mssql/bin/sqlservr-setup

Authenticate this script, as it requires a lot of permissions in order to generate the server’s engine on your machine. The default hierarchy is like this,

screenshot-7007
Figure 4: Files in the installation directory, ready to install engine. 

You can see the setup script in the list, execute it in the terminal and it will guide you through setup.

screenshot-7011
Figure 5: SQL Server installer requesting user password during installation. 

You will accept the terms, enter password etc. and server will be installed. Simple as that. But yeah, do remember the password you need it later to connect — there is no Trusted_Connection property available in this one.

You can also test the service to see if that is running properly, or running at all by going down to your task manager and looking for the running services. First of all, you can execute the following command to see if the server is running,

$ systemctl status mssql-server

screenshot-7013
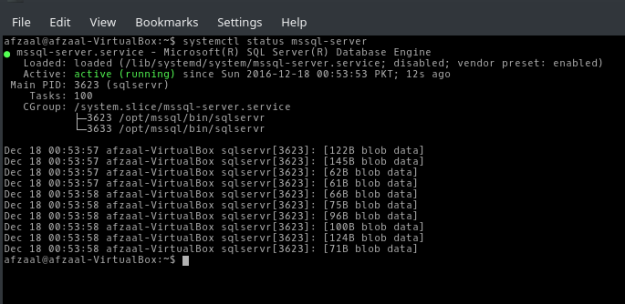
Figure 6: The screenshot shows that the response has everything required to see whether service is running or not.

In most operating systems you can find the same under processes too,

screenshot-7016
Figure 7: SQL Server collects telemetry information; the last process tells this. 

Once everything is working we can move onwards to download and install tools.

Installing SQL Server 2016 Tools

On Linux, the choice you have is very small and selected. You may download and install a few helpers and tools if you would like, such as “sqlcmd” program. Just giving a short overview of the steps required to install this package and to use it for some tinkering.

The procedure is similar to what we had, add keys, install the server,

$ curl https://packages.microsoft.com/keys/microsoft.asc | sudo apt-key add -
$ curl https://packages.microsoft.com/config/ubuntu/16.04/prod.list | sudo tee /etc/apt/sources.list.d/msprod.list

Then finally use the following command,

$ sudo apt-get update 
$ sudo apt-get install mssql-tools

The installation won’t take longer and you will be able to get the packages that you can later use, I won’t be showing these off a lot.

$ sqlcmd -S localhost -U sa

Do not enter password in the terminal at all, let the program itself ask for the password and user will enter it later, secondly user input will not be shown on the screen.

screenshot-7017
Figure 8: Result of SQL query in sqlcmd program.

This is enough and I don’t want to talk any more about this tool, plus I do not recommend this at all, why? See the result of SQL query below,

> SELECT serverproperty('edition')
> GO

screenshot-7018
Figure 9: Result of an SQL query, totally unstructured. 

The results are not properly structured so they are confusing, plus you have to scroll up and down a bit to see them properly. So, what to do then? Instead of using this I am going to teach you how to write your own programs… I already did so, and I thought I should again for .NET Core.

Writing SQL Server connector app in .NET Core

I am going to use .NET Core for this application development part, it is indeed my favorite platform there is. On the .NET world, I wrote the same article using .NET framework, you can read that article here, How to connect SQL Database to your C# program, beginner’s tutorial. That tutorial is a complete guide to SQL Server, targeted at any beginner in the platform field. However in this, I am not going to explain the basics but I am just going to show you how to write the application and how to get the output.

Note: You should read that article for more explanations, I am not going to explain this in depth. I will not be explaining System.Data.SqlClient either, it is available in that post I referred to.

You will start off by creating a new project, restoring it, and finally open it up in Visual Studio Code.

$ dotnet new
$ dotnet restore
$ code .

I ignored the new directory creation process, thinking you guys know it yourself. If you have no idea, consider reading a few of my previous posts for more on this topic, such as, A quick startup using .NET Core on Linux.

After that, add a new file to your project, name it SqlHelper, add a class with same name in it,

using System;
using System.Data.SqlClient;

namespace ConsoleApplication
{
    class SqlHelper 
    {
        private SqlConnection _conn = null;

        public SqlHelper() 
        {
            _conn = new SqlConnection("server=localhost;user id=sa;password=<password>");
            _conn.Open();
            Console.WriteLine("Connected to server.");
        }
    }
}

You still require a simple SQL connection string for your database engine, there is a website that you can use to get your connection strings. I initially told you there is no version of using trusted_connection here because there are no Windows accounts here that we can utilize. Now, call this object from your main class and you will see the result.

using System;

namespace ConsoleApplication
{
    public class Program
    {
        public static void Main(string[] args)
        {
            new SqlHelper();
        }
    }
}

screenshot-7019
Figure 10: Connected to the server.

The results are promising as they show we can connect to the server here. Now we can move onwards to actually create something useful. Let us just try to execute the commands (that we executed above) in our newly developed system, update the code to start accepting requests of SQL commands.

using System;
using System.Data.SqlClient;

namespace ConsoleApplication
{
    class SqlHelper 
    {
        private SqlConnection _conn = null;

        public SqlHelper() 
        {
            _conn = new SqlConnection("server = localhost; user id = sa; password = <password>");
            _conn.Open();
            Console.WriteLine("Connected to server.");
            _execute();
        }

        private void _execute() 
        {
            if (_conn != null ) 
            {
                Console.BackgroundColor = ConsoleColor.Red;
                Console.ForegroundColor = ConsoleColor.White;
                Console.Write("Note:");
                Console.BackgroundColor = ConsoleColor.Black;
                Console.ForegroundColor = ConsoleColor.Gray;
                Console.WriteLine(" You may enter single line queries only.");

                while(true)
                {
                    Console.Write("SQL> ");
                    string query = Console.ReadLine();
                    using (var command = new SqlCommand(query, _conn)) 
                    {
                        try {
                            using (var reader = command.ExecuteReader()) 
                            {
                                while (reader.Read()) 
                                {
                                    Console.WriteLine(reader.GetString(0));
                                }
                            }
                        } catch (Exception error) {
                            Console.WriteLine(error.Message);
                        }
                    }
                }
            }
        }
    }
}

This will start executing and will request the user to enter SQL commands, you can see how this works below,

screenshot-7020
Figure 11: Connecting and executing SQL queries on SQL Server. 

So, you have seen that even a simple .NET Core program to write and manage the queries is way better are structuring the sqlcmd program on Linux. You can update this as per needed.

Tips, tricks and considerations…

In this section I will talk about a few of the major concepts that you must know and understand before diving any deeper in SQL Server on Linux at all, if you don’t know these, then chances are you don’t know SQL Server too. So, pay attention.

1. Default Directory?

There are so many articles out there already, yet no one seems to be interested in telling the world where the server gets installed. Where to find the files? How to locate database logs etc?

In Linux, the default directory is, “/var/opt/mssql/<locked out>“. You need to have admin privileges to access and read the content of this directory. So, I got them and entered the directory.

$ sudo dolphin /var/opt/mssql/

“dolphin” is the file manager program in KDE, sorry the display was not so much clear so I selected everything for you too what is inside.

screenshot-7021
Figure 12: Data in the “data” directory under “mssql” directory.

You can surf the rest of the directory on your own, I thought I should let you know where things actually reside. On your system, in future, it might change. But, until then, enjoy. 😉

2. Edition Installed

On Windows, you are typically asked for edition that you need to install on your machine. On Linux that was not the case and it installed one for us. The default one (and at the moment, only possible one) is SQL Server Developer edition. This edition is free of cost, and it has everything that Enterprise edition has.

To confirm, just execute,

SELECT serverproperty('edition')

Or, have a look above in figure 9 or 11, you can see the edition shown. All of recent products of Microsoft based on .NET Core are x64 only. ARM and x86 are left for future, for now.

3. Usage Permissions

Yes, you can feel free to download, use and try this product out, but remember you cannot use it in production or with production data. This is the only difference in Enterprise and Developer edition of SQL Server 2016.

If you head over to SQL Server 2016 editions, you can see the chart clearly.

screenshot-7022
Figure 13: No production rights are available in Developer edition.

Thus you should not consider this to be used with production data. You can, until a time when it is allowed, you should stick with Windows platform and download Express edition. It has more than enough space for small projects.

4. Should you use it?

Finally, if you are a learner like me, if you want to try something new out, then yes of course go ahead and try it out. You can install a Ubuntu on a VirtualBox to try this thing out if you’d like.

If you find something new, message me and we can chat on that. 🙂

Automating deployment of ASP.NET Core to Azure App Service from Linux

Introduction and Background

On operating systems such as Microsoft Windows, and using great tools like Visual Studio, it is greatly easy to upload and publish your web application projects to Microsoft Azure but what about other platforms such as Linux? Microsoft has recently released PowerShell as open source project and that is a great tool to be used in the cases where you have developers who understand and can use PowerShell but if you don’t happen to have any, then you would require to use traditional tools and sometimes they will require you to manually perform these changes. In this post, I am going to cover the teams who are using Git repositories for their projects and I am going to cover how they can basically automate the publishing of their projects after each successful build. On Linux, we can basically create small scripts that run on the background just like PowerShell or the Windows command prompt terminal’s batch files. Git programs are required for this to run, actually what I am going to show in this is to execute the same commands but in a manner that most of the repository’s information is already built, the commit message is updated and the content is published to the Azure app service. The purpose of this guide is to make the entire process as easy to be understood, as A, B and C. I will be using a real world application to show you how to do what and where instead of talking generally about many things at the same time.

Before moving onward, a very little knowledge of how Git system works is required from you because some things might get a bit technical in the post below and thus you must have the know-how of how Git systems work in order to control the versioning of files.

2color-lightbg2x
Figure 1: Git logo.

Secondly, you are required to know how you can use “dotnet” script to create, build and run the .NET Core applications. If you don’t know .NET Core, I will reference to a few of my own articles that are beginner-friendly which you can read to learn more on this.

Finally, you are required to have an active Azure account with a working subscription. If you don’t happen to have on, you can get a free account with $200 credits to try out all of Azure! Once these are met, you can continue to actually using the article for something useful.

Creating the application — entire part

This part has been shared and taught many times, on many occasions. I wrote an article on the same concept, a few days ago and I would like to refer that article to you to learn how you can create a new application with web template in .NET Core. Creating and hosting ASP.NET Core application on Linux — Nothing Third-Party, read this article for a complete overview and a walkthough for the concept of building and running the applications on Linux environment. I will move onward from this step, because you must be aware of the ways of creating your own applications.

Deployment of web application to Azure

Now comes the main part, this article entirely focusses on the deployment of applications to Microsoft Azure instead of developing an application. There would be some parts, where I will be modifying the parts, but that is just to tell you how easy it would be to redeploy the application using the automation by executing a simple command. Although it is not required but you are required to have a very basic introduction to automation tools. You can get a good tutorial about these toolings easily from any software engineering guide.

Using git for deployment

Microsoft Azure uses many methods and ways to deploy the applications on the cloud, such as using Visual Studio to deploy the applications and leave the configurations to the tool itself. However, since Linux environments don’t have Visual Studio, most of the tasks are left with source control tools (Visual Studio Code also uses the same git programs to upload the code to repositories). I will show you, how you can create a minimal script or a program, that manages all of these tasks for you — automation program.

On Linux, mostly and typically, git comes pre installed in most of the Linux-distributions, such as Ubuntu, etc. However, if that is not available you get easily install it using

$ sudo apt-get install git

Or using a similar command, such as using yum etc. This would install and setup git for your environment. Once you have git installed, you need to set a few things up. Git requires the name, email address for notifying who made a change to the system. So for that we would require to execute the following commands,

$ git config --global user.name "Eminem"
$ git config --global user.email "email@domain.com"

You should pass the name and address values that you hold — I used Eminem and a random email address. And to check if your personal configurations are done correctly, you can execute the following command to test that,

$ git config --list

These are the required configurations that you must do before you can use git for any purpose at all.

Note: You also need to create a new web application service (Azure App Service) on Microsoft Azure so that you can deploy the application somewhere. Since I do not want to go deep into the development and starting of this session, I would like you guys to go and watch this video of mine, providing an overview of Microsoft Azure App Service (you may have to put the volume a bit higher).

Once you have that, you can continue onwards and actually set up repositories to deploy the application. I used the following information while creating a new service, so that if I use a name, you should know where did that come from.

screenshot-6477
Figure 2: Creating a new App Service.

screenshot-6478
Figure 3: Reviewing the information of App Service in Microsoft Azure.

Upon creating, you can visit the web service from your browser using the link provided and on the first visit without any update, the following page is shown.

screenshot-6479
Figure 4: Initial page from the App Service.

It shows that you can deploy your web applications, from many sources, using many services such as FTP, Git etc. I will show you, how to do this using Git… There are a few other things that I would like to show you here,

  1. I will show you how to do this, using git.
  2. I will also show you, how to test the build integrity — whether build succeeds or not.
  3. I will also show you, whether git considers to commit and push the changes to the server or not.

So these are a few of the tests that I have prepared for the automation tool that will be helpful for us in this case. These things are not provided on the tutorials that are available online, they are just simple straight-forward ones that only show you how to do it, not whether it is helpful to do it at all.

Setting up the local repository

On the machine side, the first thing to do is to set up a local repository for git deployments, even if you have created a project, you can still create a repository for that project and then use it as the source for your application’s content. So, for that, the following commands would work,

# If you have not created a project, remove these lines. 
$ dotnet new -t web
$ dotnet restore

# The following creates a local repository
$ git init

This would create the project, set up the repository for us under .git directory. On my machine, the following was the result of this,

screenshot-6480
Figure 5: Creating a new project using .NET Core.

Not visible at the moment, however there is a special file called .gitignore, created by default and that contains really helpful ignore constraints for the git systems. However, we will look into them later as we progress.

Adding remote repositories

We can now set up a few remote repositories on own local machine so that once we need to publish the application, we don’t have to enter the URL of the repository every time. Instead, what we can do is, just call that alias of the repository and deploy the content there. This helps to notify the system of the locations where it needs to push the changes to. For that, first of all we need to setup our online repository to allow Local Git Deployments from Microsoft Azure and only then we can assure that we can send the code to the repository online. For that, head over to, Deployment options → Deployment source → Local git repository.

screenshot-6487
Figure 6: Deployment options in Microsoft Azure.

You can see that there are other options available too, select as required and wanted. I selected the third option so that we can publish the source code from our local machines to the servers in no time at all, without having to require any third-party vendors. You need to set up the credentials, so that when you are trying to publish the applications, only you are the one in charge of pushing the changes to the server and not anyone else.

screenshot-6488
Figure 7: Setting up credentials for the deployment account.

Once these things are set up, we can then move onwards to set up our local git programs to allow it to deploy the source code from our local environment all the way up to the Microsoft Azure. Stay with me. To do so, we need to execute the following command,

$ git remote add repoinazure https://<user>@<servicename>.scm.azurewebsites.net:443/<servicename>.git

Note a few things in the previous command, the few things interesting here are that the repository always contains the name of your application service in the URL as well as in the resource file for your git processes. You need to update that, secondly, you need to update the username in the URL and as the one you used in the credentials (I used “afzaal” there). Once this is done, we can move onwards and actually push our first version of application to see, how Azure will behave.

The following commands take care of that,

$ git add .
$ git commit -m "Some random commit message here..."
$ git push repoinazure master

In the previous commands, the first one takes care of the addition of files to the local tracking of the repository, to track the files that needs to be. Second command simply commits the changes and finally a push is made to the “repoinazure”, of course that is the repository where we will publish the application to.

screenshot-6489
Figure 8: Terminal asking for password before deployment. 

It asks for the password and then continues to simply compress the objects, to deploy them using git protocol.

screenshot-6490
Figure 9: Terminal showing the progress. 

The following is a screenshot of a process going on, during the first deployment. Next times and onwards it doesn’t take this much time and is very much simpler.

screenshot-6491
Figure 10: Terminal showing the processes going on at Azure during the deployment.

However, we will also create a shell script that automates the deployment for us. Once it is done, the terminal will show the following results on the screen and we can know that Azure is set up for startup.

screenshot-6492
Figure 11: Application deployed to Azure.

Let us navigate to the website and see if things are the way we are planning them to be.

screenshot-6493
Figure 12: Application’s home page after it has been uploaded to Azure.

Voila! We have finally deployed the application to the Azure. We now need to deploy the changes and so here is where I submit my recommendations, ideas and tips.

Development and redeployments

Let us add a simple controller to this web application, and then quickly deploy that using the script that we will create to do the trick for us. In this section, I will show you a simple ASP.NET Core Web API that will be used to basically see, how early an updates get published live on the server. So, I start with adding a new controller file to the web application’s source code and then modifying it to return a few objects with some data.

using System.Collections.Generic;
using Microsoft.AspNetCore.Mvc;

namespace WebApplication.Controllers {

    [RouteAttribute("api/people")]
    public class PersonApiController : Controller {
        private List<Person> _people { get; set; } = new List<Person> { 
             new Person { ID = 1, Name = "Afzaal Ahmad Zeeshan" },
             new Person { ID = 2, Name = "Bruce Wayne" },
             new Person { ID = 3, Name = "Marshall Bruce Mathers III" } 
        };
        public List<Person> GetPeople() {
            return _people;
        }

        // Rest of the stuff here...
    }

    public class Person {
        public int ID { get; set; }
        public string Name { get; set; }
    }
}

I just added a simple HTTP GET handler to show you how easy and simple it is to actually make the changes to your live application using git deployment from a local repository.

Now the magic trick for kids, the following script will manage most of our tasks and will take care of them before we proceed deploying the application.

if [ $# == 0 ] 
    then 
    echo "Usage: automate.sh <git-remote-repository>"
    exit 1
fi

# Variables
commit_message="Deployment commit on $(date "+%B %dth, %Y at %H:%M %p")."

# Run the test
dotnet build

if [ $? == 0 ]
    then
        # Successful attempt.
        # Update the git.
        git add -A

        echo "Using commit message, \"$commit_message\"."
        git commit -m "$commit_message"
 
        # Check if anything was commited, or whether there were no changes.
        if [ $? == 0 ]
            then 
                # Files need to be updated
                # Update the azure's repository.
                echo "Connecting to server for git push..."
                git push $1 master
                exit 0
        else 
            echo "No changes to be pushed to server. Terminating."
            exit 1
        fi
        exit
    else 
        # There must have been an issue in the execution.
        echo "There were errors in building process, fix them and re-try."
        exit 1
fi

This would check if we are passing the remote repository or not, it will also build the project and then continue only if build succeeds. So, basically, this comes really handy when working with a terminal based environment especially Linux and using the git protocol for deployment. I recommend saving this as a file in your local repository, and then executing it from the terminal as a program. You can get the file from my GitHub repository too.

screenshot-6533
Figure 13: “autorun.sh” file available in the files.

Once this is done, simply create it executable and then finally execute the script to deploy it. It will go through each step and it will finally deploy the application, it would require password. I did not create the script to accept the password.

screenshot-6536
Figure 14: My script working and deploying the application to Azure.

So, let us run the system now. Once it is done, it will show you that you can now access the web application as it has been deployed successfully. Browser can confirm this,

screenshot-6539
Figure 15: Result of the deployment.

To see more information on this, we can head over to Azure to see how does the deployment affect our current source code.

screenshot-6538
Figure 16: Deployments shown on the Azure.

Clearly seen that now our most recent version of the deployment is being shown as the active deployment and the previous one is removed and set as Inactive. We can do deeper into them and change their status as needed but I won’t be doing that at all. Remember: Next time you want to publish the application, just use that script I provided.

Final words

Microsoft Azure provides very simple ways of deploying the applications, there are many other ways other than Git to deploy the applications to the server. OneDrive, GitHub and other cloud storage services can be used easily to deploy the applications.

However my major concern was to show how you can use the git, in a script-based environment to deploy the applications to Azure and also track when each commit gets pushed to the server. As you can see in this post, the commits are tracked on the cloud and you can change and select which commit you are interested in and set them as the active ones — such as in the case of a deletion of a file or so.

Is using ‘using’ block really helpful?

Introduction and Background

So, it all began on the Facebook when I was posting a status (using Twitter) about a statement that I was feeling very bad that .NET team had left out the “Close” function while designing their .NET Core framework. At first I thought maybe everything was “managed” underground until I came up to an exception telling me that the file was already being used. The code that I was using was something like this,

if(!File.Exists("path")) { File.Create("path").Close(); }

However, “Close” was not defined and I double checked against .NET Core reference documentations too, and they suggested that this was not available in .NET Core framework. So I had to use other end… Long story short, it all went up like this,

I am unable to understand why was “Close” function removed from FileStream. It can be handy guys, @dotnet.

Then, Vincent came up with the idea of saying that “Close” was removed so that we all can use “using” blocks, which are much better in many cases.

You don’t need that. It’s handier if you just put any resource that eats resources within the “using block”. 🙂

Me:

How does using, “using (var obj = File.Create()) { }” make the code handier?

I was talking about this, “File.Create().Close();”

Now, instead of this, we have to flush the stream, or perform a flush etc. But I really do love the “using block” suggestion, I try to use it as much as I can. Sometimes, that doesn’t play fair. 😉

He:

Handier because I don’t have to explicitly call out the “Close()” function. Depends on the developer’s preference, but to me, I find “using (var obj = File.Create()) { }” handier and sexier to look at rather than the plain and flat “File.Create().Close();”. Also, it’s a best practice to “always” use the using block when dealing with objects that implements IDisposable to ensure that objects are properly closed and disposed when you’re done with it. 😉

As soon as you leave the using block’s scope, the stream is closed and disposed. The using block calls the Close() function under the hood, and the Close() calls the Flush(), so you should not need to call it manually.

Me:

I will go with LINQPad to see which one is better. Will let you know.

So, now I am here, and I am going to share what I find in the LINQPad. The fact is that I have always had faith in the code that works fast and provides a better performance. He is an ASP.NET MVP on Microsoft and can be forgiven for the fact that web developers are trained on multi-core CPUs and multi-deca-giga-bytes of RAMs so they use the code that looks cleaner but… He missed the C# bytecode factor here. I am going to use LINQPad to find out the underlying modifications that can be done to find out a few things.

Special thanks to Vincent: Since a few days I was out of topics to write on, Vincent you gave me one and I am going to write on top of that debate that we had.

Notice: I also prefer using the “using” block in almost every case. Looks handier, but the following code block doesn’t look handier at all,

using (var obj = File.Create("path")) { }

And this is how it began…

Exploring the “using” and simple “Close” calls

LINQPad is a great software to try out the C# (or .NET framework) code and see how it works natively, it lets you see the native bytecode of ,NET framework and also lets you perform and check the tree diagrams of the code. The two types that we are interested in are, “using” statement of .NET framework and the simple “Close” calls that are made to the objects to close their streams.

I used a Stopwatch object to calculate the time taken by the program to execute each task, then I match the results of each of the program with each other to find out which one went fast. Looking at the code of them both, it looks the thousand-feet high view of them both looks the same,

// The using block
using (var obj = File.Create("path")) { }

// The clock method
File.Create("path").Close();

They both the same, however, their intermediate code shows something else.

// IL Code for "using" block
IL_0000: nop 
IL_0001: ldstr "F:/File.txt"
IL_0006: call System.IO.File.Create
IL_000B: stloc.0 // obj
IL_000C: nop 
IL_000D: nop 
IL_000E: leave.s IL_001B
IL_0010: ldloc.0 // obj
IL_0011: brfalse.s IL_001A
IL_0013: ldloc.0 // obj
IL_0014: callvirt System.IDisposable.Dispose
IL_0019: nop 
IL_001A: endfinally 
IL_001B: ret 

// IL Code for the close function
IL_0000: nop 
IL_0001: ldstr "F:/File.txt"
IL_0006: call System.IO.File.Create
IL_000B: callvirt System.IO.Stream.Close
IL_0010: nop 
IL_0011: ret

Oh-my-might-no! There is no way, “using” block could have ever won with all of that extra intermediate code for the .NET VM to execute before exiting. The time taken by these commands was also tested and for that I used the native Stopwatch object to calculate the “ticks” used, instead of the time in milliseconds by each of the call. So my code in the LINQPad looked like this,

void Main()
{
   Stopwatch watch = new Stopwatch();
   watch.Start();
   using (var obj = File.Create("F:/file.txt")) { }
   watch.Stop();
   Console.WriteLine($"Time required for 'using' was {watch.ElapsedTicks}.");
 
   watch.Reset();
   watch.Start();
   File.Create("F:/file.txt").Close();
   watch.Stop();
   Console.WriteLine($"Time required for 'close' was {watch.ElapsedTicks}.");
}

The execution of the above program always results in a win for the “Close” function call. In sometimes it was a close result, but still “Close” function had a win over the “using” statement. The results are shown the images below,

screenshot-5120 screenshot-5121 screenshot-5122

The same executed, produced different results, there are many factors to this and it can be forgiven for all of them,

  1. Operating system might put a break to the program for its own processing.
  2. Program might not be ready for processing.
  3. Etc. etc. etc.

There are many reasons. For example, have a look at the last image, the time taken was 609 ticks. Which also includes the ticks taken by other programs. The stopwatch was running ever since, and that is what caused the stopwatch to keep tracking the ticks. But in any case, “using” statement was not a better solution from a low level code side.

Final words

Although I also recommend using the “using” block statement in C# programs, but there is a condition where you should consider using one over other. For example, in this condition, we see that implementing one over the other has no benefit at all, but just a matter of personal interest and like. Although I totally agree to Vincent where he mentions that “using” block is helpful, but in other cases. In this case, adding a Close call is a cleaner (IMO) way of writing the program as compared to the other one.

At the end, it is all in the hands of the writer… Select the one you prefer.

Creating and hosting ASP.NET Core application on Linux — Nothing Third-Party

Introduction and Background

It has been a while since I wanted to write something about ASP.NET Core hosting stuff, and Kestrel was something that was interesting from my own perspective. Previously I have written a bunch of stuff to cover up the basics of ASP.NET Core programming and in this one I will guide you on hosting the ASP.NET Core application natively, using the .NET Core libraries that you download while installation process. Secondly, it has been a while since I have had written anything at all and I might have forgotten the interests of my readers so excuse me if I miss out a few things.

image_60140ec0-ce46-4dbf-a14f-4210eab7f42c
Figure 1: Image captured from Scott Hanselman’s blog.

There is a lot of stuff to share in this post today, so stay tuned and hold your breath basically. I will be covering the following steps in this article:

  1. Installation of the latest version of .NET Core on Linux environment
    • If you already have a .NET Core framework installed, upgrade your system if that doesn’t support ASP.NET programming as of now.
    • In the previous versions, web development wasn’t support in .NET Core for Linux operating systems. In the recent versions, it has been added to the recent versions now so that is why I insist that before continuing you at least install the latest version of .NET Core.
  2. Setup an ASP.NET Web Application in your Linux environment.
    • I will guide you through many stages, such as development, editing, maintenance and using an IDE for all of these things.
    • I will walk you through many different areas (not the ASP.NET Area!) in ASP.NET web application’s file hierarchy, plus I will tell you what is back and what is about to change (or subject to change in the hierarchy).
  3. Build and run the project
    • In this section, I will guide you through a few of the tips that would deem helpful to you.
    • Before running, I will give you an overview of Kestrel — web server for ASP.NET 5.
    • I will then move onwards to using the website, which has the same feel as it had in Windows operating system, while developing ASP.NET web applications.
    • Tip: I will then give you a tip, by default, application is uploaded at 5000 port, which you would require to change in many cases, I will show you how to change the port of the web application’s hosting service.
  4. Finally, I will head over to final words that I put at the end of every post that I write on any of the platform that I have to write about.

Installing or upgrading .NET Core

I wrote an article that covered how you can start using .NET Core on Linux environments, you can read it here. That article was written entirely, to give you a concept of the .NET Core architecture, and a few commands that you can use to do most of the stuff. The only difference between the older article and this section of the post is that this would just contain a later version of .NET Core to be installed on the system. Whereas in the previous one you had to install the older one.

Try the following,

sudo apt-get update && dist-upgrade

If that doesn’t work, or it doesn’t show the updates, head over to the main website for .NET Core, and install the latest version from there.

Creating a new web application

Previously, .NET Core only supported creating libraries or console applications. At the moment, it supports ASP.NET web application development too, it supports the templates for ASP.NET too, at the moment just a simple ASP.NET MVC oriented web application is created, and I don’t think there is any need for other templates like Web API, SignalR, single page applications etc. I believe that is complete at the moment.

To create a new web application, create the new project in .NET Core and pass the type parameter as a web application, which would guide .NET Core (dotnet) to create a new application with the template of web application.

screenshot-3007
Figure 2: Creation of a new .NET Core project using web template. 

As you can see in the command above, we are passing a type (-t parameter) to the command to create a new web templated application. The content is as following,

screenshot-3008
Figure 3: ASP.NET Web application files and directories in .NET Core. 

The project looks similar to what we have on Windows environment. Just a difference of one thing: It includes, web.config as well as project.json file. Remember that Microsoft is mostly moving back to MSBuild and of course a few of the hosting modules are based on IIS servers so that is why web.config file is available in the project. However, the project at the moment uses project.json file for project-level configuration and (as we have heard mostly during these days) these would be migrated to MSBuild way of managing the project and other related stuff.

Editing and updating the web application

Microsoft has been pushing the limits since a while, of course on Linux you already had a few of the best tools for development but Visual Studio Code is still a better tool. In my previous posts, I said that I don’t like it enough — I still don’t like it very much, it needs work! — but it is better than many tools and IDEs available for C# or .NET-related programming. Since in this post I said that I won’t be talking about anything third-party, so Visual Studio Code is the tool that I am going to suggest, support and use in this case.

You can install Visual Studio Code from their official website, note one thing, the Debian packages take a little longer for installation, so if you also don’t like to wait too much like me then I would recommend that you download the archive packages and install the IDE from them. There is no installation required at all, you just move the extracted files to a location where you want to store it. FInally, you create a symbolic link to your executable, which can be done like this,

sudo ls -s /home/username/Downloads/VSCode-linux-x64/code /usr/local/bin/code

This would create link and you can use Visual Studio Code IDE just by executing this “code” command anywhere in the directory (using the terminal), it would then load the directory itself as a project in the IDE which you can then use to update your application’s source code and other stuff that you want to.

Tip: Install the C# extension from market place for a greater experience.

Once this is done, head over to the directory where you create the project. Execute the following command,

code .

This would trigger Visual Studio Code to load your directory as the project in the IDE. This is how my environment looks like,

screenshot-3009
Figure 4: Visual Studio Code showing the default ASP.NET directory as a project.

The rest is history — I mean the rest is the similar effect, and feeling that you can get on Windows environment. First of all, when you work this way and follow my lead you will get the following errors in the IDE window.

screenshot-3010
Figure 5: Error messages in Visual Studio Code.

We will fix them in a moment. But at first, understand that these are meant to act like this. If you have had ever programmed in .NET Core, you must have known that before anything else you need to restore the NuGet packages for your project before even building the project. Visual Studio Code uses the same IntelliSense and tries to tell you what is going wrong. In doing so, it requires the binaries which are not available so you are shown that last error message. Above two are optional, middle one is a bit optional-required.

Build and run the project

Until this point we have had created the project. But now we need to restore the dependencies for our project which are going to be used by the .NET Core to actually execute our code. By default a lock file is not generated, so we need to create a new file and after that we would be able to build the project.

Execute the following command,

dotnet restore

After this, .NET Core would automatically generate the lock file and building process can be easily triggered.

screenshot-3012
Figure 6: Project.lock.json file created after restoring the project.

We can continue to building the project. I want you to pay attention to this point now. See what happens.

screenshot-3013
Figure 7: Build and run process of ASP.NET web application on .NET Core.

Now notice a few things in the above terminal window. First of all, notice that it keeps logging everything. Secondly, notice that it has a port “5000” appended. We didn’t train it to use that at all, and that also didn’t come from Program.cs file either (you can see that file!). But before I dig any deeper in explanation of how to change that, I want you to praise KestrelThe web server of ASP.NET 5. Kestrel is the implementation of libuv async I/O library that helps hosting the ASP.NET applications in a cross-platform environment. The documentation for kestrel and the reference documentation is also available, and you can get started reading most of the documentation about Kestrel, on the namespace Microsoft.AspNetCore.Server.Kestrel at the ASP.NET Core reference documentation website.

This is the interesting part because ASP.NET Core can run even on a minimal HTTP listener that can act as a web server. Kestrel is a new web server, it isn’t a full feature web server but adapts as community needs updates. it supports HTTP/1 only as of now but would support other features in the coming days. But remember, pushing every single feature and module in one server would actually kill the major purpose of using the .NET Core itself. .NET Core isn’t developed to push everything on the stack, but instead it is developed to use only the modules and features that are required.  Yes, if you want to add a feature you can update the code and build the service yourself. It is open sourced on GitHub.

Changing the port number of application

In many cases, you might want to change the port number where your server listens or you may also want to make this server the default server for all of your HTTP based communication on the network. In such cases, you must be having a special port number assigned (80-for default).

For that, head over to your Program.cs file, that is the main program file (main function of your project), and that is responsible for creating a hosting wrapper for your web application in ASP.NET Core environment. The current content for this object is,

screenshot-3015
Figure 8: Source code for the Program.cs file.

In that chain of “Use” functions, we just need to add one more function call to use a special URL. The function of “UseUrls(“”)” would allow us to update the URLs that are to be used for this web application. So I am just going to use that function here so that it would let us simply select which URL (and port) to use.

screenshot-3017
FIgure 9: URLs being managed.

Now, if you try to run the application you will run into the following problem in Linux-based system.

screenshot-3019
Figure 10: Unable to bind to the URL given, error message.

That is pretty much simple — it doesn’t have permission to do the trick. So what on Linux systems is done is that it simply is performed using the superuser credentials and account.

sudo dotnet run

It would prompt you for your password, enter your password and this time application would run on the localhost:80. In the cases where you have to upload the website to the servers, Azure App Services etc. In these cases, you are requires to have the application running under the server that acts as the default server, so in those cases you must handle the default TCP port for HTTP communication for the requests. Otherwise, you might require to work at the backends of NGINX or Apache servers etc. But that is a different story.

screenshot-3020
Figure 11: Web server running at port 80.

Now that our server is running, we can now go to a web browser to test it out. I am going to use Firefox, you can use any web browser (even a terminal-based).

screenshot-3021
Figure 12: ASP.NET Core web application being rendered in Firefox, running in Linux using Kestrel web server.

As you can see, the web application runs smoothly. Plus, it also logs any event that takes place. The terminal keeps a record of that, it can also allow you to actually transfer the output from main terminal’s output to a file stream to store everything. But that is a topic for a different post.

screenshot-3022
Figure 13: ASP.NET web application’s log in terminal window.

As requests come and responses are generated, this window will have more and more content.

Final words

I have wanted since a while, to write my own next web application for my own blog and stuff, in ASP.NET Core. At the moment, the framework is “almost” ready for production, but just not yet. Maybe in a couple of next builds it will be ready. There are many things that they need to look into. For example, the web server needs to be more agile — the features needs to be provided. That is not it, VIsual Studio Code must be fully integrated with ASP.NET Core tooling. At the moment it just allows us to edit the code, then we have to go back to the terminal to do the rest. It should provide us with the ability to do that.

To Microsoft’s team related to .NET Core: Why isn’t .NET Core being published on Linux? I am pretty much sure the framework is fully function, despite the bugs. But there are bugs in the main .NET framework too, there are some minor issues every here and there. My major concern here is to be able to do, “sudo apt-get install dotnet”. I can’t remember the longer version names.

To readers: If you are willing to use ASP.NET Core for your production applications, wait for a while. Althought ASP.NET Core is a better solution than many other solutions available. But my own recommendation is to stick to ASP.NET 4.6 as of now because that is more stable version as compared to this one.

A quick startup using .NET Core on Linux

I know you may be thinking… This post is another rhetoric post by this guy, yes it is. 🙂 .NET Core is another product that I like, the first one being, .NET framework itself. It was last year when .NET Core got started and Microsoft said they are going to release the source code as a part of their open source environment and love. By following the open source project environment and ethics, Microsoft has been working very hard in bringing global developers toward their environments, platforms and services. For example, .NET framework works on Windows, C# language is used to build Windows Store applications, C# is also the primary language in Microsoft’s web application development framework, ASP.NET and much more. The online cloud service of Microsoft is also programmed in C#; primarily. These things are interrelated to each other. Thus, when Microsoft brings all of this as an open source project, things start to get a lot better!

Everyone knows about the background of .NET Core, if you don’t know, I recommend that you read the blog post on Microsoft, Introducing .NET Core. The(ir) basic idea was to provide a framework that would work with any platform, any application type and any framework to be targeted.

Introduction and Background

In this quick post, I will walk you through getting started with .NET Core, installing it on a Linux machine and I will also give my views as to why install .NET Core on a Linux machine instead of Windows machine, I will then walk you through different steps of .NET Core programming and how you can use terminal based environment to perform multiple tasks. But first things first.

I am sure you have heard of .NET Core and other of the cool stuff that Microsoft has been releasing these years, From all of these services the ones that I like are:

  1. C# 6
    • In my own opinion, I think the language looks cleaner now. These sugar-coated features make the language easier to write too. If you haven’t yet read, please read my previous blog post at, Experimenting with C# 6’s new features.
  2. .NET Core
    • Of course, who wouldn’t love to use .NET on other platforms.
  3. Xamarin acquisition
    • I’m going to try this one out tonight. Fingers crossed.
  4. Rest are all just “usual” stuff around.

In this post I am going to talk about .NET Core on Linux because I have already talked about the C# stuff.

Screenshot (898)
Figure 1: .NET Core is a cross-platform programming framework by Microsoft.

Why Linux for .NET Core?

Before I dive any deeper, as I had said, I will give you a few of my considerations for using .NET Core on Linux and not on Windows (yet!) and they are as following. You don’t have to take them seriously or to always consider them, they are just my views and my opinions, you are free to have your own.

1. .NET Core is not yet complete

It would take a while before .NET gets released as a public stable version. Until then, using this bleeding edge technology on your own machines won’t be a good idea and someday sooner you will consider removing the binaries. In such cases, it is always better to use it in the virtual machine somewhere. I have set up a few Linux (Ubuntu-based) virtual machines for my development purposes, and I recommend that you go the same.

  1. Install VirtualBox (or any other virtualization software that you prefer; I like VirtualBox for its simplicity).
  2. Set up an Ubuntu environment.
    • Remember to use Ubuntu 14.04. Later ones are not yet supported yet.
  3. Install the .NET Core on that machine.

If something goes wrong. You can easily revert back where you want to. If the code plays dirty, you don’t have to worry about your data, or your machine at all.

2. Everything is command-line

Windows OS is not your OS if you like command-line interfaces. I am waiting for the BASH language to be introduced in Windows as in Ubuntu, until then, I am not going to use anything that requires a command-line interface to be used on my Windows environment. In Linux, however, everything almost has a command-line interface and since the .NET Core is a command-based program by Microsoft that is why I have enjoyed using it on Linux as compared to Windows.

Besides, on command-line interface, creating, building and running a .NET Core project is as simple as 1… 2… 3. You’ll see how, in the sections below. 🙂

3. I don’t use Mac

Besides these points, the only valid point left is then why shouldn’t we use Mac OS for .NET Core is because I don’t use it. You are free to use Mac OS for .NET Core development too. .NET Core does support it, its just that I don’t support that development environment. 😀

Installation of .NET Core

Although it is intended that soon, the command would be as simple as:

$ sudo apt-get install dotnet

Same command is used on Mac OS X and other operating systems other than Ubuntu and Debian derivatives. But until the .NET Core is in development process that is not going to happen. Until then, there are other steps that you can perform to install the .NET Core on your own machine. I’d like to skip this part and let Microsoft give you the steps to install the framework.

Installation procedure of .NET Core on multiple platforms.

After this step, do remember to make sure that the platform has been installed successfully. In almost any environment, you can run the following command to get the success message.

> dotnet --help

If .NET is installed, it would simply show the version and other help material on the screen. Otherwise, you may want to make sure that that procedure did not incur any problems during the installation of the packages. Before I get started, I want to show you the help material provided with “dotnet” command,

afzaal@afzaal-VirtualBox:~/Projects/Sample$ dotnet --help
.NET Command Line Tools (1.0.0-preview1-002702)
Usage: dotnet [common-options] [command] [arguments]

Arguments:
 [command]      The command to execute
 [arguments]    Arguments to pass to the command

Common Options (passed before the command):
 -v|--verbose   Enable verbose output
 --version      Display .NET CLI Version Number
 --info         Display .NET CLI Info

Common Commands:
 new           Initialize a basic .NET project
 restore       Restore dependencies specified in the .NET project
 build         Builds a .NET project
 publish       Publishes a .NET project for deployment (including the runtime)
 run           Compiles and immediately executes a .NET project
 test          Runs unit tests using the test runner specified in the project
 pack          Creates a NuGet package

So, you get the point that we are going to look deeper into the commands that dotnet provides us with.

  1. Creating a package
  2. Restoring the package
  3. Running the package
    • Build and Run both work, run would execute, build would just build the project. That was easy.
  4. Packaging the package

I will slice the stuff down to make it even more clearer and simpler to understand. One thing that you may have figured is that the option to compile the project natively is not provided as an explicit command in this set of options. As far as I can think is that this support has been removed until further notice. Until then, you need to pass a framework type to compile and build against.

Using .NET Core on Linux

Although the procedure on both of the environments is similar and alike. I am going to show you the procedure in Ubuntu. Plus, I will be explaining the purpose of these commands and multiple options that .NET provides you with. I don’t want you feel lonely here, because most of the paragraphs here would be for Microsoft team working on .NET project, so I would be providing a few suggestions for the team too. But, don’t worry, I’ll make sure the content seems to be and remain on-topic.

1. Creating a new project

I agree that the framework development is not yet near releasing and so I think I should consider passing on my own suggestions for the project too. At the moment, .NET Core supports creating a new project in the directory and uses the name of the directory as the default name (if at all required). Beginners in .NET Core are only aware of the commands that come right after the “dotnet”. However, there are other parameters that collect a few more parameters and optional values such as:

  1. Type of project.
    • Executable
      • At the moment, .NET only generates DLL files as output. Console is the default.
    • Dynamic-link library
  2. Language to be used for programming.

To create a new project, at the moment you just have to execute the following command:

$ dotnet new

In my own opinion, if you are just learning, this is enough for you. However, if you execute the following command you will get an idea of how you can modify the way project is being created and how it can be used to modify the project itself, including the programming language being used.

$ dotnet new --help
.NET Initializer

Usage: dotnet new [options]

Options:
 -h|--help Show help information
 -l|--lang <LANGUAGE> Language of project [C#|F#]
 -t|--type <TYPE> Type of project

Options are optional. However, you can pass those values if you want to create a project with a different programming language such as F#. You can also change the type, currently however, Console applications are only supported.

I already had a directory set up for my sample testing,

Screenshot (899)
Figure 2: Sample directory open. 

So, I just created the project here. I didn’t mess around with anything at all, you can see that the .NET itself creates the files.

Screenshot (900)
Figure 3: Creating the project in the same directory where we were.

Excuse the fact that I created an F# project. I did that so that I can show that I can pass the language to be used in the project too. I removed that, and instead created a C# program-based project. This is a minimal Console application.

In .NET Core applications, every project contains:

  1. A program’s source code.
    • If you were to create an F# project. Then the program would be written in F# language and in case of default settings. The program is a C# language program.
  2. A project.json file.
    • This file contains the settings for the project and dependencies that are to be maintained in the project for building the project.

However, once you are going to run you need to build the project and that is what we are going to do in the next steps.

2. Restoring the project

We didn’t delete the project. This simply means that the project needs to be restored and the dependencies need to be resolved before we can actually build to run the project. This can be done using the following command,

$ dotnet restore

Note: Make sure you are in the working directory where the project was created.

This command does the job of restoring the packages. If you try to build the project before restoring the dependencies, you are going to get the error message of:

Project {name} does not have a lock file.

.NET framework uses the lock file to look for the dependencies that a project requires and then starts the building and compilation process. Which means, this file is required before your project can be executed to ensure “it can execute”.

After this command gets executed, you will get another file in the project directory.

Screenshot (902)
Figure 4: Project.lock.json file is now available in the project directory.

And so finally, you can continue to building the project and to running it on your own machine with the default settings and setup.

3. Building the project

As I have already mentioned above, the native compilation support has been removed from the toolchain and I think Ubuntu developers may have to wait for a while and this may only be supported on Windows environment until then. However, we can somehow still execute the project as we would and we can perform other options too, such as publishing and NuGet package creation.

You can build a project using the following command,

$ dotnet build

Remember that you need to have restored the project once. Build command would do the following things for you:

  1. It would build the project for you.
  2. It would create the output directories.
    • However, as I am going to talk about this later, you can change the directories where the outputs are saved.
  3. It would prompt if there are any errors while building the project.

We have seen the way previous commands worked, so let’s slice this one into bits too. This command, too, supports manipulation. It provides you with optional flags such as:

  1. Framework to target.
  2. Directory to use for output binaries.
  3. Runtime to use.
  4. Configuration etc.

This way, you can automate the process of building by passing the parameters to the dotnet script.

4. Deploying the project

Instead of using the term running the project, I think it would be better if I could say deploying the project. One way or the other, running project is also deployed on the machine before it can run. First of all, the project I would show to be running, later I will show how to create NuGet packages.

To run the project, once you have built the project or not, you can just execute the following command:

$ dotnet run

This command also builds the project if the project is not yet built. Now, if I execute that command on my directory where the project resides, the output is something like this on my Ubuntu,

Screenshot (904)
Figure 5: Project output in terminal.

As seen, the project works and displays the message of, “Hello World!” on screen in terminal. This is a console project and a simple project with a console output command in C# only. That is why the program works this way.

Creating NuGet packages

Besides this, I would like to share how you can create the NuGet package from this project using the terminal. NuGet packages have been in the scene since a very long time and they were previously very easy to create in Visual Studio environment. Process is even simpler in this framework of programming. You just have to execute the following command:

$ dotnet pack

This command packs the project in a NuGet package. I would like to show you the output that it generates so that you can understand how it is doing everything.

afzaal@afzaal-VirtualBox:~/Projects/Sample$ dotnet pack
Project Sample (.NETCoreApp,Version=v1.0) was previously compiled. 
Skipping compilation.
Producing nuget package "Sample.1.0.0" for Sample
Sample -> /home/afzaal/Projects/Sample/bin/Debug/Sample.1.0.0.nupkg
Producing nuget package "Sample.1.0.0.symbols" for Sample
Sample -> /home/afzaal/Projects/Sample/bin/Debug/Sample.1.0.0.symbols.nupkg

It builds the project first, if the project was built then it skips that process. Once that has been done it create a new package and simply generates the file that can be published on the galleries. NuGet package management command allows you to perform some other functions too, such as updating the version number itself, it also allows you to specify framework etc. For more, have a look at the help output for this command,

afzaal@afzaal-VirtualBox:~/Projects/Sample$ dotnet pack --help
.NET Packager

Usage: dotnet pack [arguments] [options]

Arguments:
 <PROJECT> The project to compile, defaults to the current directory. 
 Can be a path to a project.json or a project directory

Options:
 -h|--help Show help information
 -o|--output <OUTPUT_DIR> Directory in which to place outputs
 --no-build Do not build project before packing
 -b|--build-base-path <OUTPUT_DIR> Directory in which to place temporary build outputs
 -c|--configuration <CONFIGURATION> Configuration under which to build
 --version-suffix <VERSION_SUFFIX> Defines what `*` should be replaced with in version 
  field in project.json

See the final one, where it shows the version suffix. It can be used to update the version based on the build version and so on. There is also a setting, which allows you modify the way building process updates the version count. This is a widely used method for changing the version number based on the build that produced the binary outputs.

The NuGet package file was saved in the default output directory.

Screenshot (905)
Figure 6: NuGet package in the default output directory.

Rest is easy, you can just upload the package from here to the NuGet galleries.

Final words

Finally, I was thinking I should publish a minimal ebook about this guide. The content was getting longer and longer and I was getting tired and tired, however since this gave me an idea about many things I think I can write a comparison of .NET Core on Windows and Linux and I think I have enough time to do that.

Secondly, there are few suggestions for end users that I want to make.

  1. Do not use .NET Core for commercial software. It is going to change sooner,
  2. .NET Core is a bleeding edge technology and well, since there is no documentation, you are going to waste a lot of time in learning and asking questions. That is why, if you are considering to learn .NET framework, then learn the .NET framework and not .NET Core. .NET framework has a great amount of good resources, articles, tips and tutorials.
  3. If you want cross-platform features and great support like .NET framework, my recommendation is Mono Project over .NET Core maybe because it is yet not mature.

I have a few feedback words on the framework itself.

  1. It is going great. Period.
  2. Since this is a cross-platform framework, features must not be available Windows-only such as that “dotnet compile –native” one. They must be made available to every platform.

At last, the framework is a great one to write programs for. I enjoyed programming for .NET Core because it doesn’t require much effort. Plus, the benefit of multiple programming languages is still there, Besides, Visual Studio Code is also a great IDE to be used and the C# extension makes it even better. I will be writing a lot about these features these days since I am free from all of the academics stuff these days. 🙂

See you in the next post.

Highlighting the faces in uploaded image in ASP.NET web applications

Introduction and Background

Previously, I was thinking we can find the faces in the uploaded image, so why not create a small module that automatically finds the faces and renders them when we want to load the images on our web pages. That was a pretty easy task but I would love to share what and how I did it. The entire procedure may look a bit complex, but trust me it is really very simple and straight-forward. However, you may be required to know about a few framework forehand as I won’t be covering most of the in-depth stuff of that scenario — such as computer vision, which is used to perform actions such as face detection.

In this post, you will learn the basics of many things that range from:

  1. Performing computer vision operations — most basic one, finding the faces in the images.
  2. Sending and receiving content from the web server based on the image data uploaded.
  3. Using the canvas HTML element to render the results.

I won’t be guiding you throughout each and everything of the computer vision, or the processes that are required to perform the facial detection in the images, for that i would like to ask you to go and read this post of mine, Facial biometric authentication on your connected devices. In this post, I’ll cover the basics of how to detect the faces in ASP.NET web application, how to pass the characters of the faces in the images, how to use those properties and to render the faces on the image in the canvas.

Making the web app face-aware

There are two steps that we need to perform in order to make our web applications face aware and to determine whether there is a face in the images that are to be uploaded or not. There are many uses, and I will enlist a few of them in the final words section below. The first step is to configure our web application to be able to consume the image and then render the image for processing. Our image processing toolkit would allow us to find the faces, and the locations of our faces. This part would then forward the request to the client-side, where our client itself would render the face locations on the images.

In this sample, I am going to use a canvas element to draw objects, whereas this can be done using multiple div containers to contain span elements and they can be rendered over the actual image to show the face boxes with their positions set to absolute.

First of all, let us program the ASP.NET web application to get the image, process the image, find the faces and generate the response to be collected on the client-side.

Programming file processing part

On the server-side, we would preferably use the Emgu CV library. This library has been of a great usage in the C# wrappers list of OpenCV library. I will be using the same library, to program the face detectors in ASP.NET. The benefits are:

  1. It is a very light-weight library.
  2. The entire processing can take less than a second or two, and the views would be generated in a second later.
  3. It is better than most of other computer vision libraries; as it is based on OpenCV.

First of all, we would need to create a new controller in our web application that would handle the requests for this purpose, we would later add the POST method handler to the controller action to upload and process the image. You can create any controller, I used the name, “FindFacesController” for this controller in my own application. To create a new Controller, follow: Right click Controllers folder → Select Add → Select Controller…, to add a new controller. Add the name to it as you like and then proceed. By default, this controller is given an action, Index and a folder with the same name is created in the Views folder. First of all, open the Views folder to add the HTML content for which we would later write the backend part. In this example project, we need to use an HTML form, where users would be able to upload the files to the servers for processing.

The following HTML snippet would do this,

<form method="post" enctype="multipart/form-data" id="form">
  <input type="file" name="image" id="image" onchange="this.form.submit()" />
</form>

You can see that this HTML form is enough in itself. There is a special event handler attached to this input element, which would cause the form to automatically submit once the user selects the image. That is because we only want to process one image at a time. I could have written a standalone function, but that would have made no sense and this inline function call is a better way to do this.

Now for the ASP.NET part, I will be using the HttpMethod property of the Request to determine if the request was to upload the image or to just load the page.

if(Request.HttpMethod == "POST") {
   // Image upload code here.
}

Now before I actually write the code I want to show and explain what we want to do in this example. The steps to be performed are as below:

  1. We need to save the image that was uploaded in the request.
  2. We would then get the file that was uploaded, and process that image using Emgu CV.
  3. We would get the locations of the faces in the image and then serialize them to JSON string using Json.NET library.
  4. Later part would be taken care of on the client-side using JavaScript code.

Before I actually write the code, let me first show you the helper objects that I had created. I needed two helper objects, one for storing the location of the faces and other to perform the facial detection in the images.

public class Location
{
    public double X { get; set; }
    public double Y { get; set; }
    public double Width { get; set; }
    public double Height { get; set; }
}

// Face detector helper object
public class FaceDetector
{
    public static List<Rectangle> DetectFaces(Mat image)
    {
        List<Rectangle> faces = new List<Rectangle>();
        var facesCascade = HttpContext.Current.Server.MapPath("~/haarcascade_frontalface_default.xml");
        using (CascadeClassifier face = new CascadeClassifier(facesCascade))
        {
            using (UMat ugray = new UMat())
            {
                CvInvoke.CvtColor(image, ugray, Emgu.CV.CvEnum.ColorConversion.Bgr2Gray);

                //normalizes brightness and increases contrast of the image
                CvInvoke.EqualizeHist(ugray, ugray);

                //Detect the faces from the gray scale image and store the locations as rectangle
                //The first dimensional is the channel
                //The second dimension is the index of the rectangle in the specific channel
                Rectangle[] facesDetected = face.DetectMultiScale(
                                                ugray,
                                                1.1,
                                                10,
                                                new Size(20, 20));

                faces.AddRange(facesDetected);
            }
        }
        return faces;
    }
}

These two objects would be used, one for the processing and other for the client-side code to render the boxes on the faces. The action code that I used for this is as below:

public ActionResult Index()
{
    if (Request.HttpMethod == "POST")
    {
         ViewBag.ImageProcessed = true;
         // Try to process the image.
         if (Request.Files.Count > 0)
         {
             // There will be just one file.
             var file = Request.Files[0];

             var fileName = Guid.NewGuid().ToString() + ".jpg";
             file.SaveAs(Server.MapPath("~/Images/" + fileName));

             // Load the saved image, for native processing using Emgu CV.
             var bitmap = new Bitmap(Server.MapPath("~/Images/" + fileName));

             var faces = FaceDetector.DetectFaces(new Image<Bgr, byte>(bitmap).Mat);

             // If faces where found.
             if (faces.Count > 0)
             {
                 ViewBag.FacesDetected = true;
                 ViewBag.FaceCount = faces.Count;

                 var positions = new List<Location>();
                 foreach (var face in faces)
                 {
                     // Add the positions.
                     positions.Add(new Location
                     {
                          X = face.X,
                          Y = face.Y,
                          Width = face.Width,
                          Height = face.Height
                     });
                 }

                 ViewBag.FacePositions = JsonConvert.SerializeObject(positions);
            }

            ViewBag.ImageUrl = fileName;
        }
    }
    return View();
}

The code above does entire processing of the images that we upload to the server. This code is responsible for processing the images, finding and detecting the faces and then returning the results for the views to be rendered in HTML.

Programming client-side canvas elements

You can create a sense of opening a modal popup to show the faces in the images. I used the canvas element on the page itself, because I just wanted to demonstrate the usage of this coding technique. As we have seen, the controller action would generate a few ViewBag properties that we can later use in the HTML content to render the results based on our previous actions.

The View content is as following,

@if (ViewBag.ImageProcessed == true)
{
    // Show the image.
    if (ViewBag.FacesDetected == true)
    {
        // Show the image here.
        <img src="~/Images/@ViewBag.ImageUrl" alt="Image" id="imageElement" style="display: none; height: 0; width: 0;" />

        <p><b>@ViewBag.FaceCount</b> @if (ViewBag.FaceCount == 1) { <text><b>face</b> was</text> } else { <text><b>faces</b> were</text> } detected in the following image.</p>
        <p>A <code>canvas</code> element is being used to render the image and then rectangles are being drawn on the top of that canvas to highlight the faces in the image.</p>

        <canvas id="faceCanvas"></canvas>

        <!-- HTML content has been loaded, run the script now. -->
        
            // Get the canvas.
            var canvas = document.getElementById("faceCanvas");
            var img = document.getElementById("imageElement");
            canvas.height = img.height;
            canvas.width = img.width;

            var myCanvas = canvas.getContext("2d");
            myCanvas.drawImage(img, 0, 0);

            @if(ViewBag.ImageProcessed == true && ViewBag.FacesDetected == true)
            {
            
            img.style.display = "none";
            var facesFound = true;
            var facePositions = JSON.parse(JSON.stringify(@Html.Raw(ViewBag.FacePositions)));
            
            }

            if(facesFound) {
                // Move forward.
                for (face in facePositions) {
                    // Draw the face.
                    myCanvas.lineWidth = 2;
                    myCanvas.strokeStyle = selectColor(face);

                    console.log(selectColor(face));
                    myCanvas.strokeRect(
                                 facePositions[face]["X"],
                                 facePositions[face]["Y"],
                                 facePositions[face]["Width"],
                                 facePositions[face]["Height"]
                             );
               }
           }

           function selectColor(iteration) {
               if (iteration == 0) { iteration = Math.floor(Math.random()); }

               var step = 42.5;
               var randomNumber = Math.floor(Math.random() * 3);

               // Select the colors.
               var red = Math.floor((step * iteration * Math.floor(Math.random() * 3)) % 255);
               var green = Math.floor((step * iteration * Math.floor(Math.random() * 3)) % 255);
               var blue = Math.floor((step * iteration * Math.floor(Math.random() * 3)) % 255);

               // Change the values of rgb, randomly.
               switch (randomNumber) {
                   case 0: red = 0; break;
                   case 1: green = 0; break;
                   case 2: blue = 0; break;
               }

               // Return the string.
               var rgbString = "rgb(" + red + ", " + green + " ," + blue + ")";
               return rgbString;
           }
        
    }
    else
    {
        <p>No faces were found in the following image.</p>

        // Show the image here.
        <img src="~/Images/@ViewBag.ImageUrl" alt="Image" id="imageElement" />
    }
}

This code is the client-side code and would be executed only if there is an upload of image previously. Now let us review what our application is capable of doing at the moment.

Running the application for testing

Since we have developed the application, now it is time that we actually run the application to see if that works as expected. The following are the results generated of multiple images that were passed to the server.

Screenshot (427)

The above image shows the default HTML page that is shown to the users when they visit the page for the first time. Then they will upload the image, and application would process the content of the image that was uploaded. Following images show the results of those images.

Screenshot (428)

I uploaded my image, it found my face and as shown above in bold text, “1 face was detected…”. It also renders the box around the area where the face was detected.

Screenshot (429)

Article would have never been complete, without Eminem being a part of it! 🙂 Love this guy.

Screenshot (426)

Secondly, I wanted to show how this application processed multiple faces. On the top, see that it shows “5 faces were detected…” and it renders 5 boxes around the areas where faces were detected. I also seem to like the photo, as I am a fan of Batman myself.

Screenshot (430)

This image shows what happens if the image does not contain a detected face (by detected, there are many possibilities where a face might not be detected, such as having hairs, wearing glasses etc.) In this image I just used the three logos of companies and the system told me there were no faces in the image. It also rendered the image, but no boxes were made since there were no faces in the image.

Final words

This was it for this post. This method is useful in many facial detection software applications, many areas where you want the users to upload a photo of their faces, not just some photo of a scenery etc. This is an ASP,NET web application project, which means that you can use this code in your own web applications too. The library usage is also very simple and straight-forward as you have already seen in the article above.

There are other uses, such as in the cases where you want to perform analysis of peoples’ faces to detect their emotions, locations and other parameters. You can first of all perform this action to determine if there are faces in the images or not.

Hashing passwords in .NET Core with tips

Previously I had written a few stuff for .NET framework and how to implement basic security concepts on your applications that are working in .NET environment. In this post I want to walk you to implement the same security concepts in your applications that are based on the .NET Core framework. As always there will be 2 topics that I will be covering in this post of mine, I did so before but since that was for .NET itself, I don’t think that works with .NET Core. Besides, .NET Core is different in this matter as compared to .NET framework, one of the major reasons being that there is no “SHA256Managed” (or any other _Managed types in the framework). So the framework is different in this manner. This post would cover the basic concepts and would help you to understand and get started using the methodologies for security.

Security_original
Figure 1: Data security in your applications is the first step for gaining confidence in clients.

First of all, I would be covering the parts of hashing and I will give you a few of my tips and considerations for hashing the passwords using .NET Core in your applications. Before I start writing the article post, I remember when I was working in Mono Project and the platform was very easy to write for. I was using Xamarin Studio as IDE and the Mono was the runtime being used at that time, in my previous guide although the focus was on the Mono programming on Ubuntu whereas in this post I will covering the concepts of same but with .NET Core. .NET Core is really beautiful, although it is not complete, yet it is very powerful. I am using the following tools at the moment so in case that you want to set up your own programming environment to match mine, you can use them.

  1. IDE: Visual Studio Code.
  2. C# extension: For C# support and debugging
  3. Terminal: Ubuntu provides a native terminal that I am using to execute the command to run the project after I have done working with my source code.

Screenshot (967)
Figure 2: Visual Studio being used for C# programming using .NET Core.

You can download and install these packages on your own system. If you are using Windows, I am unaware as to what Visual Studio Code has to offer, because since the start of Visual Studio Code I have just used it on Ubuntu and on Windows systems my preference is always Visual Studio itself. Also, I am going to use the same project that I had created and I am going to start from there, A Quick Startup Using .NET Core On Linux.

So, let’s get started… 🙂

Hashing passwords

Even before starting to write it, I am considering the thunderstorm of comments that would hit me if I make a small and simple mistake in the points here, such as:

  1. Bad practices of hashing.
  2. Not using the salts.
  3. Bad functions to be used.
  4. Etc.

However, I will break the process down since it is just a small program that does the job and there is no very less exaggeration here. Instead of talking about that, I will walk you through many concepts of hashing and how hackers may try to get the passwords where hashing helps you out.

Until now I have written like 3 to 4 articles about hashing, and I can’t find any difference in any of these codes that I have been writing. The common difference is that there are no extra managed code stuff around. .NET Core removed everything redundant in the code samples. So we are left with the simple ones now that we would be using.

What I did was that I just created a simple minimal block of the SHA256 algorithm that would hash the string text that I am going to pass. I used the following code,

// SHA256 is disposable by inheritance.
using (var sha256 = SHA256.Create()) {
    // Send a sample text to hash.
    var hashedBytes = sha256.ComputeHash(Encoding.UTF8.GetBytes("hello world"));
 
    // Get the hashed string.
    var hash = BitConverter.ToString(hashedBytes).Replace("-", "").ToLower();
 
    // Print the string. 
    Console.WriteLine(hash);
}

This code is a bit different from the one being used in .NET framework. In the case of .NET framework the code starts as:

using (var sha256 = new SHA256Managed()) {
     // Crypto code here...
}

That is the only difference here, rest of the stuff is almost alike. The conversion of bytes into string text is upto you. You can either convert the bytes to hexadecimal strings or you can use the BitConverter helper to convert that to the text that is being represented.

The result of this code is,

Screenshot (968)
Figure 3: Result of the above shown code in C# being executed in Ubuntu terminal on .NET Core runtime. 

There is one another constraint here, “Encoding.UTF8“, if you use another encoding for characters then the chances are your hashed string would be different. You can try out other flavors of the character encodings such as:

  1. ASCII
  2. UTF-8
  3. Unicode (.NET framework takes Unicode encoding as UTF-16 LE)
  4. Rest of the encodings of Unicode etc.

The reason is that they provide a different byte ordering and this hashing function works on the bytes of the data that are passed.

Tips and considerations

There are generally two namespaces rising, one of them is the very old familiar .NET’s namespace, System.Security.Cryptography, whereas another one is Microsoft.AspNet.Cryptography which is a part of ASP.NET Core and are to be released. Anyways, here are a few of the tips that you should consider before handing the passwords.

Passwords are fragile — handle with care

I can’t think of any online service, offline privacy application, API hosts where passwords are not handled with care. If there is, I would still act as I never knew of it. Passwords must always be hashed before saving in the database. Hashing is done because hashing algorithms are created with one thing in mind, that they are hard (if not impossible) to convert back to plain-text passwords. This makes it harder for the hackers to get the passwords back in the real form. To explain this fact, I converted the code into a functional one and printed the hash with a little change in the text.

private static string getHash(string text) {
    // SHA512 is disposable by inheritance.
    using (var sha256 = SHA256.Create()) {
        // Send a sample text to hash.
        var hashedBytes = sha256.ComputeHash(Encoding.UTF8.GetBytes(text));
   
        // Get the hashed string.
        return BitConverter.ToString(hashedBytes).Replace("-", "").ToLower();
    }
}

I will execute this function and get the hashed string back for the text that have very less difference in them.

string[] passwords = { "PASSWORD", "P@SSW0RD", "password", "p@ssw0rd" };
 
foreach (var password in passwords) {
    Console.WriteLine($"'{password}': '{getHash(password)}'");
}

Although they seem to look alike but have a look at the avalanche effect that happens due to such small changes. Even have a look at the differences in the capital case and small case.

Screenshot (972)
Figure 4: Password hashes being shown in the terminal. 

This helps in many ways, because it is harder to guess what the possible plain-text alternate would be for this hashed string. Remember the constraints again,

  1. The character encoding is UTF-8; others would provide a different character encoding bytes ordering.
  2. Hash algorithm being used in SHA256, others would produce even different results.

If you don’t hash out the passwords, hackers may try to use most common attacks on your database system to gain privileges of access. A few common type of attacks are:

  1. Brute force attack
  2. Dictionary attack
  3. Rainbow table attack

Rainbow table attack work in a different manner, it tries to convert the hash back to the plain-text based on the database where a password/hash combination is present. Brute force and dictionary attacks use a guessing and commonly used passwords respectively, to gain access. You need to prevent these attacks from happening.

Besides there are cases where your password hashing is useless. Such as when you want to use MD5 hashing algorithms. MD5 algorithms can be easily cracked and the tables for entire password look up are already available and hackers can use those tables to crack your passwords that are hashed using MD5. Even SHA256, SHA512 don’t work as you are going to see in the following section. In such cases you have to add an extra layer of security.

Bonus: how to break it?

Before I continue further, I wanted to share the point of these passwords and their hashes being weaker. There are many hacking tools available, such as reverse look ups. Let us take our first password and see if that can be cracked. I used CrackStation service to crack the password and convert it back to its original text form,

Screenshot (975)
Figure 5: SHA256 based password converted back to its original form. 

See how inefficient even these tricks happen to be. In a later section I will show you how to salt the passwords and what the effect is. Although we had hashed it using SHA256, the reverse lookup table already has that password of ours. Hackers would just try to use that hash and get the real string value in the plain-text to be used for authentication purposes.

Slower algorithms

On networks where hackers are generally going to attack your websites with a script. You should have a hashing algorithm that is (not very) significantly slow. About half a second or 3rd of a second should be enough. The purpose is:

  1. It should add a delay to the attacker if they are trying to run a combination of passwords to gain access.
  2. It should not affect the UX.

There are many algorithms that keep the iterations to a number of 10,000 or so. The namespace that I had talked of, Microsoft.AspNet.Cryptography has the objects that allow you to specify the iteration, salt addition etc.

Remember: For online applications, do not increase the iteration count. You would indirectly cause a bad UX for the users who are waiting for a response.

Add salt to the recipe

I wonder who started the terminology of salt in cryptography. He must have a good taste in computers, I’d say. I did cover most of the parts of adding the salts in the article that I have added in the references section, please refer to that article. However, I would like to share the code that I have used to generate a random salt for the password. Adding the salt would help you randomize the password itself. Suppose, a user had a password of, “helloserver”, another one had the same password too. By default the hash would be alike but if you add a random salt to it, it would randomize the password.

In .NET Core, you can use the “RandomNumberGenerator” to create the salt that can be used for the password.

private static string getSalt() {
    byte[] bytes = new byte[128 / 8];
    using (var keyGenerator = RandomNumberGenerator.Create()) {
        keyGenerator.GetBytes(bytes);
 
        return BitConverter.ToString(bytes).Replace("-", "").ToLower();
    }
}

This would create a few random bytes and then would return them to be used for the passwords.

string[] passwords = { "PASSWORD", "P@SSW0RD", "password", "p@ssw0rd" };
 
foreach (var password in passwords) {
    string salt = getSalt();
    Console.WriteLine($@"{{
       'password': '{password}', 
       'salt': '{salt}',
       'hash': '{getHash(password + salt)}'
       }}"
    );
}

This shows how the passwords with “random salt” differ.

Screenshot (974)
Figure 6: Passwords with their salts being hashed. 

Have a look at the hashes now. The hashes differ from what they were before. Also, notice that the function returns a different salt every time which makes it possible to generate different hashes for even the similar passwords. One of the benefits of this is, that your passwords would be secure from a rainbow table attack.

Test: We saw that unsalted passwords are easy to be reverse looked up. In this, case, we salted the password and we are going to test the last of our password to see if there is a match.

Screenshot (976)
Figure 7: Password not found.

Great, isn’t it? The password was not matched against any case in the password dictionary. This gives us an extra layer of security because hacker won’t be able to convert the password back to their original form by using a reverse look up table.

Using salt: the good way

There is no good way of using the salt, there is no standard to be followed while adding the salt to the password. It is just an extra “random” string to be added to your password strings before their are hashed. There are many common ways, some add salt to the end, some prepend it some do the both.

Do as you please. 🙂 There are however a few tips that you should keep in mind while salting the passwords.

  1. Do not reuse the salts.
  2. Do not try to extract the salts from the passwords or usernames.
  3. Use suitable salt size; 128-bit?
  4. Use random salt.
    • You should consider using a good library for generating the salts.
  5. Store the salts and passwords together. Random salts won’t be created again (in a near future).

References:

  1. Avalanche effect
  2. Hashing Passwords using ASP.NET’s Crypto Class
  3. Guide for building C# apps on Ubuntu: Cryptographic helpers
  4. What are the differences between dictionary attack and brute force attack?

Final words

In this post, I demonstrated the hashing techniques in .NET Core, although the procedure is similar and very much alike. There are a few differences that the objects are not similar. The object instantiation is not similar and in my own opinion, this is also going to change sooner.

I gave you a good overview of password hashing, how to crack them (actually, how an attacker may crack them) and how you can add an extra layer of security. Besides, you should consider adding more security protocols to your own application to secure it from other hacking techniques too.

What Windows Runtime can teach .NET developers?

Introduction and Background

C# programming language has evolved too much in these years and many frameworks and platforms have been created and developed that support C# language as their primary programming language. Indeed, C# was release with .NET framework but has grown out to support Windows Runtime applications, ASP.NET applications, many .NET framework platforms such as WPF, WinForms etc. I have programmed for all of these frameworks, taught beginners in these frameworks and also wrote a lot of articles for these frameworks. However, the framework that appealed my interests the most was Windows Runtime. Windows Runtime is the new kid on the block with an object-oriented design and performance factor much similar to that of C++ applications.

At a higher-level it seems very simple, easy and straight-forward application development framework. At its core, it has great amount of validations and check points and most of the times, it is pain in somewhere censored. I remember the days when I was developing applications for .NET framework. WPF, WinForms, ASP.NET and other similar ones. I did have a few problems learning and starting, but there was one thing: Underlying framework was a very patient one. They never showed hatred for beginners or newbies. But when I started to write applications for Windows Runtime, I found out that it had no patience in it, at all. It was like, do this or it’s not gonna work.

3jLdy
Figure 1: Windows kernel services and how it branches into different frameworks. 

In this post, I am going to collectively talk about a few things that Windows Runtime may teach C# programmers, for a better overview of the applications that they are going to develop.

1. As a framework

Windows Runtime came into existence way after .NET framework itself and the child frameworks of .NET framework. But one thing that I find in Windows Runtime is that it is very much based on asynchronous patterns for programming. Microsoft never wanted to provide a good UI and UX but to leave out the performance factors.

One of the things that I find in Windows Runtime is that it still uses the same philosophy of C# programming language. But, adds the asynchronous pattern, too much. Not too much in a bad way, but in a positive way. The benefit is that you get to perform many things at the same time and let the framework handle stuff. So a few of the things that it teaches are, that you should always consider having tasks when there is a chance of latency.

  1. Network
  2. File I/O
  3. Long running tasks

These are the bottlenecks in the performance. Windows Runtime allows you to overcome these. .NET framework also uses the same mechanism, but developers typically leave out that part and go for the non-async functions. Bad practice!

References

For more on asynchronous programming, please refer to:

  1. Diving deep with WinRT and await
  2. Asynchronous Programming with Async and Await

2. Modularity

C++ programmers have been using modular programming, developing small snippets of codes and then using them here and there. Basically, modularity provides you with an efficient way of reusing the code in many areas of the application. Windows Runtime has a great modularity philosophy.

The foundation has been laid down on categories, and under those categories there are namespaces that contain the objects that communicate and bring an outstanding experience for the developers.

C# is an object-oriented programming, which means that even if you’re forcing yourself to have a single source file. You are still going to have multiple objects, working collectively for each of the purpose of that application.

Yet, it is recommended that you keep things where they belong.

IC269648
Figure 2: Modules can contain the functionality in them, through which user can communicate with the underlying objects and data sources.

References

  1. Windows API reference for Windows Runtime apps
  2. Modularity

3. Simplicity of the development

I don’t want to lie here, Windows Runtime is simple, it takes times to understand its simplicity. 😉

When I started to write applications for Windows Runtime framework, I did not understand the framework or how to develop the application. That is because, I was fond of straight-forward small programs. Windows Runtime is a beast, a humungousaur, with its handles hanging down to the developers through the interfaces of C# language.

Windows Runtime has everything already set up in different areas. Like, the views, source code, capabilities, properties, resources and much more.

Visual Studio brings a way more simpler mean of development. I mean, Visual Studio handled everything,

  1. Managing the source code.
  2. Managing the output directories and how binaries are generated.
  3. Managing the visual items; the image assets may be difficult to add, Visual Studio makes it really very easy to add the assets of different sizes.
  4. The properties and manifest of the application is also written in XML. But Visual Studio makes really very simple to edit and update the manifest of the application.

While building applications for other platforms and frameworks, like WPF, we can use the same philosophy of Windows Runtime to build a great project and package directory. The settings and configuration files can be kep separate to make it simpler to build the development process.

4. Keep all architectures in mind

.NET framework developers don’t have to worry about the architecture that they are going to target. That made them forget the way that application would be targeted on multiple devices and environments. Windows Runtime is not like that. Windows Runtime generates multiple binaries for multiple environments, multiple architectures and devices.

  1. x86
  2. x64
  3. ARM

These are a few of the configurations for which binaries are generated and since the code that gets generated in a native one. The code must match the architecture, otherwise, the results are undefined.

However implementing the multiple architecture pattern would also require more manpower, more time for testing and implementing the patterns. Windows Runtime in Visual Studio has all of that already supported, but thing is, you need your men ready for any new framework to be included and tested on.

5. You may want to test it again!

Before, Windows Runtime, I thought, if everything works correctly. It is going to work anyways. But, ever since I had started to write applications for Windows Runtime and Windows Store I forgot that mind set and wanted to ensure that it passed all of the tests that it must undergo. That all started when I was about to upload my application, “Note It! App” to Windows Store. Application was passing all of the tests in Debug mode. Yet, when it was tested in the Release mode, it failed many of the tests.

Note: I am not talking about the Windows App Certification Tests.

The thing is, the code in the Debug mode has a debugger attached, which knows when something is going wrong and tells the developers about it and we can fix it. In Release mode, it is not the same. The error checks, the memory segmentation and other stuff in Windows Runtime is not same as it is in .NET framework. .NET framework uses Just-in-time compilation and performs many checks. However, in Windows Runtime, that is not the case. Everything is pre-compiled to overcome the JIT latency; delay.

That is exactly why, you should build the application in debug mode. However, always test the applications in Release mode. If you test the application in debug mode, you will skip a few of the key points in your application where it needs to be checked against.

Also, at the end, the App Cert Kit would be found useful to test if other tests, like resources, binaries and signature packaging is all well.

acx0E
Figure 3: App Certification Kit.

References

For more about it, read these:

  1. Release IS NOT Debug: 64bit Optimizations and C# Method Inlining in Release Build Call Stacks
  2. Debugging Release Mode Problems

Points of Interest

No developer wants to publish their buggy and faulty application on the Internet. I try, not to publish the application until it has passed every possible condition of test. However, no software is 100% bug-free and perfect solution.

In this post, I didn’t mean to target Windows Runtime as an ideal case for solution building, instead I wanted to just share a few of the great cards it has up its sleeves. .NET framework is simple, easy and agile to build on. But agility may drive you insane someday sooner.

Always keep these things on mind, and write applications by keeping these things in mind.

Building custom email client in WPF using C#

Download from Dropbox

Introduction and Background

Yesterday, I was talking to myself about writing another post for C# programming; I agree I am addicted to programming now. So, I wanted to write a blog post and I found that I had a topic on my “write list”. Just not that I wrote about that topic, I added a bit more of programming to it to support another feature. So basically what I had on my writing list was an email client in C# programming language. In this blog post, I will share the basics for developing an email client in C# using Windows Presentation Foundation framework. The source code is very much shorter and compact that building your own basic client takes no time at all. However, adding a few more features would take some time. I will point out those features later in the post itself, and you may add them later.

You are required to have the basic understanding of Windows Presentation Foundation framework and how C# language can be used. Typically, C# can be used to create an application of any kind. However, WPF is a framework that can be extended to any limit and can be used to create a graphical application of high-performance and maximum extensibility. WPF power would be used to build this one SMTP + IMAP application to develop a simple email client.

Understanding the protocols

Before I dig deeper and start to write the source code and explain the methods to build the application. I would try to explain the protocols that would be used in this application. The two of them are:

  1. IMAP: Internet message access protocol.
  2. SMTP: Simple mail transfer protocol.

These protocols are typically used to send and receive email messages. Other than IMAP, POP and POP3 are two protocols used to receive the emails, or to keep the emails on your devices. But, I won’t talk about them.

.NET framework provides native support for SMTP protocol for sending emails through your .NET applications like Console, WinForms or WPF etc. However, .NET framework doesn’t provide any implementation for IMAP protocol. Instead, they provide you with TCP clients and listeners. Since, IMAP and SMTP etc. are all protocols running on TCP protocol; or any other transmission layer protocol like UDP, implementing the native protocols like IMAP is very simple and easy in .NET framework.

For more of such packages and namespace to manage the networking capabilities of an application, read System.Net namespaces on MSDN.

Instead, I will use a library to get myself started in no time. Very long time ago, I came up to a library, “ImapX”, which is a wonderful tool for implementing the IMAP protocol in C# applications. You can get ImapX from NuGet galleries by executing the following NuGet package manager command:

Install-Package Imapx

This would add the package. Remember, Imapx works in only selected environments and not all. You should read more about it, on the CodePlex website.

The IMAP protocol is used to fetch the emails, to read, rather than downloading the entire mailbox and storing it on your own device. It is very flexible protocol because the email is still present on the server, and is accessible on every device that you have. Network latency is not a bad factor here, because you don’t have to download the email entirely. You just download the content that you need right now.

3dUC5U4Ly
Figure 1: IMAP protocol usage on the network.

Building the application

Now that I have pointed out a few of the things that will be used in this application, I guess the time is to continue the programming part and develop the application itself. First of all, create a new application of WPF framework. It is always a good approach to write the concerns and different sections of your applications.

Our application would have the following modules:

  1. Authentication module.
    • Initially we will ask the users for authentication.
    • Due to complexity level, I have only supported Google Mail at the moment.
      • That is why, application only asks for username and password combination.
    • You definitely should leave the maximum fields at the user’s will to be filled so that they can connect to their own IMAP service; other than Google Mail.
  2. Folder view
    • Viewing the folders and their messages.
  3. Message view
    • Viewing the messages and its details.
  4. Create a new message.

Separating these concerns would help us build the application in a much agile way so that when we have to update or create a new feature in the application, doing so won’t take any longer. However, if you hard-code everything in the same page. Then things get really very difficult. In this post, I will also give you a few tips to ensure that things are not made difficult than they can be.

Managing the “MainWindow”

Each WPF application would contain a MainWindow window, which is the default window that gets rendered on the screen. But, my recommendation is that you only create a Frame object in that window. Nothing else. That frame object would be used to navigate to multiple pages and different views of the applications depending on the user and application interactions.

<Grid>
   <Frame Name="mainFrame" NavigationUIVisibility="Hidden" />
</Grid>

One thing to note here is that Frame has a (IMO) really annoying navigation UI. You should keep that hidden. Apply the same setting to frames, or use this in the application resources and apply is application-wide.

This is helpful, in changing the views instead of changing the visibilities of the grids and stack panel objects. However, on the runtime exchange, this won’t be available. To be able to use it, you would have to store the frame instance at a location which can be accessed from external objects too. I created the following property in the class, to hold the reference to this frame.

public static Frame MainFrame { get; set; }

Static fields would be accessible from the out objects, without having to require an instance. It would be helpful and you will find it being helpful in the later source samples below. The class itself is like this:

public partial class MainWindow : Window
{
    public static Frame MainFrame { get; set; }
    public static bool LoggedIn { get; set; }

    public MainWindow()
    {
        InitializeComponent();
        MainFrame = mainFrame;

        // Chance are, its not logged in.
        MainFrame.Content = new LoginPage();

        // Initialize the Imap
        ImapService.Initialize();
    }
}

Pretty much simple, developing the building block of the application. This would allow us to have separate UIs for our separate concerns and features. The main things would be done, rendered and handled by the separate pages that we will have for our application.

Before I get started with rendering the later sections of pages, I would need to explain the IMAP base controller that I had developed to provide and serve me with the basic functionality and features of the IMAP protocol.

ImapService object

It is better to keep things allocated at the same place so that when we need to make a chance we can make change right from there, instead of having to search, “Where I wrote that part of API?” That is why, this service object would contain all of the functions that are going to be used in the application.

We need 4 functions and an event handler (for IDLE support; discussed later)

  1. Initialization function; which is a requirement by design.
  2. Login and logout functions.
  3. Function to get all folders
  4. Function to fetch the email messages of a function.

The event is used to notify when a new message comes.

The object is defined as below:

using System;
using System.Collections.Generic;
using System.Linq;
using System.Text;
using System.Threading.Tasks;

using ImapX;
using ImapX.Collections;
using System.Windows;

namespace ImapPackage
{
    class ImapService
    {
         private static ImapClient client { get; set; }
  
         public static void Initialize()
         {
              client = new ImapClient("imap.gmail.com", true); 
 
              if(!client.Connect())
              {
                   throw new Exception("Error connecting to the client.");
              }
         }


         public static bool Login(string u, string p)
         {
              return client.Login(u, p);
         }

         public static void Logout()
         {
              // Remove the login value from the client.
              if(client.IsAuthenticated) { client.Logout(); }
       
              // Clear the logged in value.
              MainWindow.LoggedIn = false;
         } 

         public static List<EmailFolder> GetFolders()
         {
              var folders = new List<EmailFolder>();

              foreach (var folder in client.Folders)
              {
                  folders.Add(new EmailFolder { Title = folder.Name });
              }

              // Before returning start the idling
              client.Folders.Inbox.StartIdling(); // And continue to listen for more.

              client.Folders.Inbox.OnNewMessagesArrived += Inbox_OnNewMessagesArrived;
              return folders;
         }

         private static void Inbox_OnNewMessagesArrived(object sender, IdleEventArgs e)
         {
              // Show a dialog
              MessageBox.Show($"A new message was downloaded in {e.Folder.Name} folder.");
         }

         public static MessageCollection GetMessagesForFolder(string name)
         {
              client.Folders[name].Messages.Download(); // Start the download process;
              return client.Folders[name].Messages;
         }
    }
}

This basic class would be used throughout the application to load the resources and messages. I won’t go in the depth of this library because I will just explain a few points and how to use the basic functions and features. However, the library is very strong and powerful and provides you with every tool and service required to build a full featured email client.

Login page

The first step would be to authenticate the users by asking them for their username and passwords. Typically, your application would cache the user authentication details; in most cases username, and in some cases if user allows, then the password too.

In a real application you are going to have a full authentication page, which would provide the fields such as input for username, port, IMAP hosts and passwords etc. But however in my application I have not used any of such fields because I wanted to keep things really simple. I just asked user to username and password, and used other settings hard coded in the application’s source code.

The XAML of the page looks like this:

<StackPanel Width="500" Height="300">
    <TextBlock Text="Login to continue" FontSize="25" />
    <TextBlock Text="We support Google Mail at the moment, only." />
    <Grid Height="150" Margin="0, 30, 0, 0">
       <Grid.ColumnDefinitions>
           <ColumnDefinition />
           <ColumnDefinition Width="3*" />
       </Grid.ColumnDefinitions>
       <StackPanel Grid.Column="0">
           <TextBlock Text="Username" Margin="0, 5, 0, 15" />
           <TextBlock Text="Password" />
       </StackPanel>
       <StackPanel Grid.Column="1">
           <TextBox Name="username" Margin="0, 0, 0, 5" Padding="4" />
           <PasswordBox Name="password" Padding="4" />
       </StackPanel>
    </Grid>
    <Button Width="150" Name="loginBtn" Click="loginBtn_Click">Login</Button>
    <TextBlock Name="error" Margin="10" Foreground="Red" />
</StackPanel>

This content would be loaded and since in the constructor for the MainWindow we had loaded this page, we will see this page initially.

Screenshot (2082)
Figure 2: Authentication page for the application.

Definitely, you are going to provide extra sections and fields for the users to configure the way your application is going to connect to their IMAP service provider. However, this would also work. Mozilla’s Thunderbird does the same, they just ask for the username and password and find the correct settings and configurations themselves. But, however you want, you can write the application in your own way.

We just need to handle the event of the button,

private void loginBtn_Click(object sender, RoutedEventArgs e)
{
    MainWindow.LoggedIn = ImapService.Login(username.Text, password.Password);

    // Also navigate the user
    if(MainWindow.LoggedIn)
    {
        // Logged in
        MainWindow.MainFrame.Content = new HomePage();
    }
    else
    {
        // Problem
        error.Text = "There was a problem logging you in to Google Mail.";
    }
}

Clearly, this would just make the calls to the service that we created previously. The benefit is that we just need to add the validation and verification code here. We  don’t need to write anything new here because we have done all of that in the previously set up service named, “ImapService”. At the end, if everything went correct, it would navigate the user to the home page.

Note: There is no asynchrony in the application and that is why, it may “freeze” sometimes. To overcome this problem you may want to rewrite the entire service provided to develop it with async/await.

Home page

In this application the major component is the home page, the home page is where the folders and messages would be loaded. There is no difficulty in loading those, because we have already created the function to execute to get the folders and messages in those folders (read the ImapService class once again).

The basic XAML controls that are being used here, are the following ones:

<ListView Name="foldersList" SelectionChanged="foldersList_SelectionChanged">
    <ListView.ItemTemplate>
        <DataTemplate>
            <TextBlock Margin="10" Cursor="Hand" Text="{Binding Title}" Name="folderTitle" />
        </DataTemplate>
    </ListView.ItemTemplate>
</ListView>
<Frame Grid.Column="1" Name="contentFrame" NavigationUIVisibility="Hidden" />
A list view that would render the folders and another frame that would be used to load multiple pages. I used the same method to hold a reference to this frame, in my class object and I loaded it using the contructor itself.
public HomePage()
{
    InitializeComponent();
    ContentFrame = contentFrame;

    foldersList.ItemsSource = ImapService.GetFolders();

    ClearRoom();
}

Just using the same small steps, I created the page. Which would then have its own functionality and would allow the features to handle their interaction with the users.

Screenshot (2052)Figure 3: Folders listed in the application.

We can load the folder messages by selecting a folder. That would show the messages in the right side and we can then read a message. The code for which is provided in the application itself.

private void foldersList_SelectionChanged(object sender, SelectionChangedEventArgs e)
{
    var item = foldersList.SelectedItem as EmailFolder;

    if(item != null)
    {
        // Load the folder for its messages.
        loadFolder(item.Title);
    }
}

private void loadFolder(string name)
{
    ContentFrame.Content = new FolderMessagesPage(name);
}

This way, we load the folder in the content frame that we are having in the application’s home page.

Sending the emails

We have talked a lot about the IMAP protocol and I guess I should also share a few points about the SMTP protocol support in this application. SMTP protocol support is provided natively in .NET framework.

I have written an article for SMTP protocol support in .NET framework, which you may be interested in,  Sending emails over .NET framework, and general problems – using C# code. That article discusses a lot about doing so, and guess what, I used the same code from that article and wrote the entire feature for sending the emails on it.

I created the “send email” form as follows:

<Grid>
    <Grid.ColumnDefinitions>
        <ColumnDefinition />
        <ColumnDefinition Width="3*" />
    </Grid.ColumnDefinitions>
    <StackPanel Grid.Column="0">
        <TextBlock Text="To" Margin="0, 5" />
        <TextBlock Text="Subject" Margin="0, 5" />
        <TextBlock Text="Body" Margin="0, 5" />
    </StackPanel>
    <StackPanel Grid.Column="1">
        <TextBox Margin="0, 3" Padding="1" Name="to" />
        <TextBox Margin="0, 3" Padding="1" Name="subject" />
        <TextBox Margin="0, 3" Padding="1" Height="130" Name="body" 
                 AcceptsReturn="True"
                 ScrollViewer.CanContentScroll="True" 
                 ScrollViewer.VerticalScrollBarVisibility="Auto" />
        <Button Width="50" Name="sendBtn" Click="sendBtn_Click">Send</Button>
        <Button Width="50" Name="cancelBtn" 
               Click="cancelBtn_Click" Margin="130, -20, 0, 0">Cancel</Button>
    </StackPanel>
</Grid>

Although, I understand that is not the best of what I could have made, but, for the sake of this post, that would (should!) suffice. This would allow the user to enter the details for a very basic email.

Screenshot (2056)
Figure 4: SMTP protocol test, email form. 

Upon clicking the send button, the email would be sent. The code to do so is really straight-forward and (as mentioned ago) available on that article I wrote about sending the emails in C#.

Bonus: IDLE support for folders

Before I wind things up, I wanted to enlighten the topic of IDLE support. In IMAP, IDLE support means that your application don’t need to send the request to the server in order to fetch new messages. Instead, the server would itself send the data to the client, whenever a new email is received.

What I did was, that I wrote that code to support IDLE feature in the ImapService because that was a service of IMAP and not the application itself. I updated the folder fetching code and added the following statements, (or since I haven’t shared the code at all, the code is like the following),

public static List<EmailFolder> GetFolders()
{
     var folders = new List<EmailFolder>();
 
     foreach (var folder in client.Folders)
     {
          folders.Add(new EmailFolder { Title = folder.Name });
     }

     // Before returning start the idling
     client.Folders.Inbox.StartIdling(); // And continue to listen for more.

     client.Folders.Inbox.OnNewMessagesArrived += Inbox_OnNewMessagesArrived;

     return folders;
}

private static void Inbox_OnNewMessagesArrived(object sender, IdleEventArgs e)
{
     // Show a dialog
     MessageBox.Show($"A new message was downloaded in {e.Folder.Name} folder.");
}

The handler and the event would then work as a counter-part and would provide us with a very beautiful service in which our application would be able to fetch the messages when a message is received!

We can use a folder, to start IDLE for. In my case, I used Inbox folder. Inbox folder would let us know for any new email message that we may receive and we can then use the properties of the event arguments to find out which folder received which message.

Points of Interest

In .NET framework, SMTP protocol is supported natively, implementing the IMAP protocol is a bit of a task. For that, developers may use ImapX, which is a free and open source package and library for C# applications that may want to support email messages.

In this blog, I have explained the methods used to build the applications that can receive and send email messages on the internet to the clients. IMAP protocol is much preferred and loved protocol because it doesn’t need you to download the emails, you can just download the stuff that you need.

If I write something extra, I will update the post or create a new one. Do leave me a message if you find something missing.

Building a custom documentation tool

Introduction and Background

A team of software developers would all be willing to write a great amount of documentation because after all it is the document that provides their users a resource from where they can get some help. But if your team believes in Agile development methodologies, then you are better off left with programming and “no-documentation” face! That is not at all a problem to most of the programmers, but that is also not a good practice after all. Most of the libraries and tools out there require a good documentation of their APIs. This can be understood by the fact that many programmers are building applications for Microsoft platforms and not for other platforms. I consider myself one of them. The fact is easy, to get any kind of help in Microsoft platforms, I just need to go to MSDN (Microsoft Developer Network) and I can get any document, help with any framework, with any object, with any task and much more. Microsoft has really invested a lot of their times in building a great amount of resources on internet. Their investment pays off in a way that others cannot expect to get paid. The result is, they get a lot of attention from developers, and novice programmers also feel great while programming. Compare this to that of a Linux, compare this to that of any Java library and so on. I don’t want to be biased, but Java APIs, even of Oracle, are very badly written. There is a list of functions, but no remarks, no explanation, no nothing. Which makes it much more complex for beginners to learn and get a grasp of.

Currently I am seeking my Master’s degree in Computer Science and I am going to have a project to build later this year. While that has some months to come, I am thinking of something to build that would help me in many ways. One of them is to build a custom program that helps me to document the API so that I can submit that to the professors when they ask me for my project.

This blog post is about the “things” I have thought about, while building the tool. I haven’t built the tool yet, but I am hoping to have it built soon. But, I can show you the blueprint and the scratch code for that.

Why document the code?

If you are an indie developer, and you don’t like to share the code with anyone, don’t worry about this. Chances are, that 2 or 4 years later, you may “still” have the idea, why you wrote down that code. But if you also have to share the same code with your partner, team or external world. Then, you should either comment the code well. But… In the cases, where you don’t want to share the internal code, then you should provide a well written API for that code.

That would save you from many messages, emails and feedbacks, like, “How to do that?”. That question annoys many people because, developer of that API is already aware of the “simplicity” of the API, but others don’t know it. They are not aware of the objects introduced and so on. In such cases, you should always consider documenting the code well, so that others, when face a trouble, can simply read that documentation and say, “Oh, that’s how I do that!”

In many cases, it also helps you when after 2 years, you lose the focus that you had back in those days when you started the project. Happens to me too. 🙂

keep-calm-and-document-your-code
Figure 1: Keep calm programmers! 

How to build a custom documentation tool?

I am sorry to disappoint you guys, but I am going to talk about C# only. There was a lot of time when I was learning other frameworks, writing applications for Linux, compiling articles and books for other operating systems. This is, when I feel I need to get back to where I belong. I belong to C#. I am going to use C# to show you how you can build the application that documents the code that you have written. Now that is somewhat a complex idea and process. But, for the sake of this post, I am going to keep things really very short here and I will demonstrate the use of the very basic concepts to build such a great and vital tool for you team so that they can focus more on the programming part, and leave the documentation part to this tool itself.

I am going to use the following three basic features:

  1. C# language itself.
    • You can use any framework, Console, WPF, WinForms etc.
  2. HTML document for previewing the results.
    • You may use ASP.NET applications or web sites for previewing. I used static HTML pages.
  3. Some reflection.

In the above parts, I think most of you would get yourselves confused when it comes to “Reflection” in C#. Well, it is not that tough part to understand. Reflection in C# (or .NET itself) is a very simple and easy concept to understand. Using reflection, we can simply, get to know the assemblies, objects, classes and their members, on the run-time. In the IDE, we know what is the class name, what are functions defined. But how to know on run-time, is a part of reflection.

Introduction to Reflection

Before, I finally end up the post I want to give you an overview of the reflection in C#. If you have ever programmed in C#, you are aware of, typeof() operator or GetType() function. Both of them are the first steps toward the reflection. Basically, reflection is performed on types of the objects. Types expose the assembly information, members information, properties, functions (methods) and events information… Much more! So, we use the signature to determine many values, like the names, assembly, namespace, versioning etc.

I am going to use the same tool, and I am going to extract the properties from these types and I am going to build an HTML documentation for the classes. This is same mechanism which is used on MSDN or any other “good” documentation. You should never write the documentation yourself, one object after the other. Create an interface which does the underlying task and then do the modifications and reviews.

I would end this section with this one code sample:

class Student {
   public int ID { get; set; }
   public string Name { get; set; }
}

// In the main function
public static void Main(string[] args) {
    var type = typeof(Student);

    // Above line is similar to, 
    var type = new Student().GetType();

    // But prefer the previous one. 

    // We can use the variable to extract the name of the type.
    Console.WriteLine(type.Name);
}

// Output: Student

We get many other similar functions that we may use to actually get the information on the class that we are using.

You should try them out, for further reading please refer MSDN, System.Reflection Namespace.

Building the HTML document

As I have already mentioned that you can use ASP.NET web site, web application too, to represent the documentation for online users. But I used static HTML pages, which are much simpler to build and don’t have to manage the rest of the underlying stuff for the application.

What I did was that I used a C# program to render the HTML content for me. Based on the type that I pass. I created a new class, “DocumentHelper”, and created a function which takes an object and renders the HTML document for its name. Here is what I made:

<!doctype html>
<html>
<head>
   <title></title>
   <style>
      html {
         margin: 0 auto;
         font-family: 'Segoe UI';
         font-size: 13px;
      }
 
      body {
         /* Nothing special here. */
      }

      table {
         min-width: 500px;
         border: 1px dashed #cecece;
         padding: 5px 10px;
         text-align: center;
      }

      table tr:first-child {
         width: 150px;
         font-size: 15px;
         font-weight: 600px;
      }
   </style>
</head>
<body>
   <h4></h4>
   <p></p>
   <table id="properties">
 
   </table>
   <table id="methods">
 
   </table>
</body>
</html>

This is the very basic HTML document, that will be used to render the details for the item. We can then use the C# program to loop over the properties and render them in our HTML document.

If you would consider using C# 6, you would be provided with useful features such as, string interpolation etc.

// Create the instance
StringBuilder builder = new StringBuilder();

// Append html head
builder.AppendLine("<!doctype html><html><head>");

// Append title and the style here
// Append the lines, based on an iterative loop

// Append the final lines
builder.AppendLine("</body></html>");

// Get the document
var htmlDoc = builder.ToString();

You can then store the file, and at the same time, execute the call to show the file too.

System.Diagnostics.Process.Start(linkToFile);

It would open the default application to render the HTML file (if you saved the file with .html or .html extension). In my case, it was Google Chrome. I did not write the table content or anything, but just the simple title and the full name of the object. Whose web page screenshot is:

Screenshot (943)
Figure 2: Rendering the dynamic HTML content.

This way, we can use other classes and their types to render the documentation web pages too.

Points of Interest

In this post, I have talked about the simplest method required to build a tool that automatically documents the code in your project. You can share the HTML documents with your clients who can easily read those documentations based on the content that you have provided based on the UI you use in the HTML document.

Of course this is not complete, this was just the idea that I was having and I am hoping to complete this project as soon as possible and if I do develop, I will share the source code publicly on GitHub.

There are many more things to do:

  1. Learn Reflection
  2. Find a good way to store the HTML documents.
    • In database
    • In static files
    • Other data source
  3. Build a crawler for your API

Crawler would simply crawl from one object to another using the relations and would continue to build the documentation. 🙂