You can download the sample at Dropbox.
ASP.NET presented developers with a new framework for website development, in which they would easily distinguish between data layer, business layer and the methodology they would use to render these objects on the screen. They called this framework ASP.NET MVC, in which MVC stands for Model, View, Controller.I will elaborate these items in this blog post as well as other objects and technologies I am going to use too. First lets talk about what is MVC pattern itself, and what ASP.NET MVC offers us as compared to other ASP.NET frameworks; which include and are well-known, Web Pages and Web Forms, and all other web-scripting frameworks.
ASP.NET MVC
First thing is to understand the ASP.NET MVC framework itself, once we’ve gotten enough understanding of the ASP.NET MVC framework, then it would be a lot easy for us to understand why ASP.NET team provided us with this framework. In web development, there are different schemes used to create web sites and web applications, which at a minor age don’t seem to cause a problem. Solving a bug might take hours of headscratching and some other help too. It is harder to find the problem that is scripted inside the HTML web page. In these scenarios, it is always found helpfull to seperate your code from your data and from your HTML markup. This would make it a lot easier to find and solve the problem. Because, now all of the code has been seperated and finding the problem at exact location won’t be a harder task. These three fields are divided and make up the MVC; Model, View and Controller pattern for web development.
Actually this is not a pattern, specific to the web development. If you go to Wikipedia’s web page for this, you will find that it is actually a framework used for software development, meaning that it can be applied anywhere, where you want to distinguish between your application’s data link layer, business logic layer and the rendering code.
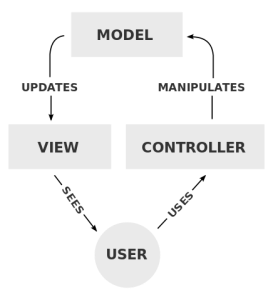
The link between these three objects of MVC pattern have been depicted in this image above.
Controller
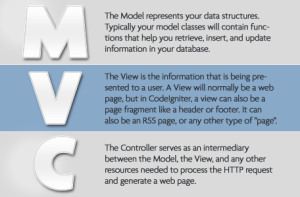
The Controller in the MVC comes at the last, but is the most used part of the MVC pattern. It is used to work with the HTTP requests, coming from the clients; from the browsers or from any other application that can generate an HttpRequest (not to be confused with the .NET’s HttpRequest object; but a simple HTTP Request). Each request, when comes, is handled by the Controller and then Controller, according to the request makes decisions to load the data, create the response and then sends the data back to the client.
It should also be noted here, that your Controller acts as a bridge between your Model and the View. Because they, as themself, cannot perform any action. Controller triggers their events and makes them do something, like return data from Model, or to render the HTML document from the View etc. All of the resources and errors are also handled by the Controller. Making it the heart of the pattern, because the response is also sent back from a controller. You can think of an example of a Controller to be the entire Business-logic-layer. The code that is used to run the application’s back-end processing, like creating accounts, managing solutions etc, would make up the Controller section of this pattern.
View
Next comes the part of the View, this is the actual web page that is being displayed to the user. It contains the HTML codes that are to be sent back to the data as a response to his request. Correct, Controller sends this response back to the client, View – its self – doesn’t send this response to client whereas Controllers takes this data, and sends back to the client.
View, can also be created dynamically. As already said, all of the requests are handled by Controller, so any parameter (including QueryStrings) can also be handled by Controllers. Using these parameters, we can generate dynamic Views. So dynamic content in our view, change their layouts or show some other error messages if the data sent is not of our own choice. View, generally depends on the Model that is being used to create the View and these dynamic data objects are capture from the Model (Model is discussed in the next section).
Point to be noted here is that while section-in-action is View, still Controller is playing a vital role for passing the values and for retrieving the data to be sent to client.
Model
As the name suggests, it is a model of some object. The object in this case is our application’s data. It can be of any type, like extracted from a database; no matter which one, SQL Server, MySQL or MS Access etc, or it can be a simple data that comes from a Reporting, or from a Spreadsheet etc. Model is never shown to the user (actually, the client) because he is supposed to see the data and the results we want him to see, that is why, it is a good approach to keep a great abstraction layer between Model and the user (the client).
Model doesn’t only store the data, it – at the same time – keeps the View and the Controller updated or any change being made to it. Models are designed, just like Controllers and Views are designed, just so that there is no ambiguity between three of them and it is easy for them to communicate to make the web application fluent. Everytime a change is made, View is update by the Controller, because Controller is informed about the change (this informing event is also raised by Controller; as I already said, Controller handles the events). To store anything in the Model, the user has not been provided with any form that is directly connected to the Model, instead a form is generated in the View by the Controller for the user to fill in. Once the form is filled, the form values are then passed to the model for storing purposes. All kinds of data validations (most special type of which are SQL Injections) can be checked at the Controller level rather than loosing (important) data.

The user must be allowed to interact with Model himself, instead a Controller must be used to connect to the Model to get the data for the user’s View that would be shown to him.
Until now, we’ve been discussing the ASP.NET MVC itself, in the next section we will be discussing a real-world example of an ASP.NET MVC Application, and I will show how to create custom Controllers, Views and Models. In an ASP.NET MVC project a user triggers the Controller, the controller then reads and manipulates the requests, Requests the Model for data, gets the data and then Updates the View to be sent back to the client.
Overview of MVC pattern.
Real world example of ASP.NET MVC Application
In this blog post, I am going to explain creating an MVC application to control your client’s data. For that, I am going to use the Model, View and Controller architecture, so that I can easily distinguish between the data of my application (which would be the data for the clients), code for the requests and responses (which would constitute the controller) and how the data is shown to the users (views of my application). I am going to create everything from scratch, to make every thing understandable for you. For that I am going to start from creating every single object in my application, every controller, every view and model in my project.
One thing you should think about here is that I am going to use JSON files as data source, because database field has already been covered by the ASP.NET team at its best. I don’t think there is any need to re-write the same thing, that is why I am going to explain how to use anything as your model. If you want to read that one, and want to stick to SQL Server database you can go to ASP.NET MVC’s tutorial website to learn that. You’re right, Entity framework won’t be supported here! That is why I am saying I am going to create everything from scratch, to explain every bit of the MVC pattern for you and how you can create actions that respond to your actual processes, not just to the built-in ones.
Real-life example
Let’s have an example of a simple office, where a person gets different clients, whose name, address is stored. Just to distinguish them all, an ID is also stored. Whether the client is trusted or not, is also stored along with him. Office manager wants to be able to, create new clients, modify the existing ones, and once he is done with them he wants to be able to delete the previous ones. To implement this basic example in ASP.NET MVC, we will start off by creating a simple ASP.NET MVC application. To do so, you can either press CTRL+SHIFT+N, or you can click on File, then New and a Project. Like this,
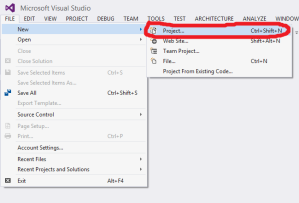
Creating a new project – in Visual Studio 2013
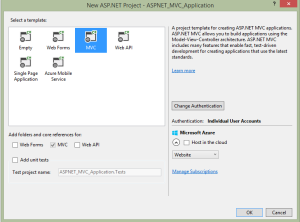
After this, please select the Web and inside select ASP.NET Web Application, then name it as you want. I named it, ASPNET_MVC_Application. You can use any name that you want.

Selecting an ASP.NET web application.
Then you will be required to make the selections for your application in the next tab. You shouldn’t make any change for now, keep the selected options selected and click Next on this tab.
This would then create your application, with the default content for your application settings. You might see this web page inside your Visual Studio.

ASP.NET MVC read me page viewed inside the Visual Studiom 2013 – application’s first run.
This is the tutorial until creation of the application. This web page is also a sign of success, if you still want to make sure that everything runs, just press the green button (with a Browser’s name on it; mine had Google Chrome) to see your application runs in the browser. In the next section, I will be creating the application’s objects (MVC) and then showing you how they can interact and in the end I will give some tips for making your application better.
Customizing the ASP.NET MVC Application
Once all of the things are set, and your application runs. You can continue to make changes to it, so that it would reflect your own application and not the default ASP.NET MVC application that is a sample. First thing to do is to create a controller which we’re going to be using inside our application to control all of the requests and is going to send back the response (view). How to create views and what would be the model will be covered in coming sections. For now, just make up your mind to understand the Controller in MVC.
Required package: Since we’re going to use JSON data, Newtonsoft.Json package is a very usefull package to use, so before you go any further open your NuGet package manager console (inside the Tools) and run the following command to download and include it in your project. It is required.
Install-Package Newtonsoft.Json
Creating a custom Controller
A custom controller is something that you can use to create your custom controllers for your application, that would handle the requests coming for them and they will provide the user with a view filled in with the data from the model. You can name them as you would like to name them, there is no convention; but just one convention which is to append “Controller” to the name of the class. Controller is a class in real which inherits from System.Web.Mvc.Controller class, making it able to inherit all of the functions and members of the Controller (parent) class. Let us create a Controller. Inside your Source code, there is a folder named as Controllers. If you open it, there would be 3 controllers by default, you can create your own.

Default controllers in ASP.NET MVC application
Right click on Controller folder and inside the Add option, click Controller to create a new one.

Creating a new Controller
Give a custom name to your controller; remember to have that Controller at the end of your class’ name. You must create an empty controller, because for the sake of this post we’re not going to use anything built-in but just scratch classes.


We just need an Empty controller, to create our own functions (actions in MVC) for it to handle and perform.
At this stage, your basic Controller has been created and you’re now ready to customize it. Before we move on to create actions that this Controller would perform. I wanted to remind you about (automatic) changes that were made in your Views folder. What Views folder is about, is – yes, well – self-explainatory but we’ll be talking about it too in the coming section. Right now, there is a new Client (or what ever Controller you create’s named) folder inside your View folder. Now it does start to make some sense, doesn’t it? Every controller has its own particular view to display data for, and each time the request would initiate from client (not our class, but the user of course) the Controller would be used (you can think like an instance of that class would be created) and then the Action of Controller would be checked against (inside the URL; which would then trigger the function of the Controller, which we’re going to create next). Like every class, we can create different functions for our Controllers, which are known as Actions. Let us think what we’re supposed to let our manager do with the client, he wants to
- Create a new client – Create
- Modify current client’s data – Update or Edit
- Delete clients when he has finished the work – Delete
We can use above logic to create our functions for the Client Controller. Open your ClientController.cs file and edit it, to write this code in it.
using System;
using System.Collections.Generic;
using System.Linq;
using System.Web;
using System.IO;
using System.Web.Mvc;

using ASP.NET_MVC_Application.Models;
using Newtonsoft.Json;

namespace ASP.NET_MVC_Application.Controllers
{
   public class ClientController : Controller
   {
      // GET: Client
      public ActionResult Index()
      {
         // Load the data for the client
         var clients = Client.GetClients();

         // Return the view.
         return View(clients);
      }

      public ActionResult Create()
      {
         ViewBag.Submitted = false;
         var created = false;
         // Create the Client
         if (HttpContext.Request.RequestType == "POST")
         {
            ViewBag.Submitted = true;
            // If the request is POST, get the values from the form
            var id = Request.Form["id"];
            var name = Request.Form["name"];
            var address = Request.Form["address"];
            var trusted = false;

            if(Request.Form["trusted"] == "on") {
               trusted = true;
            }

            // Create a new Client for these details.
            Client client = new Client()
            {
               ID = Convert.ToInt16(id),
               Name = name,
               Address = address,
               Trusted = Convert.ToBoolean(trusted)
            };

            // Save the client in the ClientList
            var ClientFile = Client.ClientFile;
            var ClientData = System.IO.File.ReadAllText(ClientFile);
            List<Client> ClientList = new List<Client>();
            ClientList = JsonConvert.DeserializeObject<List<Client>>(ClientData);

            if (ClientList == null)
            {
               ClientList = new List<Client>();
            }
            ClientList.Add(client);

            // Now save the list on the disk
            System.IO.File.WriteAllText(ClientFile, JsonConvert.SerializeObject(ClientList));

            // Denote that the client was created
            created = true;
         }

         if (created)
         {
            ViewBag.Message = "Client was created successfully.";
         }
         else
         {
            ViewBag.Message = "There was an error while creating the client.";
         }
       return View();
     }

     public ActionResult Update(int id)
     {
        if (HttpContext.Request.RequestType == "POST")
        {
           // Request is Post type; must be a submit
           var name = Request.Form["name"];
           var address = Request.Form["address"];
           var trusted = Request.Form["trusted"];

           // Get all of the clients
           var clints = Client.GetClients();

           foreach (Client client in clints)
           {
              // Find the client
              if (client.ID == id)
              {
                 // Client found, now update his properties and save it.
                 client.Name = name;
                 client.Address = address;
                 client.Trusted = Convert.ToBoolean(trusted);
                 // Break through the loop
                 break;
              }
           }

           // Update the clients in the disk
           System.IO.File.WriteAllText(Client.ClientFile, JsonConvert.SerializeObject(clints));

           // Add the details to the View
           Response.Redirect("~/Client/Index?Message=Client_Updated");
       }


       // Create a model object.
       var clnt = new Client();
       // Get the list of clients
       var clients = Client.GetClients();
       // Search within the clients
       foreach (Client client in clients)
       {
          // If the client's ID matches
          if (client.ID == id)
          {
              clnt = client;
          }
          // No need to further run the loop
          break;
       }
       if (clnt == null)
       {
           // No client was found
           ViewBag.Message = "No client was found.";
       }
     return View(clnt);
   }

   public ActionResult Delete(int id)
   {
      // Get the clients
      var Clients = Client.GetClients();
      var deleted = false;
      // Delete the specific one.
      foreach (Client client in Clients)
      {
        // Found the client
        if (client.ID == id)
        {
          // delete this client
          var index = Clients.IndexOf(client);
          Clients.RemoveAt(index);

          // Removed now save the data back.
          System.IO.File.WriteAllText(Client.ClientFile, JsonConvert.SerializeObject(Clients));
          deleted = true;
          break;
       }
    }

     // Add the process details to the ViewBag
     if (deleted)
     {
        ViewBag.Message = "Client was deleted successfully.";
     }
     else
     {
        ViewBag.Message = "There was an error while deleting the client.";
     }
     return View();
    }
  }
}
Done! That was our controller, if you have a look at the code above you will find a few functions, a few ViewBags and a few Views etc. I will explain them in the end, because they’re built-in functions of ASP.NET MVC for the application and which we are bound to use them for application to run. Each time you’re going to create a request to your application to load data about clients, this controller would take action, and will provide with the data that user (in case here, you) want from the application. In the above code Create, Update, Delete and Index are the functions of the class, in MVC application they will act as Actions of the application’s Controller. You will use them to tell the application what to do, when user triggers such a particular action in your application. They’re just average functions in a simple class; which inherits from System.Web.Mvc.Controller.
Creating a custom View
Now that back-end code (Controller code) has been done, and you can now create the Views for your application. Views are used to show the content (data) of your application to the client (user) in HTML markup. Because browser can only render HTML content, we will be using that markup, and Views are used for that. Each controller has its own particular view. One thing to note here, is that to return a View, the name of the View must match the Action’s name. You can put it, like each of the Action (function) in the Controller is meant for a particular View (HTML document to be returned) in the application. We, need four Views, for our four Actions; Index, Create, Update, Delete. To create a View you can click on the Views folder, and create a new folder; but remember, here you don’t need to create any new folder, because as I already said when you created the Controller a new folder was already created with the name of the Controller “Client”. Right-click that folder, and inside the Add click on the MVC 5 View with Layout and click Next to go to the next step.

Creating a new View (with Layout)
Now name the View, I named it Index because we need a view for Index page.

Now select the layout, layout is applied across the pages (Views) to design them a like. You can use your own views too, but for this I am going to use the default layout. 
This is the step-by-step method to create the View in ASP.NET MVC using Visual Studio. ASP.NET uses Razor syntax to create HTML pages, which shortens the codes for the developers. Update the code inside this page and write this following code,
@model IEnumerable<ASPNET_MVC_Application.Models.Client>

@{
   ViewBag.Title = "All Clients";
   Layout = "~/Views/Shared/_Layout.cshtml";
}

<h3>Following table shows the Clients detail</h3>
<p>You will find their details, as well as other links to other actions that can be performed and operated over the client objects. </p>

<p>You can also create a new client <a href="~/Client/Create">here</a>. </p>

<table class="clients-table">
   <tr>
   <th>ID</th>
   <th>Name</th>
   <th>Address</th>
   <th>Trusted</th>
   <th>Actions</th>
</tr>

 @if(Model != null && Model.Count() > 0)
 {
   foreach (var client in Model)
   {
     // Create the list of these clients
     <tr>
       <td>@client.ID</td>
       <td>@client.Name</td>
       <td>@client.Address</td>
       <td>@client.Trusted</td>
       <td>
         <a href="~/Client/Update/@client.ID">Update</a>
         <a href="~/Client/Delete/@client.ID">Delete</a>
       </td>
     </tr>
   }
 }
</table>
In the above page’s source code, you will find one new thing. @model IEnumerable<ASPNET_MVC_Application.Models.Client> that is the type of the data that has to be used inside this View; Yes, it is the model being used here. After that it is just simple razor syntax, to create the HTML document (View) and to return to the client (user). The Model object (the one used in the foreach loop) is having the value of what ever is passed for the @model thing.
You should create next three Views yourself (as a test) and write this content to them.
For Create View:
@{
   ViewBag.Title = "Create";
   Layout = "~/Views/Shared/_Layout.cshtml";
}

<div>
   <h3>Fill in the following form</h3>
</div>
<form method="post" style="margin: 5% 0 0">
   <div class="float-left">
     <p>Client ID</p>
     <p>Name</p>
     <p>Address</p>
     <p>Trusted</p>
   </div>
   <div class="float-right">
     <input type="text" style="margin: 1px 0 2px" name="id" /><br />
     <input type="text" style="margin: 1px 0 2px" name="name" /><br />
     <input type="text" style="margin: 1px 0 2px" name="address" /><br />
     <input type="checkbox" style="margin: 1px 0 2px" name="trusted" /><br />
     <input type="submit" value="Save" />
   </div>
</form>

<p>
   @if (ViewBag.Submitted)
   {
     // If the form was submitted
     @ViewBag.Message
   }
</p>
For Update View:
@model ASP.NET_MVC_Application.Models.Client

@{
   ViewBag.Title = "Update the Client";
   Layout = "~/Views/Shared/_Layout.cshtml";
}


<div>
  <h3>Update the following form</h3>
</div>
<form method="post" style="margin: 5% 0 0">
  <div class="float-left">
     <p>Name</p>
     <p>Address</p>
     <p>Trusted</p>
  </div>
  <div class="float-right">
     <input type="text" style="margin: 1px 0 2px" name="name" value="@Model.Name" /><br />
     <input type="text" style="margin: 1px 0 2px" name="address" value="@Model.Address" /><br />
     <input type="checkbox" style="margin: 1px 0 2px" name="trusted"
          @if (Model.Trusted) { <text>checked="checked"</text> }
     />
 <br />
     <input type="submit" value="Save" />
  </div>
</form>

<p>
   @if (ViewBag.Submitted != null && ViewBag.Submitted)
   {
      // If the form was submitted
     @ViewBag.Message
   }
</p>
For Delete View:
@{
   Layout = "~/Views/Shared/_Layout.cshtml";
}

<p>@ViewBag.Message</p>
You will find, that in Create view I am not passing any model. That is because, for a View, to have a model is not obligatory. Model is just to allow dynamic content to it, if you don’t want to use any model, fair enough, you don’t have to use a model in every view to create it an MVC application. These are just simple HTML pages, that are being made update-to-the-content by the razor syntax and then sent back to the browser in an HTML markup, for rendering purposes. _ViewStart.cshtml page is used as the first page to check for any layouts. If you don’t want to set any layout for all of the pages themself and want a unique look across the web app, you can set that in this page and it will be applied to all of the pages.
Creating the custom Model
As far as Model is concerned, ASP.NET MVC allows you to use any kind of data (coming from a data source; server or what so ever) to be used as a Model. You can pass the data from the model to the view from the Controller, which will be then rendered as a simple HTML markup and will be displayed inside the browser to the user.
I have already mentioned, and in-case you missed it above, if you want to use SQL Server database as your Model for application, then ASP.NET team has provided a very good tutorial for that and you might want to join them on their journey here. They used Entity Framework for their Actions. In our project, we will be using JSON files and custom created Actions to perform CRUD operations. This would (try to) remove ambiguity in our minds about this MVC pattern and its extensiveness for other technologies and frameworks.
A Model, like a Controller, is just a class file, that we can instanitiate and get different objects from, when working with a request from a client. A model is a representation of the real-world objects in our own context; which here is the ASP.NET MVC Application. Think of it like there is a Client model. He would have a ClientID, Name, Address and a Trusted as a flag (you should recall our scenario if you have no idea of where these came from). What would you write as a class for this Client? Look at the following class code and have understanding of the Model we’re going to have.
using System;
using System.IO;
using System.Collections.Generic;
using System.Linq;
using System.Web;

using Newtonsoft.Json;

namespace ASP.NET_MVC_Application.Models
{
   public class Client
   {
     public static string ClientFile = HttpContext.Current.Server.MapPath("~/App_Data/Clients.json");

     public int ID { get; set; }
     public string Name { get; set; }
     public string Address { get; set; }
     public bool Trusted { get; set; }

     public static List<Client> GetClients()
     {
        List<Client> clients = new List<Client>();
        if (File.Exists(ClientFile))
        {
           // File exists..
           string content = File.ReadAllText(ClientFile);
           // Deserialize the objects
           clients = JsonConvert.DeserializeObject<List<Client>>(content);

           // Returns the clients, either empty list or containing the Client(s).
           return clients;
        }
        else
        {
           // Create the file
           File.Create(ClientFile).Close();
           // Write data to it; [] means an array,
           // List<Client> would throw error if [] is not wrapping text
           File.WriteAllText(ClientFile, "[]");

           // Re run the function
           GetClients();
        }

        return clients;
      }
   }
}
A simple C# class file, that would serve our application as a Model. You will find one other major change, which is the namespace this class is location in. The name is having an extra .Models attached to our project’s name. That makes up our different fields. ASP.NET and Visual Studio do these things for us, although they’re not required but just conventions to be followed. Let us create a Model for our application, click on the Models folder in your app, and inside Add click on Class file and name it Client.cs and click Next to continue.

Select a new class file to be created as a Model

Name it what-ever-you-want, but I would be using Client.
These were the three major fields in the MVC that are used to create an application. However, there are a few other minor fields that work and run our application, that I will be covering here for you to atleast know how to kick-start your project.
As far, we have covered what is Controller (controls the HTTP requests coming our going to client), what is a View (it is rendered as HTML output in the browser, the response that is returned to the client in HTML markup can be said to be the View) and finally what is a Model (the representation of the real-world data in our application is called a model). Now, we can go and have a look at the classes and objects which run our application. Like all other apps, that run over .NET framework, ASP.NET also exposes some functions for its developers to use, to perform different actions when the app starts, when the app crashes etc. If you open the folder App_Start in your application, you will find a few classes there. BundleConfig is used to configure your JavaScript libraries, ASP.NET also enables the developers to perform some client-side actions. IdentityConfig configures the Identity service (user authortization servicer), but the main file that I wanted to talk about here, which needs our attention too, is the RouteConfig.cs file.
In ASP.NET, you do not need to have a physical path fixed in order for the client to send a request to its virtual location to read it. Instead, you can now create custom URLs to let your users visit your application, without you having to have a specified file at that location. You create different routing techniques, to allow different data values inside the URL to create dynamic web pages for the clients.
If you open up this file, you will find the following code in it, (I am going to use a partial part of the file)
routes.MapRoute(
   name: "Default",
   url: "{controller}/{action}/{id}",
   defaults: new { controller = "Home", action = "Index", id = UrlParameter.Optional }
);
This defines a route, for your application. It has been named “Default” and has the default configurations for the URL, any URL that comes will be matches against this scheme. First value would match for a Controller second to an action (the function inside the Controller class) and then an optional field (see the default values field). You can change this sequence of arragement, to make sure that the URLs are website and user-friendly for your context.
Every ASP.NET can have as many routes enabled in it, every one will be used but the best possible route would be used, but at least one route must be present for the app to run. Let us now run the app and test, for anything that might need our attention.
Running the application (Optional part; if you want to download and test the app, skip this section)
This application was run over the app named “ASP.NET MVC Application” but I created a new app named “ASPNET_MVC_Application”, there is a huge different between these two, usually only difference is the namespace naming one so if you were following the blog post you might find this a bit of confusion; so my apologies for that. 🙂

In the beginning, the table is empty.
Now let us, start adding a few objects; at this instance, let us just take one object under consideration.

Fill in this form and click Save, the application would save this client’s information.
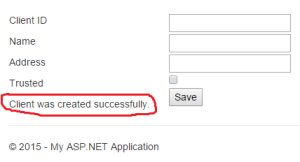
Message showing the success of our operation.
If you go back to the main page of the Client’s directory (controller), you will find a record available there.

Let us, now try to update this client’s value, in the Actions attribute of table, you will find two hyperlinks, they actually are just Actions (functions) of our controller, we will pass (optional) ID of our client to it, and then we will update the value. We will update our value as,

Let’s go back and see if our View now reflects any change.

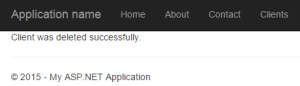
Voila! It does reflect our change, which proves that a Model updates the View for any new change that we make. Try using the second hyperlink, it would delete the object from the collection.
That was up, for the working process. Now our application runs fine enough, our manager can add clients, remove clients or modify their data as per his requirements. As far as now, this application is running and our clients can visit and use it as per their requirement.
This was a basic overview of ASP.NET MVC application, that contains the Model for our data, View for the users to visit and see and a Controller that controls the HTTP data coming or going to the client.
Points of Interest
ASP.NET MVC pattern contains a Controller for controlling all of the HTTP requests coming, and responses going to the clients. A view for generating HTML web pages, Razor view engine is used for creating the HTML markup from C# objects. A Model is a simple C# class that contains the object’s properties. Each time the application is run, Controller gets the data from the Model and populates the View for the user to read the result in his/her browser.
Every real-world object can be used in ASP.NET MVC application as the data source. To create a model, C# files are used (if you’re using C#, otherwise you would be creating a file related to your language). The properties and members act as properties that you would be using inside your HTML markup for rendering purposes.
You can control what kind of URLs are being used in your application by creating routing techniques. These define the structure of your application’s URLs. You must define at least one route in your application for it to run, otherwise you can define as many as you want.
MVC pattern removes the ambiguity between the data and the code-behind of your application. Your code-behind is now a part of the Controller of your application and is written inside the Controllers. The data is stored inside the Model (actually which is just the representation of the data, actual data is stored in somewhere like a file or database) and the what user sees is written in the View. This way, any error can be fixed as soon as possible without having to worry about any other bug, because every field is now controlled and written in a different part.
Model part of this pattern must always not perform any kind of business-logic, because that would entirely kill the actual purpose of this MVC pattern. That is why, all of the logic code is written in the controller; even the creation of data or the manipulation of data should be done in controller through functions, since user has no connection with Model, it provides an extra layer of safety as the user is totally oblivious to the schema of the database.
ViewBag and the View are special objects in ASP.NET used to manipulate the View (HTML markup), you can pass any member (which is dynamic) to this ViewBag from the Controller, to be used inside the View page (.cshtml in these cases) for rendering; like I did for showing some messages like an error or a success message.


