Monthly Archives: December 2015

Earning revenue through in-app purchases on Windows Store

Introduction and Background

A small overview of in-app purchases in Windows Store platform, in this post I will only cover the short summaries of quickly editing the small modules that you have recently created and to enable users to purchase them to support your development environments. Building applications is a tough task, and programmers need to be given what they deserve. Sometimes, respect is just not enough. Sometimes, the module you created is a tough one and you have full rights to ask for some money in a repay. It is your choice to select a price that users have to pay before they can consume the service.

Windows Store allows you to simply create a block of code, around the service, feature or application itself. That code is capable of managing the payment information, client information and other required stuff to make sure the user pays you before they can access the information and the service you are providing them with. Windows Store holds information for users too, it knows if a user has already made the purchase. If so, Windows Store won’t bother the users again to make the purchase and will hold the information for that license, user has acquired.

App monetization methods

On Windows Store you are offered with many methods and ways to earn money and to get support for your development environments and stuff! A few of them are:

  1. Ads display in your application.
    • The ads are of both types, static images or videos.
  2. Providing paid services in your applications.
  3. Asking for a pre-use purchase of your application. Paid apps.

You can ask for an upfront payment by your users. Many application developers use this method to support their development scenarios. This allows them to have an upfront payment to continue their programming and to support any of the updates to their clients. Not just this, the clients are also able to get free updates to the application later one.

But sometimes you want to allow your users to download and install the applications for free! This allows you to allow your users to try out your application. Users like free stuff, specially the stuff that is not available currently in their device’s marketplace. You can develop an application and start to offer a trial-period to allow users to use your service. If they like it, you can then ask them to purchase the license.

Otherwise, you can add a service separately that needs users to purchase it. You can add the price for it and allow users to purchase it. This method is very simple, helpful and handy! Your users can try out the application that they want to, and you can get the revenue for the features that were difficult to build and deploy. In this post, I will discuss and talk about the monetization methods by “in-app purchases” in Windows Store applications.

In-app purchases in Windows Store apps

In-app purchases requires you to have a Windows Store developer account and that you have published your application! In-app purchases are edited (and published) from the WIndows Store dashboard. You create a new in-app purchase in the dashboard, you edit the details and then update the application’s code to call those in-app purchases and provide the users with a service.

If you do not have a Windows Store developer account, you can still edit the application, you can test the license information but you won’t be able to publish the application, you won’t be able to ask your users (if any!) to purchase the services. So, first step would be to create a new developer account. Register as a developer.

If you are all set up for publishing a new application, continue with the sections and by the end you will be able to include in-app purchases for earning some revenue for your development tasks!

Creating a new app

Although, for development purposes you can test the application for performing the purchases without an online application, or a developer account. For that, you can use CurrentAppSimulator object, instead of CurrentApp object from Windows Store API. CurrentAppSimulator allows you to perform actions without having to call the active Windows Store APIs, and to just test the code in your application. This lets you test many things in your application and how user interacts with your application.

However, if you do not like to waste time, you can just head over to the “hard core” stuff. Where you publish an application, create a new in-app and start consuming it and allowing the users to purchase it. First of all, head over to the dashboard (provided: You have a developer account!) and create a new application. Publish it to the store.

Note: Developing application, uploading the source code and getting it to be published after verification takes time. My application took 16+ hours. Yours should have to go through the same procedure so be patient. I assume that you are having an application ready.

Once your application is created, continue to the next section and start creating and developing for an in-app purchase.

Creating the in-app product

The in-app product first needs to be defined in the Windows Store and the team then needs to approve the service. Once the product service has been approved by the team, you can use the product ID of that service to program your application. The product ID is used to check the license information for the application and if user owns the license to use the service or not.

License Information

LicenseInformation object of the application holds the information about the license. License can be checked for,

  1. ExpirationDate
  2. IsActive
  3. IsTrial
  4. ProductLicenses

These properties can be checked to determine the information about license of the application (if your application is a paid application), otherwise you can check for licenses of the in-app products. The in-app products also have a license and they also have properties set up, like active, trial etc. You can check against them!

An example of this license information is something like this,

var license = CurrentApp.LicenseInformation;

if(license.IsActive) {
    // License is active
    // Allow user to use the service.
} else {
    // Allow the users to purchase the service.
}

The same applies to in-app products! You would use the same method, the code for in-apps is in a later section so continue to read.

Create a product in Windows Store

You will be able to create a new in-app product online, on your application’s dashboard! Head over there and find the following option.

Screenshot (3586)
Figure 1: Windows Store showing IAPs option.

Click on this option and it would take you a new page where you can create a new IAP! Click on, “Create a new IAP” and enter a new product ID.

Screenshot (3587)
Figure 2: Enter a new product ID here and click on “Create IAP”.

You may have read that you need to be sure of the name. You won’t be able to update or delete it once you publish it.

Editing the in-app product

You will then be able to update the properties for that product in Windows Store. This is when your updates and properties would need to be verified. You will get the following three properties, that you can edit to make your product a bit “understandable”!

  1. Properties
    • Type of the purchase:
      • Consumables are those services that can be consumed. Like, 500 gold coins! Users can use them and re-purchase them.
      • Durables are those who have a lifetime. Like a premium service of 30 days.
    • Content type
    • Keywords
    • Tag
  2. Pricing and availability
    • Base price
    • A few other settings like Markets to sell the product in.
  3. Descriptions
    • Language
    • Description and title for the purchase. This is shown in the Windows Store.

You can edit the properties there, and then continue to submit it to the store. The team there would read the information and would approve it if there aren’t any problems with it. Chances are, it gets approved within an hour. Then you would continue to write the code to handle the products.

Remember: It takes at least one day to make the changes on the system. So, even if you upload the package along with the products, it would take one day for Windows Store to be able to start selling your products.

Writing the application to provide services

The Windows Store side is a very short process that you can perform in within less than 30 minutes. The longer part is to write the source code to handle the user’s license and to allow or request the user to purchase the license and service. The code is very short, intuitive and simple! I will explain the entire process here, so that it is very easy for you to get started earning revenues from Windows Store applications that you build.

Create a module

I wonder why this section even exists. Just create a module, a function or a service that performs some actions in your application. Suppose, you want to earn something from it. You can create it as a function, so that you can wrap the function within another code block that checks for a license. License information would be used to either allow the user to consume the service or to reject the request and to ask the user to purchase the service from Windows Store.

Add the license check-up!

I shared a code above, to determine the license for the application, you would do the same in case of in-app product too. You would see if a user has the license or not. The following code would do the thing for you:

// Remember the license object we created above?
if(license.ProductLicenses["productId"].IsActive) {
   // productId that you created while creating the in-app product

   // The user owns the license to use it.
} else {
   // Ask the user to get a licence.
}

You can use the CurrentApp.RequestProductPurchaseAsync(“productId”) function to allow the user to purchase the product from Windows Store. Windows Store would open a new window for the user to make a purchase. You can then (as its result) check if the user made the purchase or not. If he made the purchase, then allow him to use the service otherwise just end the request.

The common example for this would be like this:

// Get the license for the user
var license = CurrentApp.LicenseInformation;

// License for the in-app
var iapLicense = license.ProductLicenses["productId"];

// Apply a condition for the in-app product license
if(iapLicense.IsActive) {
   // User has bought the service; provide service
   provideService();
} else {
   // Allow user to purchase it
   await var resultOfPurchase = CurrentApp.RequestProductPurchaseAsync("productId");
   if(resultOfPurchase.Status == ProductPurchaseStatus.Succeeded) {
      // User has bought the service now
   } else {
      // Show the error message; for try again.
   }
}

This way, user would be able to purchase the item from Windows Store. The process is mostly similar to this one:

Screenshot (3588)
Figure 3: Windows Store purchase window is loading up.

Screenshot (3590)
Figure 4: Windows Store shows the details for the purchase the user is about to make. Also allows them to add a payment method to their account.

Screenshot (3589)
Figure 5: Windows Store shows the following methods (or any other, or less; depending on the country of users) to allow them to make the purchase. 

This would then allow the users to make a payment and then it would update their licenses to be able to consume the service later. It would update the “IsActive” property of their license information.

Points of Interest

This is it for this post, in this post you were taught how to earn revenue from your Windows Store applications. MSDN documentation has a lot of great resources available for developers to learn more about in-app purchases and services provided to developers to ensure that users pay for their services and for the users, to allow developers that they have indeed made the purchase and you should allow them to use the service.

There are many other topics that you should consider reading, such as:

  1. Allowing consuming of services like tokens.
  2. Managing the services from Windows Store.
  3. Adding more in-app products.
  4. Using receipts to verify the purchase status.
  5. Validating the receipts of services.

As a further read, you should consider reading “Enable in-app product purchases” guide on MSDN. I hope I have helped you with this post, and I think this is the last post for 2015, catch you in the next year!

Happy New Year! 🙂

2015 in review (Review of my blog)

The WordPress.com stats helper monkeys prepared a 2015 annual report for this blog.

Here’s an excerpt:

A New York City subway train holds 1,200 people. This blog was viewed about 4,400 times in 2015. If it were a NYC subway train, it would take about 4 trips to carry that many people.

Click here to see the complete report.

Tips for programmers (and other readers) before 2016

We are about to enter the next year, 2016, and we haven’t yet learnt anything from our mistakes that we have made last year. We may have learnt new things, new ideas and new technologies but unless we learn from our mistakes we are not going to get anything better done in 2016. And, I would hate to hear the same questions in 2016 that I heard in 2015. So, here goes the 5 tips for programmers that I want them to take under considerations before moving forward to 2016!

No C++, no C#, no Java. But a human-to-human talk is all this post is about. I am not going to talk about computers, but you! Programmers make up the computers, computers are nothing but a bunch of transistors passing on electric current from one IC to another. You, my brother (or sister) are the one who matter. Time to share some memories, I guess?! 🙂

Do not go gentle into that good night

I am a very big fan of Interstellar movie, this poem of Dylan Thomas I remember and I use each time when I am about to lose hope in myself. 2016 is about to come, make up some resolutions, make up plans for the party as it is “about to happen“. Do not lose hope, if 2015 was not a good year or if you did not get success. There are many reasons to moan and grieve, but there are many other reasons to smile at 2015 too.

A new year always doesn’t have to be celebration, sometimes you need to consider new innovations before moving on to the new year. Most of us are still working to make our 2016 better! Think of them and work.

I remember, 2014 was not a very much good year for me. Things were rough, odds were all against me and… I was losing hope in myself. I joined C# Corner in January, 2015. I remember myself posting articles with an intent to just share what I had. I did not want any accolade, just shared them. That made me feel good and I had no wish or dream for anything as a repay.and on the eve of 18th March I received the MVP award from C# Corner! I really feel very thankful to them, for granting me with such a pride. I would like to recommend the same to others.

You can read the poem at Academy of American Poets.

Do not go gentle into that good night,
Old age should burn and rave at close of day;
Rage, rage against the dying of the light.

© Dylan Thomas

tumblr_nfrm5pbdS21sao974o1_500


Keep dreaming, keep awake

I am not a writer, nor do I consider myself to be a great author but I have a personal saying, that I usually use for myself:

Wake up, open your eyes and start dreaming…

I believe dreams are not what we see in sleep. Dreams are something that doesn’t let us sleep. You cannot just simply skip your dreams, you can dream of anything and if you do not achieve it. You didn’t simply dream enough for it! This is a very simple rule.

All of these discoveries have been made through imagination. There was no concept of gravity until that Apple fell. There was no concept of relativity until Einstein imagined something while sitting on a chair. All of these, they are imaginations, dreams, that people work so hard to bring to reality. If you do not bring it to reality, work more harder.

Physics, chemistry, computer science and many other fields, including Astronomy, are all based on human conceptions. You cannot just do anything with current ideas. You have to look at the verge of chances and then make a decision.

tumblr_m241bwi5PC1r4z4mto1_500

So, now, can I hope you are going to dream, dream bigger than you did in 2015? 🙂 The bigger you dream the better the results would be! Take it for guaranteed, brother.

Find a hobby

Sometimes, you get bored and fed up by the same routine that you have. Go get yourself a hobby, work on it. I might say, the following may be great ones:

  1. Gardening
  2. Household works (trust me, they are not just meant for girls!)
  3. Sports (football, cricket; spend some time in open air)

Your mind would feel fresh and would get impregnated with impressive ideas. I live in an open area, in Rabwah and I am blessed with an open lawn where I can walk and even sleep at night. The stars outside are also mind freshening. Which most of my friends from Delhi often complain about; I can understand how “not having an open area” feels like. If you could find yourself a hobby along with the job, you can get relax very much as compared to those who just work.

Spend time with your loved ones. They need you!

Digital world has separated us so much, and it our own duty to make sure we are not far away when we sit next to each other. Spend most of your time with your parents, and not your laptops. Spend your time with your siblings and not your hardware! Siblings and parents have feelings and emotions attached to you. Your hardware only has a cable attached to the AC line.

Spend most of your time with your mother, father, who really do care about you! Not just that is a good action, but most of the times your parents would find a better solution to your problems. You should always share your mental problems, regular hurdles and other similar troubles with your parents. Remember: Your parents have more experience with “life” than you! No matter how much lucky, rich and successful you become, they will always be your parents.

Families over hardware

Share the happiness

New Year is about to come, it is a happy event for everyone. Share the happiness with everyone, greet everyone you meet!

So, why shouldn’t I be the first one to do so in advance, “Happy New Year, everyone!” 🙂

latest-happy-new-year-2016-photos

You made mistakes, but did you learn anything?

Everyone makes mistakes, that is not the point. The point is to learn something from your mistakes and to solve your problems that may arise in future. I personally hate to make mistakes, but when I do, I try to dig deeper to learn why it happened and how can I make sure it doesn’t happen again.

I remember I made a lot of mistakes, and most of the times I made mistakes that even made me go mad at myself and to doubt my skills. But, I never gave up. Most of the times beginners who get fed up of making mistakes and causing errors ask me, “How did I become a master?” in any programming language or framework. I reply,

I am a master because I have made mistakes more than you can ever make!

Master is not someone who knows everything by birth. But, we come to know everything by experience. I was also making mistakes, the same errors that you get, I got them too! But I never gave up, instead I learnt how to fix them, how to make sure they don’t come again.

Learn-from-Mistakes-500x290

Never give up!

Do not have a plan B. Your plan B must always be to complete plan A! Because the moment you decide a plan B for yourself, you have accepted that your plan A is not going to work. Always consider plan A to be the best one, but once it has been implemented, stick to it, no matter what!

The statements like, “If plan A doesn’t work don’t worry there are 25 other characters…” are only meant to be ironic. Do not put your life on a chance, you may not get another.

NO PLAN B!

Plan-A-Will-Smith-Red

Remember: You can do anything you set your mind to, man!

In the end, I just want to say, do not waste another year of your life! With the celebration of 2016, remember that our time is also running out of our hand like sand. I would suggest that you make up some plans before this year ends.

de86e-10948772_447078795442699_1718729731_n

Eminem — my love, my motivator, my mentor, my favorite hip hop artist — has been a motivation to me for a very long time. His songs, raps had kept me on the right path for a very long time! All, what I am, I think its just because of his motivating songs.

You should also consider to find yourself a motivation, then just stick to your plans and do what’s necessary! 🙂

Tackling text-to-speech and audio file in Windows Store applications

Introduction and Background

I was adding a few more features to the Windows Store application that I have, “Speak It!“, and while doing so it became much more complex task as I dig deeper into streams. Remember, streams provided by Windows Runtime are not as much simpler as .NET has. So, in this post I will talk about a few of those hazards that you may come across. This post consists of two sections, first one is to talk about the “Text-to-speech” API in Windows Store, sorry, Universal Windows Platform and the second one would talk about the saving the generated speech stream to an audio file.

I have already shared most of the concept in another article of mine, which covers the basic concepts, prerequisites and other basic stuff to be understood to build a Text-to-speech application. Unfortunately, that was .NET oriented whereas this article covers the concepts for text-to-speech API in Windows Runtime API set. The article can be read on C# Corner as I did not post it as a blog here, sorry.

App That Reads Out Text For You in WPF

That article is very much similar, because .NET for Windows Store is pretty much similar to what we have as .NET itself! .NET framework (in my opinion!) is very much simple, easy and intuitive as compared to Windows Runtime API set. You can use the same code provided there to get start with the text-to-speech portion, however there are a few differences that I must warn you about. That article also talks about the audio file generation, in this article post I will discuss the development stages in Windows Runtime too. So, follow up with me and learn how to do that!

1. Building text-to-speech part of the application

First section would be to build the basic foundation of the application. I am not going to talk about the UI or UX guidelines at all, instead I will move on to C# code to share how to actually build the application on the backend, so that it actually does some work instead of just showing up its belly. 🙂

I don’t know why, but Windows development team would like to add speech APIs to media technologies and thus they have provided the objects (classes) under Windows.Media.SpeechSynthesis namespace. Please understand this fact, text-to-speech in Windows API is very simple and intuitive task, you don’t even have to do anything to perform a function to generate speech for text. Windows manages everything itself. So, I am going to show you the C# code, simple C# code, that can generate the audio results for the text that you enter in the application.

Initializing the synthesizer

The synthesizer is defined in the above mentioned namespace, you can use it by calling a constructor and passing a language (or using the default languages provided by the Windows operating system; which are installed by the user). In most cases you don’t have to set up the engines, you can get them already set up. But if you would want to change the engines up and down, you can still manipulate the object that you create.

// Namespace addition
using Windows.Media.SpeechSynthesis;

// Create the object here...
var synthesizer = new SpeechSynthesizer();

// You can update the properties, such as voice engine being used.

The next step is just to execute the “Synthesize…” function! This function would return the stream, based on what you pass. You can pass text and SSML; which I will not cover, then engine would return the stream for audio speech based on the parameter.

Modifying the properties

Before the final stage, I want to discuss the properties that you may want to update in your engine to provide a better experience to your users and target a wide variety of audience.

Voices and other stuff

First of all, you should consider that an engine would always require a voice to be installed on the system. Each and every voice that you want to use, must be there on the system before your application can think about using it in your application! That is why, I would recommend that you first of all, consider which language have been installed. I use English language, my family members also do, but my friends don’t. Some prefer French whereas some have Urdu or Hindi languages installed. So, if you would hard code anything in the application it may cause a runtime exception when application won’t be able to build an engine with specified language. In such cases, you can loop through the available languages (voices!)

// Object created above
var voices = synthesizer.AllVoices;

Now you can loop over each language voice and then provide the users an interface to select a language from each one installed on the machine. Also, allow users to install more languages so that they can render the text in audio streams in many more voices. Voices are also based on genders, geographic location, pitch and age. So you can also find out if a specific language is installed or not.

Then each of the item in this array would target the Voice object. This object is another type, VoiceInformation, which holds the information about the voice that gets used to render the text into. The voice (as already mentioned!) can hold information about language it speaks, age and gender based information. You can also select a language based on these parameters if you want to select a language and don’t know which language is installed or don’t want to hard code the language name in your application.

You can then change the voice of the synthesizer to the one you want to use. For example,

// Assume you collected a voice information from the AllVoices list
synthesizer.Voice = voiceFromList;

Then you can continue to the next stage, where you get the stream!

Getting and loading the stream of speech

In Windows 10, you do not get an audio from this API, instead you get a stream of data, audio data, you then need a player to play that stream. Windows 10 has a control named, MediaElement. You can use that player to render the stream for you. Easy way, I would say! The thing is, MediaElement would handle most of the headache for you and you wouldn’t have to work around with the codecs and other byte-management concepts, you just send it as a resource to the media element and it would then preview it.

Even the code to do that is pretty much simple and straight-forward, you only have to specify the stream and the content-type so that MediaElement can render the media correctly. Have a look at the two-line code below:

// Generate the stream
var stream = await synthesizer.SynthesizeTextToStreamAsync(message);

// Set it as a source
mediaElement.SetSource(stream, stream.ContentType);

MediaElement would then render the controls, seek bar and other stuff that it requires.

Screenshot (3078)
Figure 1: Application showing controls and resources for text-to-speech

In the above image, it is clear that MediaElement displays the controls, renders the stream and allows the users to pause or play the content and even seek it through the audio stream. This makes it better for story-reader applications.

So, this was it for the text-to-stream section. Rest of the stuff is just “extra cheese topping” that I don’t want to talk about, I want to focus on generating the audio content to be saved as a file on the machine. So, head over to the next section.

2. Generating audio files for audio speech streams

This part was tough one and I had to work on it for like 1 and a half hour to get it to work! Actually, there is a bit of confusion between the Stream object in .NET and the .NET for Windows Store. That caused me a lot of trouble, but anyways I want to share the achievement with you so that you don’t have to pull your hairs off your head.

Selecting a file

In Windows Runtime (or, Windows Store applications), you cannot just move from here to there like you could in .NET environment. You are abstracted by permission set and thus it is better to allow the user to select and set up a location for you to work. This way, Windows won’t intervene and would allow your application to have permissions as if user were doing them himself.

The following code does that and the object being used is FileSavePicker, which allows user to select a file where your application would save the data. You can specify the type of file, extension and (optionally) the name of the file.

// Create the object
var picker = new FileSavePicker();

// Set up a few settings
picker.DefaultFileExtension = ".wav";
picker.CommitButtonText = "Save";
picker.FileTypeChoices.Add("Audio", new List<string>() { ".wav" });

// Let the user select a file now; and a location
var file = await picker.PickSaveFileAsync();

Then you can use the file selected and load the data in it. The conceptual point comes after this. If the user has selected the file, you now need to:

  1. Open a stream to that file, with read/write permissions.
  2. Create a byte-array for the stream you have.
    1. For this, you would need to use MemoryStream.
  3. Write those byte-array values to the file.
  4. File type would be .wav file so make sure it is that one.
  5. Commit the changes to the file system and you’re done!

Now, implementing the above logic is also very similar part. Have a look at the following code, FileIO object provided by Windows Runtime is a great object to lets us work around with Input/output across the files. So, using the same object I am going to write a block that does what I want it to…

// If user selected a file
if (file != null)
{
    // Create a memory stream
    using (var mem = new MemoryStream())
    {
        // Get the stream object; Stream of .NET
        var strm = stream.AsStream();
        strm.Position = 0;                  // Change the location index to copy from
        await strm.CopyToAsync(mem);
       
        // Convert to array of bytes
        var array = mem.ToArray();
        // Write the byte-array to the file.
        await FileIO.WriteBytesAsync(file, array);
    }
}

Just the above code is required! We’re done. The code when I refactored it, amazed me and I was very much shocked as to why did I not get it in the first place. The code is simple and it does what it is intended to do, so if I convert the above speech stream to audio file, it would be like this.

Screenshot (3103)
Figure 2: FileSavePicker showing the interface to select a file to save the data to.

Screenshot (3104)
Figure 3: Windows File Manager showing the “MyAudio” file just created using the above mentioned application for Windows 10!

So, this way we can store the data in audio file.

Points of Interest

Windows 10 is new, Windows Runtime is also new… Most of the C# programmers are still fond of .NET environment, although Microsoft did provide them with tools to work around in Windows Runtime, but still Windows Runtime API is not as much simple and beautiful as is .NET framework.

This post talks about and shares the information required to build your own text-to-speech application and not just that, it also shares how to convert that audio stream to audio file that can be played later. Of course on this post, I cannot play the file but in real, it does say what I wrote. 🙂

It’s almost end of the month, I may write a new post someday earlier, but anyways, Happy new year folks! 🙂

Developing apps for Ubuntu using Ubuntu SDK

Introduction and Background

In this article I am more focussed to write about applications for Ubuntu platform. I have always wanted to write about the platform, SDK, features and more stuff ever since I started programming for Ubuntu, back 3 months ago. The platform is so catchy, even for script-kiddies, that even I was caught by its catchy features. I do not prefer writing apps where I have to use shell scripts too often. But, Ubuntu is an exceptional case for me though. I have not yet tried using C# or the open sourced .NET Core on Ubuntu but I am sure going to try it some day sooner, and I will update the article for that or write a new one for that one section.

There have been many questions related to Ubuntu programming, graphical UIs in Ubuntu, SDK for Ubuntu etc and I always wanted to make sure that I do share some of my knowledge as an article for community but I was always found busy in other projects and blog etc. that I was not able to actually write it. So, since I am free from any other job, project, I guess before starting my Masters in CS course I should write the article for Ubuntu starters. I am sure you would enjoy the SDK and the article as you read it.

Some light on Ubuntu itself

Ubuntu, if you are unaware of what it is, is a Linux (kernel and Debian) based operating system. So right under that GUI a Linux kernel is being used for the underground stuff. Linux kernel maintains the processes and the communication channels between the operating system and the machine hardware. Machine is totally abstracted from the operating system, and kernel is used (along with a few other stuff) to make sure that operating system runs on every (selected or supported) architecture of machines. For example, you can run Ubuntu on a 32-bits and 64-bits, x86 and other architectures. The processes seem to be alike and the applications that you make for one of the machine runs on other machine too which is running Ubuntu. Why? Because Ubuntu runs at a very high-level in the hierarchy, so the programs that run the application are abstracted from the machine. The OS in this state only acts as the virtual machine, with a byte-code (for example!) that runs in it. The byte-code is compiled to native machine code just-in-time! Due to this fact, the code that you write once is executed on every machine because the virtual machine decides which code to be compiled as which instruction. The instructions for machines differ from one to another.

Some introduction of Linux

Ubuntu is a distribution of Linux, Linux was just a kernel, it is not an operating system. And that is exactly the difference between Linux and GNU. GNU was the project that lacked a kernel, until Linus Torvalds created Linux and GNU guys took that open-source kernel (which, still offers royalty to Mr. Linus) and completed their operating system project. Thus, Linux is the kernel, GNU is the operating system. So, if someone asks you to do something on a GNU based system, do not confuse it with “Hey, but I only know how to do that on a Linux“.

For more: Well, that is it for now for Linux. If you want to learn more about Linux itself, go and read

  1. Minix 3
    Background and a few books that you can get about Minix 3.
  2. Linux
    Background and history
  3. GNU

After reading these, you will have an idea of what is Minix 3, how Linux started and how did it complete GNU. 🙂 I won’t talk more on these, and will move on to Ubuntu for now.

Ubuntu—a Linux distribution

Linux alone would be a favorite operating system for the shell-lovers, and those with a craze for command-line interface. But, for ones like me, if there is no graphical user-interface and no way to click a button to open “This PC”, the OS is not “my type”. Right? There are many distributions of Linux kernel, many companies and organizations has invested their money and time in creating an operating system over Linux kernel. Linux kernel allows them to worry about the operating system and the programs and services that it will offer while kernel manages the low-level services, CPU interrupts, RAM management and other facilities. Latest versions of Linux include many bug fixes, security patches and other loophole fixes so that operating systems have to worry about the code on their ends.

Ubuntu is one of those distributions, and is mostly used on personal computers. Ubuntu is based on Linux (according to the website, and yes, many geeks, it is a Debian-based Linux distribution) and yes, you can use the same features that Linux has, those same user accounts and the commands. But Ubuntu just adds a graphical user-interface on top of that, plus a framework and design to support third-party applications to be developed and ported to the devices. Ubuntu is not just a desktop OS, but also provides services for:

  1. Web servers
  2. Smartphones
  3. Tablets
  4. Cloud management
  5. Quite other options are also available because it is not a one machine based OS.

In my opinion, the concept of Windows 10 is much like Ubuntu’s infrastructure. One operating system to rule it all. So the applications that you create on one device are able to run on multiple devices, just the way Windows 10 applications work, they just need a few tinkering and they are ready to go.

As captured from this thread, where Ubuntu’s architecture is discussed about, the following representation may suffice your needs of understanding the architecture.


Figure 1: Graphical representation of Ubuntu OS from a Linux point-of-view. Drawing the schema for every service and process is almost impossible in a single diagram.

Now, as already said, explaining and connecting each and every service provided in Ubuntu OS or the kernel is almost impossible. So, I will leave you with an abstracted overview that the levels come in a way, like, first there is Linux kernel (skip the machine), then a few services that continue to run and communicate with Linux kernel, then a few UI services that render the graphics on screen for the opened windows and tabs, after that comes your application. These services communicate with the kernel and kernel executes the commands on CPU.

Well, on other hand I have created a much simpler diagram that you may find easier to understand also.


Figure 2: An easier to understand, abstracted overview of Ubuntu OS.

In the above image you can get the overview of Ubuntu OS itself, now if that is some-what clear we can now continue to the main topic, Ubuntu SDK. In the next sections I will walk you through using Ubuntu SDK and how to create an application in Ubuntu SDK for Ubuntu OS.

Ubuntu SDK—Qt creator and a bunch of services

Ubuntu SDK is a collection of a few services that every SDK has, Ubuntu is a Linux based system so an IDE is not a fully-integrated IDE as Windows has, Visual Studio. Ubuntu didn’t come with a full-featured IDE, but not anymore. Ubuntu OS also has a full-featured IDE (special thanks to Qt project) which includes:

  1. Text-editor with syntax highlighting.
    Of course most of the programmers need it, the syntax highlighting includes JavaScript, C++, C and many other languages, including the QML (markup language for Qt applications). Qt is a most widely used IDE and framework for cross-platform development. Qt is used for Windows, Linux (Ubuntu, Debian and Android etc), Mac and mobile phone development. So it has to include the syntax highlighting for a wide-variety of languages.

    • C/C++
    • JavaScript
    • QML
    • XML
    • JSON
    • etc…
  2. Compilers for languages.
    Along with the compilers, it also comes with the markup language and JavaScript parsers.

    • QML allows you to integrate the client-side scripting using JavaScript. So the events are handled using JavaScript and the same pattern is used. Plus, the QML markup language is also so much easy that creating the GUI is not at all a problem.
    • The integrated compilers for C/C++ make it easy to run and debug your application instead of having to execute separate commands for each of these processes.
      • Compile the code
      • Parse the markup
      • Assemble the binaries
      • Create a package
      • Find the executables
      • Run them to see what happens.
    • In Ubuntu, you just have to run the application; or debug it.
  3. Debuggers
    Should you run into any trouble with your application or whether you want to try out the application before publishing it, SDK contains the stuff required.

    • Debugger
    • Profiler
  4. Emulators and devices
    SDK also contains the stuff that would help you to create the emulators and devices, on which you can run the applications on. In this guide, I will use the device that I am using to run the app on.

    • You can create emulators for mobiles, desktop and other platform or architecture where you want your application to run.
    • I will be using Desktop one only in this guide.
  5. Source control
    If you are a team of developers working together to create a project, then you would need source control, every team needs it. Ubuntu SDK has a wide variety of source control ranging from git to Bazaar. You can chose the one that suffices your needs.

    • git is a most-widely used source control, it also allows you to host your code over GitHub. It is fast and is widely used by command-line programmers. Plus, there are many guides already provided for you to learn git.
    • Bazaar is another source control which is mostly used in Ubuntu, I never stumbled upon it in Windows. But, I didn’t find a way to create an account so look for that yourself. 🙂
  6. Publishing tools
    Ubuntu SDK also provides you with facility to publish the applications to Ubuntu Software Center. Where your application can be downloaded by thousands of users!
    Note: There is a commercial version of applications provided, but since I am in Pakistan and do not have a PayPal account I have no idea how that would be done, but that is also simple. Just add the details for your account and they will pay you for the revenue that your application will make.

That is just an overview of Ubuntu SDK, but using Ubuntu SDK and installing it just really very easy. I do love Visual Studio, everyone does, but installing Ubuntu SDK is a very simple and easy task. The size of SDK is also very compact, so downloading the binaries won’t take too much time. Installation is also very robust and fast that it doesn’t really matter what you do, it would take at maximum of 10 minutes; depends on your network and machine.

Installing the SDK

I will assume that you are having Ubuntu installed. You can get Ubuntu SDK two ways,

  1. From the Software Center; where you get to only click a button, “Install” and it gets installed.
  2. or… From the terminal. Where the stuff is processed step-by-step and you are aware of how long it will take and what process is being executed.

I will share “how-to” of both of these procedures to make it clear for you, I personally prefer the terminal way of installing the SDK, they are just 3 commands and you get most of the stuff already fixed up for you!

1. Installing using graphical user-interface

First of all, a section for graphical user-interface lovers. The process is very easy, all you need to do is go the Software Center and install the Ubuntu SDK. Using the software center you would have to only click a single button. Rest of the stuff is managed by the software center itself.

Go to the developer tools, right under their find IDEs. Ubuntu SDK is categorized under there.


Figure 3: Ubuntu SDK listed in the IDEs category of Developer Tools section.

You should click on More Info to get more details on this. This window should come up,


Figure 4: Ubuntu SDK details and a button to Quick-Install it.

You should click on Install if you have gone through the details of this software product. Once you click on that, Ubuntu would ask you for your password to perform super-user actions. It would take some time, it requires both Internet and some time. It would have the SDK installed for you!

2. Installing from the terminal

This is my favorite method of installing the Ubuntu SDK. It doesn’t take much time, but is very powerful and simple way, since it only requires a few commands to install the SDK for you!

Open the terminal from your machine and proceed with installing the SDK,

1. Add the SDK release PPA
$ sudo add-apt-repository ppa:ubuntu-sdk-team/ppa

It will prompt you for a password, enter the password for your user account. Once that is done, proceed with the installation of the SDK package.

2. Install the SDK

Execute the following command to install the SDK:

$ sudo apt update && sudo apt install ubuntu-sdk

This would now look for the packages and other resources on the network to download and setup for the SDK. It does take some time and this is the step that will take most of the time. It depends on your network speed so make sure you have a good network, slow would also work, but slowly. 🙂

Once that is finished, there is no other stuff required to worry about. The SDK is set up. Start it, the terminal way.

$ ubuntu-sdk

There you will have the SDK running in front of you. Yes, it is the Qt creator ported with a few more plugins to work with Ubuntu programming.


Figure 5: Ubuntu SDK start up screen.

In the next section I will walk you through different options that Qt creator (Ubuntu SDK) provides you with for developing the Ubuntu applications. The IDE has many features and many templates for applications that you can use to create the applications. The applications are of wide variety.

  1. Console applications
    If you want to build a program that doesn’t need any graphics or rendering, then you can create a simple C/C++ console application and write the logic for your application.
  2. Services or templates
  3. Graphical user-interface apps
    If you want to create applications that make use of graphics, then these are your options.
  4. Non-Qt projects
    When you need to use the native power of Ubuntu, you can create Non-Qt projects and write softwares that make use of native power for better performance.

The applications created in GUI mode, use QML as the markup language for user-interface and JavaScript as the handler for clients’ interactions. C++ is used as a back-end language for processing complex algorithms and structures. In most cases, JavaScript will suffice for example in case of network requests etc. But in cases where you need CPU to be used, you can make use of C++ language at its best!

Points of Interest—future versions of post

Alright, I think this is enough for this post. Until now you have got the basic idea of Ubuntu SDK, Ubuntu and how to build the applications. You may also have got the understanding of SDK IDE’s environment and other basic tools and packages. That was all this post was meant to provide you with.

In next post about Ubuntu SDK, I will show you how to build different applications on Ubuntu platform. Ubuntu is a very powerful platform to build applications on. From console-based, to services to GUI based applications. The GUI based applications, built using Qt are also very easy in Ubuntu SDK. The QML, C++ configuration and all of that stuff, is very easy and native to understand that even if you have never programmed for Ubuntu, or if you are a web developer you will still get your hands on Ubuntu, pretty quick!

See you in the later posts. 🙂

Creating a “customizable” personal blog using ASP.NET

Introduction and Background

I don’t want to speak too much in this piece of article, instead I just want to demonstrate the presentation that I have to make today. This article is a short piece of “long report” that can be considered as an answer to most common question, “How to create a blog in ASP.NET?”

Well, I find it most compelling that most people are unaware of what a blog itself is, because if they knew they could just play around with ASP.NET to build one for themselves in a night or two. In this article I will discuss a few steps that are needed to be followed while creating your own blog. I am not a good designer, so please forgive the most annoying design that you are going to witness in coming sections. But I promise I will give you an overview of a “blog in ASP.NET”. The facts that I will talk about, or the reason that you should read this article is that this article is not a “specific” how to for my own procedures. Instead, I am writing this article to give you a brief overview of what a blog is, what ASP.NET has in it for you, how you can create it and not just that, but also, how you can create a blog with all that you have. In most cases, you just have a small area for hosting with less HDD space and no database. I will cover what to do in such cases too. Just read the post.

To add some “content” I wrote a Windows 10 client application to consume the blog posts through ASP.NET Web API. I am sure in most cases this Web API thing for ASP.NET blog posts would interest you.

What is a blog, anyways?

Putting the content here simple, a blog is a place where you can share, what you want, anytime you want, with anyone you want! That is a general type of blog being used. Blog is a short form for weblog (logging, makes sense?). More specific types of blogs come depending on your content. Some of blog categories are as below:

  1. Microblogs
    Compact and straight-forward blogs. 140 characters beast, Twitter, is an example of this type.
  2. Personal blogs
    Anyone can create them and they are very much personal, demonstrating only one person. Your website can be your personal blog.
  3. Media blogs
    You can share the images, videos and other multi-media content in media blogs.

So basically a blog is just a website for sharing the content. If you ever created an online website for sharing the content, current work information, regular “diary”, then you have already worked on developing a personal blog. Blog is just a term given to online log system, where you can “log” your regular discussion topics.

So, in this article post I am going to cover a basic application that can act as a blog for someone. As an additional support I will also give you an idea of using ASP.NET’s Web API to promote your blog on native applications, such as a native Windows 10 application that loads the content from your only blog and display the blog posts to users natively.

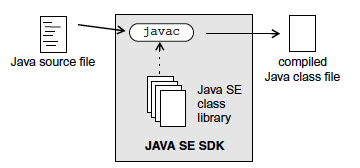
Getting started with ASP.NET

Since most of the readers are currently not upgrading themselves to ASP.NET MVC 6, I will use ASP.NET MVC 5 (not ASP.NET 5) to show you how to do it. Things are very much similar in ASP.NET MVC 5 and ASP.NET MVC 6. The common things that I have found to change in the coming versions is that ASP.NET is now cross-platform, so if you continue to write the same application by following my article, in ASP.NET MVC 6, you will be able to run it on a server in Ubuntu, or Mac and so on. But that is not a big deal here, is it?

I will be using ASP.NET MVC 5 (not ASP.NET 5!) to demonstrate how to build your own ASP.NET personal blog. But before I get Visual Studio started, I wanted to explain the term “customizable”, which is used in the title of my current article. By the term “customizable” I mean

  1. A blog that is entirely flexible. You can integrate plugins, or update the theme and so on.
  2. A blog that doesn’t rely on a specific third-party framework, even a data source.
  3. A blog that is built just on top of ASP.NET assemblies and doesn’t require you to do anything at all.
  4. A general blogging platform, which can be then altered to create
    1. Social blogging service.
    2. Personal CV house
    3. Your own website to demonstrate your services
    4. So on and so forth.

In simple, the blog can be altered to your own needs and requirements. After all an ASP.NET blog is just an ASP.NET web application that you have modified to suit your own needs.

At this stage I would ask you to create a new ASP.NET project in your own machine, in the next section I will continue with the next things, like create controllers, defining the Views and so on. So, it would be good for you to create a new project at this moment and continue with the article next.

Building the application

First of all, I would like to share how I actually built the ASP.NET web application to be able to host my blog. I am going to use a web interface and an API interface, to be able to consume the blog from multiple native applications. So, I will talk about the ASP.NET programming in this section and then I will talk about the Windows 10 application programming, to actually consume the blog posts and show it to the users in a “native experience”.

Web interface controller

First of all, I will consider building the web interface to be able to showcase the blog on the internet, using a browser. This is what ASP.NET was initially developed for. To build web sites, and web applications. Web applications were introduced a bit later and then was introduced the Web API and so on. So, I am going to use the very basic concepts of ASP.NET MVC to build a simple web application, that can “act” as a blog.

If you are novice to ASP.NET, because most of the times the question (in the title) is asked by a beginner in ASP.NET, so if you have no idea about ASP.NET, please read the previous posts of mine that cover ASP.NET in a great detail and would help you in understanding and learning every bit of ASP.NET programming, as from a beginner’s perspective.

  1. Understanding ASP.NET MVC using real world example, for beginners and intermediate
  2. Novice to MVC? Read this… (ASP.NET MVC is implementation of MVC pattern of software development, this post talks about MVC not ASP.NET MVC)

I will continue to share more of my articles and posts, as the topic proceeds. I would recommend that you read the above posts if you are new to ASP.NET, most of the concepts like Controller, Views and Models may cause a confusion to you, if you are a newbie!

Almost there…

I am very much fan of JSON data, I prefer using JSON over SQL databases and thus I am a fan of Newtonsoft.Json library. So, please consider installing the library before moving further. This library would be the backbone for our data source.

PM> Install-Package Newtonsoft.Json -Version 7.0.1

Once this package gets installed, please continue to the next section.

1. Build the model for application

In my case, I always prefer building the models first. This gives me an idea of building the controllers and then building the views for the application. So, I would also give you a tip, to always build the models, data structures first and then continue to build the rest of the stuff.

The model we need is just a model for the blog post. So, the structure would just be as easy as the following,

using System;
using System.Collections.Generic;
using System.Linq;
using System.Web;
using System.IO;
using Newtonsoft.Json;

namespace PersonalBlogTemplateWithServices.Models
{
     public class BlogPostModel
     {
         // General properties
         public int ID { get; set; }
         public string Title { get; set; }
         public string Content { get; set; }
         public List<string> Tags { get; set; }

         // Time based properties
         public DateTime CreateTime { get; set; }

         // Other properties and settings may include UserID, RoleID etc.
      }
 
      // The class to manage the data-sources
      public class PostManager
      {
          // Define the members
          private static string PostsFile = HttpContext.Current.Server.MapPath("~/App_Data/Posts.json");
          private static List<BlogPostModel> posts = new List<BlogPostModel>();

          // The CRUD functions
          public static void Create(string postJson)
          {
              var obj = JsonConvert.DeserializeObject<BlogPostModel>(postJson);

              if(posts.Count > 0)
              {
                  posts = (from post in posts
                           orderby post.CreateTime
                           select post).ToList();
                  obj.ID = posts.Last().ID + 1;
              } else
              {
                  obj.ID = 1;
              }
          }

          posts.Add(obj);
          save();
      }

      public static List<BlogPostModel> Read()
      {
          // Check if the file exists.
          if(!File.Exists(PostsFile))
          {
              File.Create(PostsFile).Close();
              File.WriteAllText(PostsFile, "[]"); // Create the file if it doesn't exist.
          }
          posts = JsonConvert.DeserializeObject<List<BlogPostModel>>(File.ReadAllText(PostsFile));
          return posts;
      }

      public static void Update(int id, string postJson)
      {
          Delete(id);
          Create(postJson);
          save();
      }

      public static void Delete(int id)
      {
          posts.Remove(posts.Find(x => x.ID == id));
          save();
      }

      // Output function
      private static void save()
      {
          File.WriteAllText(PostsFile, JsonConvert.SerializeObject(posts));
       }
    }
}

In the model , I have the following attributes that can be used to identify or describe the blog post at the instance.

  1. ID
  2. Title
  3. Content
  4. Tags (is an array; List)
  5. CreateTime (used to sort the items)

Great, we now have a model, and now we can continue to write the rest of the logic for our application. The model implements the CRUD functions, that we can call from external objects, from both, web interface and from Web API interface. This would allow us to manage the data layer in this class.

2. Creating the controller

Alright, first of all, create the controller. The controller would have the actions that we need to perform in our blog. Please pay attention to the following code:

using System;
using System.Collections.Generic;
using System.Linq;
using System.Web;
using System.Web.Mvc;

using PersonalBlogTemplateWithServices.Models;
using Newtonsoft.Json;

namespace PersonalBlogTemplateWithServices.Controllers
{
    public class BlogController : Controller
    {
        // GET: Blog
        public ActionResult Index()
        {
            // Read the list
            var blogs = PostManager.Read();
            if (blogs == null)
            {
                 ViewBag.Empty = true;
                 return View();
            }
            else
            {
                 // Just for sorting.
                 blogs = (from blog in blogs
                          orderby blog.CreateTime descending
                          select blog).ToList();

                 ViewBag.Empty = false;
                 return View(blogs);
            }
        }
 
        [Route("blog/read/{id}")] // Set the ID parameter
        public ActionResult Read(int id)
        {
            // Read one single blog
            var blogs = PostManager.Read();
            BlogPostModel post = null;
 
            if(blogs != null && blogs.Count > 0)
            {
                post = blogs.Find(x => x.ID == id);
            }

            if(post == null)
            {
                ViewBag.PostFound = false;
                return View();
            } else
            {
                ViewBag.PostFound = true;
                return View(post);
            }
        }

        public ActionResult Create()
        {
            if (Request.HttpMethod == "POST")
            {
                 // Post request method
                 var title = Request.Form["title"].ToString();
                 var tags = Request.Form["tags"].ToString().Split(new char[] { ',' }, StringSplitOptions.RemoveEmptyEntries);
                 var content = Request.Form["content"].ToString();

                 // Save content
                 var post = new BlogPostModel { Title = title, CreateTime = DateTime.Now, Content = content, Tags = tags.ToList() };
                 PostManager.Create(JsonConvert.SerializeObject(post));

                 // Redirect
                 Response.Redirect("~/blog");
            }
            return View();
        }

        [Route("blog/edit/{id}")]
        public ActionResult Edit(int id)
        {
             if(Request.HttpMethod == "POST")
             {
                 // Post request method
                 var title = Request.Form["title"].ToString();
                 var tags = Request.Form["tags"].ToString().Split(new char[] { ',' }, StringSplitOptions.RemoveEmptyEntries);
                 var content = Request.Form["content"].ToString();

                 // Save content
                 var post = new BlogPostModel { Title = title, CreateTime = DateTime.Now, Content = content, Tags = tags.ToList() };
                 PostManager.Update(id, JsonConvert.SerializeObject(post));

                 // Redirect
                 Response.Redirect("~/blog");
             } else
             {
                 // Find the required post.
                 var post = PostManager.Read().Find(x => x.ID == id);

                 if (post != null)
                 {
                     // Set the values
                     ViewBag.Found = true;
                     ViewBag.PostTitle = post.Title;
                     ViewBag.Tags = post.Tags;
                     ViewBag.Content = post.Content;
                 }
                 else
                 {
                     ViewBag.Found = false;
                 }
             }

             // Finally return the view.
             return View();
         }
    }
}

The above code, is enough! This code contains the code that you may be needing. Now, I think I need to explain the code a bit.

I have implemented the CRUD functions, in this manner, I created the functions that would allow me to create a new post, read the list of posts, read a single post at the web page or perform other functions, like update the post. You can also see, that most of the codes and functions are being called from the model. That is why, I designed the model before I created the controller. I think now you understand the importance of a model before controller.

The controller would simply capture the request, extract the data from it and then pass the data and request over to the Model. The model would then perform as per our request and return a response, which can then be sent back to the client. The purpose of such a design, is to create a web application being consumed over by Web API too. In the later sections I will consider sharing that too.

Until now, the web application is able to show us messages on the blog. If we have created a post, it will show us the post otherwise it will show us a message that there is no post currently available.

3. Creating the views

Views are simple enough to be understood easily! If you have been developing using HTML, I won’t explain them. If you haven’t, go learn! 🙂

Default page…

The default page for the blog would be simple one, it would either enlist the blog posts otherwise show a message.

For this page, I would instead show the HTML code, and for the rest of the pages I will show the images, because I want to demonstrate how to use the actions.

@model List<PersonalBlogTemplateWithServices.Models.BlogPostModel>
@{
    ViewBag.Title = "My Blog";
}

@if(ViewBag.Message != null)
{
    <h4>@ViewBag.Message</h4>
}

@if(Model == null || Model.Count == 0)
{
    <h4>Blog empty</h4>
    <p>Either under development, or author is busy. Visit back again later! :-)</p>
    <a href="~/blog/create">Create new post</a>
}
else
{
    <h4>My blog</h4>
    <p>Read my blog posts below...</p>
    // Content is available.
    <a href="~/blog/create">Create new post</a>
    foreach (var post in Model)
    {
       int tagIndex = 1;
       <h4><a href="~/blog/read/@post.ID">@post.Title</a></h4>
       <p>
       @foreach (var tag in post.Tags)
       {
           if(tagIndex == post.Tags.Count)
           {
               <span class="tag"><a href="~/blog/tag/@tag">@tag</a></span>
           }
           else
           {
               <span class="tag"><a href="~/blog/tag/@tag">@tag</a></span>
           }

           tagIndex++;
       }
       </p>
   }
}

The page uses the conditional values from the controller. You may have noticed the value from Controller, which is passed as a model (of type of the BlogPostModel). I have checked against that, to see if there are any posts in the data source. That is pretty much simple and straight-forward. The main thing to see, if what happens if there is a new post in the data source. Consider the next section, please!

Creating the post

When you create a new post, you follow the hyperlink, which takes you to a page where you have created a form and so on. I am not much a designer-type, so the UI is very ugly. You can make it better if you want to.

The view for “C” in “CRUD, is something like this.

@{
 ViewBag.Title = "New Post";
}

<h2>Create new blog post</h2>

<form method="post">
    <label>Title</label>
    <input type="text" name="title" style="" class="form-control" placeholder="The headline goes here..." /><br />
    <label>Tags</label>
    <input type="text" name="tags" style="" class="form-control" placeholder="Separate each tag using a comma ','." /><br />
    <label>Content</label>
    <textarea name="content" class="form-control" style="height: 300px;" placeholder="What would you like to write?"></textarea><br />
    <input type="submit" style="width: auto; font-weight: 600;" value="Post" /><br />
</form>

Very simple though, yet powerful! Power is in your hands. Add some, or leave it if you do not want to share the admin panel with anyone. 🙂 Once this page gets loaded, it takes the following web page shape.

Screenshot (219)
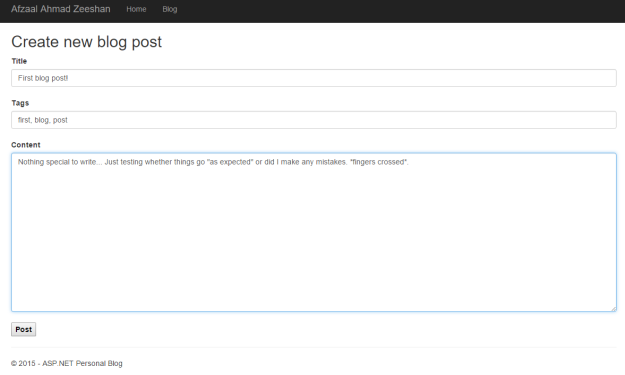
Figure 1: Create a new blog post page. Form is filled.

The above HTML takes this shape. The HTML looks clean because of hard work of

  1. ASP.NET team for providing a template.
  2. Bootstrap guys, Twitter bootstrap is being used here (is provided along with ASP.NET template)

You can now submit the post. Alright, until now things are pretty neat and simple. Do you have any questions? Please re-read this section. 🙂

Reviewing the default page now

If you go back to the default page now, you will see that the blog would now enlist the posts (currently only 1). The following is the image, you already have the HTML for this page.

Screenshot (220)
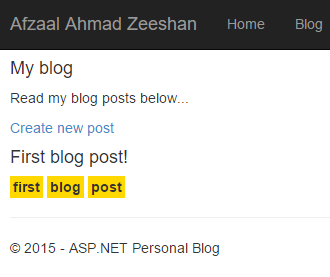
Figure 2: Default page showing one blog in the list. 

Now the page is able to demonstrate that we have a post, it displays the tags and name. Nothing else. After all, why would we show anything else on the default page?

Reading the blog posts, one by one

If you could read the HTML for the default page, you will see that the title of the blog post is actually a URL to the blog post, to be read. I have created the action for that (please read the controller code for Read action). This would let us now read the content,

Screenshot (221).png
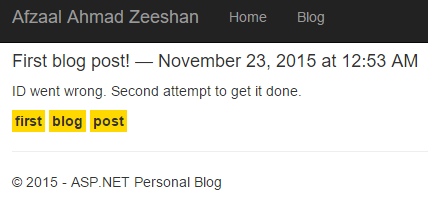
Figure 3: Reading the post, shows date time, content and tags. 

This is how I display the content. I agree, a very bad design. But I am very bad at designing the web applications. (I know, my first attempt went wrong because IDs were null and… Ah, you get it the second time, didn’t time? Quit whining!)

I used the following HTML code for this, the thing was that I just wanted to display the blog post, in a very simple way. Indeed in your case, you will write something much more useful. But, at the moment, just read this.

@model PersonalBlogTemplateWithServices.Models.BlogPostModel
@{
    ViewBag.Title = Model.Title;
    var tagIndex = 1;
}

<h4 style="font-weight: bold;">@Model.Title</h4>

<p>@Html.Raw(Model.Content.Replace("\r\n", "<br />"))</p>
<p>Posted by &mdash; Afzaal Ahmad Zeeshan &mdash; on @Model.CreateTime.ToString("MMMM dd, yyyy 'at' hh:mm tt")</p>
<p>
    Tagged under:
    @foreach (var tag in Model.Tags)
    {
        <span class="tag"><a href="~/blog/tag/@tag">@tag</a></span>
        if (tagIndex == Model.Tags.Count)
        {
            // In the end, write the edit hyperlink
            <span><a href="~/blog/edit/@Model.ID">Edit</a></span>
        }

        // Finally increment the index
        tagIndex++;
    }
</p>

So, this code would give us the post. I have many things hardcoded, like, “Posted by &mdash; Afzaal Ahmad Zeeshan &mdash; on {Date Time}”. You can change it, to see who is the author and so on. There are many other things to be taken care of.

One thing to understand is that your HTML is not the same that gets saved in the data source. So, you might need to re-consider the HTML, then render it using Html.Raw function. Have a look at the following code, for example,

<p>@Html.Raw(Model.Content.Replace("\r\n", "<br />"))</p>

Now, each of the occurrence of “\r\n” would be replaced with the breakline object in HTML. This way, you can re-build the HTML and show it as plain text on the HTML web page.

Updating the posts

The final concept that I will be talking about here would be of updating the posts. Updating is similar to creating the new post, but just that you also provide the previous data that you are having. Title, content and other stuff can be provided and then user is allowed to update them as required and then you save it back to the data source.

I have used the same HTML form in this case,

@{
 ViewBag.Title = "Edit the post";

 var tags = string.Join(", ", ViewBag.Tags as List<string>);
}

<h2>Edit the post</h2>

<form method="post">
    <label>Title</label>
    <input type="text" name="title" style="" class="form-control" value="@ViewBag.PostTitle" placeholder="The headline goes here..." /><br />
    <label>Tags</label>
    <input type="text" name="tags" style="" class="form-control" value="@tags" placeholder="Separate each tag using a comma ','." /><br />
    <label>Content</label>
    <textarea name="content" class="form-control" style="height: 300px;" placeholder="What would you like to write?">@ViewBag.Content</textarea><br />
    <input type="submit" style="width: auto; font-weight: 600;" value="Post" /><br />
</form>

This is similar to what we had previously. But it renders along with the previous data we had.

Screenshot (222)
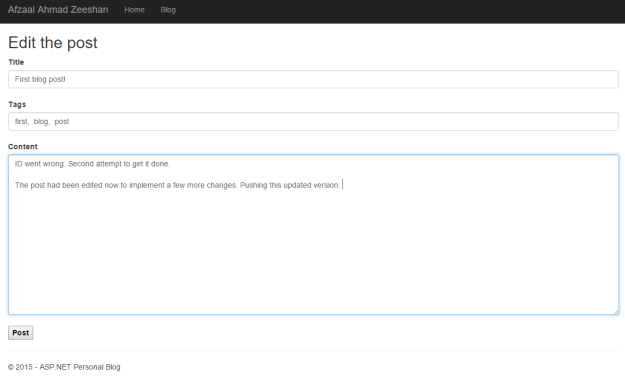
Figure 4: HTML page showing the form to edit the previously updated post.

As you can see, the post contains the previous data, but also allows me to update the post. This is useful, in cases when you want to update the post. I am adding a new paragraph line, which would then be rendered as it is being written.

Tip: This is not WYSIWYG editor, just a plain-textarea. You should get a WYSIWYG editor if you want to be able to use the full power of HTML in your post.

Now, once I will submit this, it would get published as this version. Please revise the controller action,

if(Request.HttpMethod == "POST")
{
    // Post request method
    var title = Request.Form["title"].ToString();
    var tags = Request.Form["tags"].ToString().Split(new char[] { ',' }, StringSplitOptions.RemoveEmptyEntries);
    var content = Request.Form["content"].ToString();

    // Save content
    var post = new BlogPostModel { Title = title, CreateTime = DateTime.Now, Content = content, Tags = tags.ToList() };
    PostManager.Update(id, JsonConvert.SerializeObject(post));

    // Redirect
    Response.Redirect("~/blog");
 }

This demonstrates, how you will update the post. Once again, we are using PostManager, the object we created in our model to be able to perform the actions. The post is now updated, have a look at the revisit to the post preview. Screenshot (223).png
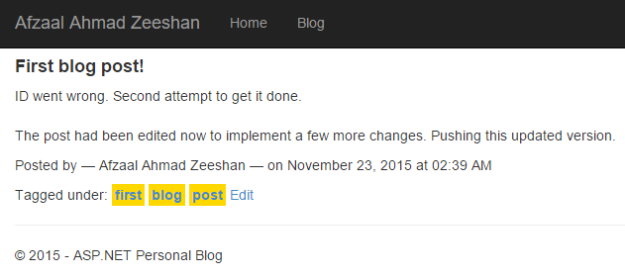
Figure 5: Updated post preview.

This now shows the updates being made. It is also clear as to how the new line is added to the post. Pretty simple it was, but I wanted to demonstrate the concept of this too.

Adding new posts

One more thing is, to add new posts. This is same, requires just a view. I am about to give you an overview of adding new posts, multiple posts and how does this preview them on the default page.

Screenshot (224).png
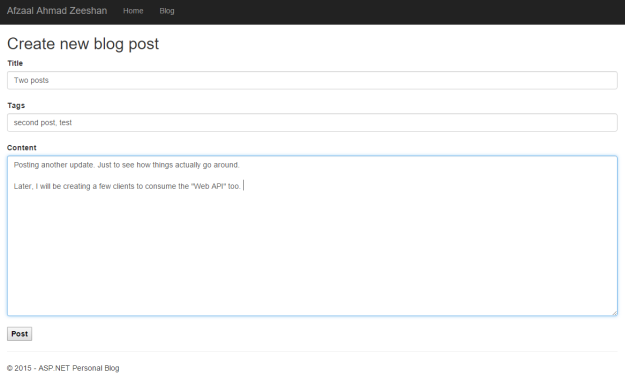
Figure 6: Creating a new blog post, second one.

This is similar, the only thing to understand is how is it rendered on the blog.

Screenshot (225).png
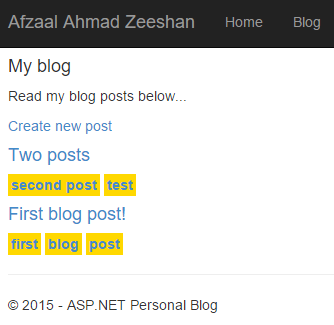
Figure 7: Two posts being previewed.

The thing that I wanted to share here, is that ASP.NET won’t automatically sort the posts, you would have to do that yourself. If you pay attention to the LINQ code, you will understand it.

// Just for sorting.
blogs = (from blog in blogs
         orderby blog.CreateTime descending
         select blog).ToList();

This would now sort the blogs, a descending order. That is why, “Two posts” shows above, whereas in the JSON data it would come after the “First blog post!” But we have now sorted the list as per our requirements.

Heading over to Windows 10 application and Web API

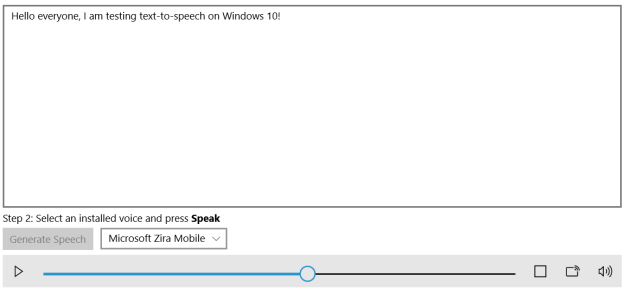
Before I actually head over, I want to make a final post, that would be read in the application! Please see the following image, then we continue to the next section.

Screenshot (226).png
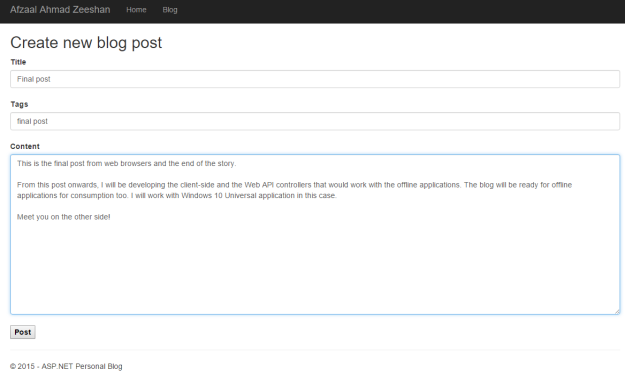
Figure 8: Final post online.

Web interface has been discussed enough, the next sections will talk about the Web API and Windows 10 application programming.

Further reading:

If you want to get more in-depth information, please read the following documents and articles.

  1. A tip for ajax developers in ASP.NET MVC framework
  2. Getting Started with LINQ in C#

Web API and Windows 10 client application

In this section, I will first talk about the ASP.NET Web API and then I will build the application to consume the API and show the blogs. In the client application, we do not need any functions, like create, update etc. We just consume and display the data, so the client application won’t have enough functions but it would display the content.

Building the API

Actually, the API is simple and does not need anything to be done! The application has already been completed, so our API would only redirect to the application and load the data from the model and return it. API does not need to have any HTML data or CSS stylesheets, instead API just returns the data in JSON or XML format. I personally recommend and always will recommend using JSON. XML is a very heavy format and is also not efficient. JSON is much simple, lightweight and portable format!

The API is just a controller, with the same actions that we need and a return-type. Since we do not need any functions but C (from CRUD), I defined the API to be as simple as,

using Newtonsoft.Json;
using PersonalBlogTemplateWithServices.Models;
using System;
using System.Collections.Generic;
using System.Linq;
using System.Net;
using System.Net.Http;
using System.Web.Http;

namespace PersonalBlogTemplateWithServices.Controllers
{
    public class BlogApiController : ApiController
    {
        // In this controller, we just need the Read functions. Nothing else!
        // We do not need the clients to be able to write or update the blogs... Just read them

        [HttpGet]
        [Route("blog/api")]
        public List<BlogPostModel> Get()
        {
            return PostManager.Read();
        }
    }
}

Small, but enough.This would let us consume the API from our client application. There is also no need to edit the API configuration, because I have provided the Routing scheme to the function.

[Route("blog/api")]

This would automatically get routed to this URL. The rest of the functionality is to be provided by the application.

One thing to note, is that this function again, reads the data from the model and returns is, as a collection. This would then be translated as JSON data later. So our application will be able to use the JSON converters to get the data from the API and render it on the application.

I hope things for API are clear upto this stage! If not, please re-read. I think the post is pretty much simple. 🙂

Building the client application; Windows 10 application

Great, until now you have learnt how to build the online blog, that has a web interface and an API interface. I will continue with the next post, to teach you how to consume the API, the post has gone way more than I was expecting (it overwent 4k words).

Read the above article and leave your feedback, I would love to hear it!

Points of interest

Thank you for reading the post, I have shared a common, yet easy and simple way to build your own blog. The post contains the information that you may need to have to create your own online personal blog. I have not shared any third-party library because I want you to be able to add your own. The blog is built on top of native ASP.NET frameworks.

In a later post, I will also share the common concepts for building the data sources, so that the only dependency of “Newtonsoft.Json” would also be removed from this project. Until then, please bear with me.

One more thing, the text editor used is plain-textarea, you can replace it with your favorite WYSIWYG editor to be able to use the power of HTML, then render the HTML on the screen.

In coming days, I will write two more posts:

  1. Consuming the Web API from Windows 10 application.
  2. Building your own custom data sources.

Stay tuned for more of such content! 🙂

Using C# for cross-platform development

Introduction and Background

I wrote a bunch of articles about C# programming, but all of them were Windows or .NET oriented. I want to write an article about C# programming on multiple platforms. C# is a very powerful and strong programming language with a very solid foundation over programming concepts. The language is indeed designed to work on high-level applications and initially it was designed to run for .NET applications only, but as time passed it got introduced to other platforms and applications too.

In this article, I will share a few things that you can do on Windows and Linux. I don’t own a Macintosh so I won’t be able to share that concept but I guarantee the procedure to program a Mac application in C# is also similar to this one! Cross-platform itself means to be able to do everything that you can do one platform, on another one too. C# is able to do the same, on every platform. The concept only requires to modify your compilers to be able to accept new environments, same thing applies to C++ and Java and other similar high-level programming languages. C# also works in a similar manner. The concept of C# compilation is that the code doesn’t compile down to machine code. Instead C# code is compiled down to a bytecode, which is later assembled and translated to machine code by the virtual machine; .NET’s virtual machine! That is what makes C# programming language very powerful and at the same time flexible and portable programming language.

If you are a “diagram” lover, please view the following image:

IC15013
Image from MSDN article: Introduction to the C# Language and the .NET Framework

The assemblies are sent to virtual machine, who then translates the code using their metadata and other stuff all the way down to the metal. That is exactly, why it is possible to execute the same C# code on every machine, every platform and every architecture (x86 and x64). Although the instructions are different, but bytecode helps C# to be executed on any machine! In this article, I am going to use the same concept (and a tool) to help you write native applications on other platforms, too.

References:

If you want to learn more about C# or cross-platform, you may read the following contents,

  1. Cross-platform programming: An open-source overview
  2. Introduction to the C# Language and the .NET Framework

Cross-platform tools for C#: Mono Project

If you started programming on Windows, you might have used Visual Studio as your first IDE and specifically, chances are that you started programming using C# programming language. C# is widely used, that it managed to get attention of developers from other platforms and systems too. Mono Project is one of such products which came up not in a near future, but had been known since a while. Mono Project was started to provide C# developers a cross-platform experience. Mono Project can be installed on the following platforms:

  1. Windows
  2. Linux
    This counts any of the distro of Linux kernel, Ubuntu, Red Hat and so on.
  3. OS X

Mono Project can then be used to compile the C# projects as a native application on that platform. In my opinion, that is pretty much self-explanatory, each platform has the resources and architecture information and the related binaries used to target the platform, Mono Project uses those resources and compiles the project down to bare metal components.

In this post I am going to use Mono IDE, not Visual Studio, because Mono is a cross-platform C# development environment, whereas Visual Studio is a Windows-only tool. But C# can be used on other platforms, all thank you to Mono Project! Using Mono Project you can build,

  1. Console applications in C#
  2. Graphical applications using C#
  3. ASP.NET web applications

Mono Project also allows you to use VB.NET, but I won’t be talking about that, instead I am going to cover C# only.

Getting starting…

First of all, you may want to install the Mono on your environment. If you are using Windows, then (in my opinion), you should consider using Visual Studio. You can get Visual Studio Community for free if you are a student, learner, open-source developer or a small team. That’s the beauty of Visual Studio. But, if you are going to develop applications using C# where Visual Studio is not supported, you should consider downloading and installing Mono Project, which includes everything starting from the Mono documentation, Mono IDE and the compilers for the languages.

I did say, that you should try Visual Studio on Windows but if you want to learn other environment on Windows, you can for sure install Mono on your Windows environment too. It would give you a much better experience to program C# applications on non-Windows environment and all by just using terminal or command-line commands to compile and use the application. I have learnt a lot of things by using the terminal in Linux environment, so I would also recommend you guys to give it a try!

Installing Mono

Installing the Mono is different on different environments, on Windows and Mac it is pretty much same. All you have to do is to download the installer and run it. It installs everything for you. But on the environments, like Linux you have to create repositories and then start installing the packages. That takes a bit of time. I will show you how to do that on all of the environments!

1. Installing on Windows/OS X (Mac)

The procedure to install on Windows and Mac is similar. Just download the package and then go install it, by executing the installer. It would install the Mono project including all of the dependencies, files and executables. You can then use your Mono project to build C# applications on platforms, other than .NET themselves.

Install Mono on Windows
Install Mono on Mac OS X

2. Installing on Linux (or Linux distros)

Now the things here get complicated. In Linux, you are going to use the terminal and then execute the commands to build the repository systems and then install the packages, for every Linux distro, it is different process so that may also cause a trouble and that is why I won’t be sharing a single script “to rule it all”, instead I will be providing you with a link that contains all of the scripts that you should execute to get your job done! In the Linux environments, you can execute commands differently to have your job done! Head over to this page to find out which command set would work on your environment. That page would give you the commands that you can execute to set up the environment. Rest assured, now you can execute the following command in your own environment to install the Mono assemblies.

sudo apt-get install mono-complete

This command may also differ based on the environment, some may use yum, some may use rpm or others. Please refer to your own installer commands.

Wait, I cannot find the IDE. Where is it?

Correct, until now, you have only installed the binaries and assemblies required to make Mono workable. You have not yet installed the IDE. Until now you just installed the compilers and binaries. To install the IDE, execute the following command:

sudo apt-get install monodevelop

Now, head over to your IDE that was recently installed and start it! You are going to love it, and well, the folks have seriously put some great efforts in it.

Screenshot (1547)
Ubuntu Studio showing the list of IDEs.

Screenshot (1549)
Hello world project opened in Mono Project.

In the next step, I will share a few example of using C# to build cross-platform applications. Head over to the next step!

References:

I am attaching a few good links in this section too,

  1. Visual Studio Community
  2. Mono Project — Official Website
  3. Install Mono

Building the applications

In this section, I will show you three sample codes for C#, which you already do know in .NET environment. The samples are not to give a new task in C#, but rather just a simple code, to help you understand how C# can be used to execute commands on different environments, different platforms and so on.

Hello world from Linux

First of all, I want to make my application greet me, from a Linux environment, using the same code that you would use on .NET environment. You all are already aware of the following code,

using System;
using System.Net.Http;

namespace HelloWorld
{
   class MainClass
   {
        public static void Main (string[] args)
        {
            Console.WriteLine ("Hello, who's there?");
            string name = "";
            name = Console.ReadLine ();
            Console.WriteLine (string.Format("Hello {0} from Linux using C#.", name));
        }
    }
}

Aren’t you? Yes, it’s the same “elementary” C# code to greet someone! This time, running on a non-.NET environment. This would just prompt me for some input and then continue to do what it was intended to do.

Screenshot (1550)

Pretty simple, right? But notice that this code now runs on native Linux environment. There is no underground .NET frameworks supporting it. In real, it is the Mono Runtime that actually does the processing underground. Please read the reference to Mono Runtime in the references below.

C# programming using collections

Collections are a great resource in any application, you can accept a long record of user data in a single object, that is of type: Collection. C# has been providing generic programming objects, for collections. Collections are much better than arrays, because collections are mutable, unlike arrays. In this section, I will show you how to write an application that consumes the collections.

I created a class object, to hold the values of the people. Then I created a list to hold “some” people and then printed their values. It is also a similar code.

using System;
using System.Net.Http;
using System.Collections.Generic;

namespace HelloWorld
{
    class MainClass
    {
        public static void Main (string[] args)
        {
            // Create the list of the people.
            var people = new List<Person> ();
            people.Add (new Person { Name = "Afzaal Ahmad Zeeshan", Age = 20 });
            people.Add (new Person { Name = "Sofiya Zeeshan", Age = 19 });
            people.Add (new Person { Name = "Daniyal Ahmad Rizwan", Age = 15 });
            people.Add (new Person { Name = "Eminem", Age = 43 });

            // Printing the details for people.
            foreach (var person in people) {
                Console.WriteLine (person);
            }
        }
    }

    class Person {
        // Provide the attributes.
        public string Name { get; set; }
        public int Age { get; set; }

        // Override the default ToString
        public override string ToString ()
        {
            return string.Format ("[Person: Name={0}, Age={1}]", Name, Age);
        }
    }
}

How this code actually ran, please see below.

Screenshot (1551)

It just prints everything and then terminates. These were a few things that were basic. Let’s try out if C# still has the same power or not, why not try out Internet access in C#?

Using C# to access online resources

Now in this section, I will be referring an online API of my own to access the data. This may make things a bit tough, if you have never worked with System.Net namespaces in .NET framework. I will be using an object from these namespace and then I will call the functions to actually download the data from an online API and then I will print it.

Linux also provides the similar manner to use the TCP/IP protocol that is why C# code written for Windows would work in a similar manner with Linux and other Mac’s OS X system.

In the following code, I have also used another concept in C#, asynchronous programming. Mono supports async models of C#, and you can avail the services right in the IDE, just like Visual Studio. The code I have used is like the one below,

using System;
using System.Net.Http;
using System.Collections.Generic;

namespace HelloWorld
{
    class MainClass
    {
        public static void Main (string[] args)
        {
            downloadAndPrint ();
        }

        private static void downloadAndPrint() {
            System.Threading.Tasks.Task.Run (async () => {
                using (var client = new HttpClient()) {
                     Console.WriteLine ("Downloading the data...");
                     var message = await client.GetStringAsync("http://afzaalahmadzeeshan.gear.host/api/sample");
                     Console.WriteLine();
                     Console.WriteLine(message);
                }
            }).Wait();
            Console.WriteLine ("Exiting the function..");
        }
    }
}

The above code simply downloads the response as string and prints it. This shows, that C# not only just works in the console, but it also works perfectly with the protocols on different systems. All of this is managed by the Mono Runtime.

Screenshot (1552)

So, I guess this is enough to demonstrate how C# can be used.

References:

A few topics that you should consider reading:

  1. The Mono Runtime
  2. HttpClient Class
  3. List<T> Class
  4. Asynchronous Programming with Async and Await

Points of Interest

In this article, I have demonstrated how you can use C# to develop cross-platform applications. There is no need to learn multiple languages to target multiple frameworks and application systems. You can use one single programming language, even C#, and write native applications on multiple platforms.

Although C# doesn’t execute natively, even on those platforms. Mono Runtime is responsible for executing the applications on those platforms. Just like .NET’s virtual machine or Windows Runtime executes C# code on Windows environments. On other platforms (and including Windows if compiling and using Mono), you can use Mono Runtime to target the platforms and make use of .NET libraries and lightweight programming model of C# programming language.

I hope you like this article, wait up for the next articles, or write back to me to get more. 🙂

Considerations for C# Corner profile theme

Ever since new profile theme came out on C# Corner I had been asking myself, “Isn’t this page a bit over congested?” Indeed the profile page is, pretty much congested with many things that can be put forth to different areas or at least things can be shifted a bit. I think I should consider sharing a few of my own ideas about the design.

At the moment, my C# Corner profile looks something like this,

Screenshot (1216)

From the obvious look, a few things are unclear or at least they need some more details to actually share their purpose on the profile page.

  1. Rank of the user, it is unclear whether his rank is increasing or whether he is falling in rank.
  2. Read on articles, same. Unclear whether he is gaining traffic or whether he is loosing it.
  3. Reputation (2.5k) is enough, but 2537 would have been more better. Or at least the full marks should be provided in the “title” attribute.

I also thought about a few other things. Like the awards are not being visible in the “first glance”. No one would care whether someone has 10 features articles or whether they share code snippets or not (because C# Corner is a programmer-oriented community, so indeed everyone is posting something related to “code”), the main thing to share is what is their stand on the platform. Are they MVP? Are they Speaker? Are they a Chapter Leader?

These would (and should) motivate the readers to follow the author and would allow them to read the content with a “guarantee” that the author has good potential and the content is “community’s recommended”. So, I also changed the location of awards and achievements too, also I provided a suggestion to showcase the awards list.

Changes or suggestions

First of all, I want to suggest the following changes to the profile page. The awards must come above, right under the profile picture. Just like to any officer, their badge and level comes right on their chest to showcase their level. Our “badges” must also come right under our picture! Not under the bio. Bio can be very long.

Since bio can be very long. It can be truncated! 🙂

Screenshot (1307)_Editted

In the above image, the awards are visible and are present right under the image. Then, list of awards and status changes are being shared.

  1. MVP awards for years.
  2. VIP status achieved
  3. Became chapter of {city}, {month-year}.
  4. So on.

Then I also suggest to make the BIO a little truncated. 5-6 lines is enough, take the rest of the lines to another page, like “about” and show other relative data there.

I have also made a few changes to the profile page, I removed the “Joined Since” date, that is not required to know. I also made a few changes to social buttons and other stuff.

Screenshot (1216)_Editted

This would now give the developers a lot of space to actually show a detail statistic about the user. Like his rank, his repatation change, his total count rating and so on. C# Corner currently has “Writes about” on the top, that is not (IMO) correct place to keep it. 🙂 It can be kept somewhere, where reader doesn’t focus.

Make more pages…

I would like to suggest to make 2 more pages. As per this design, it would be needed to support more 2 pages:

  1. Contributions: Where readers can visit and categorize and view the contributions in form of articles, blogs and news etc.
  2. About: Where the rest of the information about a user is present. You can surely add the “Joined Since” date here. If someone is interested in knowing when a user joined C# Corner, they can go to the “About” page.

More page would make the profile page less congested, as it is right now. Also, loading less data would make it possible to load the pages faster and with more efficiency. The suggested design would make it possible to demonstrate the current state of user in C# Corner, and not just his “BIO” and “Writes About”. In the old design, most of the page is taken over by “irrelevant” stuff.

About and Contribution pages are good. Also, remove the unwanted or un-contributed categories. I have not contributed any video, so do not include it on my profile, I have not contributed any photo, do not include it either and so on. Just showcase the content that I have and make it count.

Cross-platform programming: An open-source overview

Since past few months, I have been very active in cross-platform environment and open-source programming frameworks and operating systems. I have found many great tools, many things caused me some troubles, many things needed some experienced vision and some things were pretty much obvious. I find it interesting that open source community is a great community and people who actually share their experience have much more knowledge than any of the individual present in a proprietary software owning company. The reason is simple, the members of an open source community are:

  1. Open and always welcoming new ideas.
  2. They share their experience.
  3. They are welcoming the negative comments on their experience.
  4. They are not looking forward for any thing to be repaid with.
  5. They enjoy programming and they like to “solve puzzles”. Most open source contributions are solutions to “real world” problems.

In this article of mine I am going to focus on the aspects of cross-platform programming and open source community impacts, that make the regular day programming even better! If you are a programmer, I would love to recommend that you take a trip to open source community and enjoy a few days off for cross-platform development. Programming itself is not just about C#, Java or Python. There are many programming languages, markup languages, compilers and tools already available in the outside world that you would love to use and get your hands dirty in.

When I started programming, I always thought that I am never going to leave this one framework. But as I started learning stuff, I enjoyed them. I really enjoyed using each and every single framework and I really want you to enjoy that same joy. 🙂 This article is dedicated to open source community and cross-platform languages and compilers. I will demonstrate a few of the compilers, a few languages (the languages that you know of!) and a few operating systems to try out.

Introduction: Open source community and platforms

If you are a newbie to computer programming, then you may be asking yourself what is “open-source” and what is this term “cross-platform”. Hold your thought, in this section I will provide you with a good introduction as to what these two things are. Pretty much, it could have been done by forwarding you to Google, much rude! Or I could just try to give you a simple-English introduction of these two things.

opensource-400
Open source software is mostly research or helpful programs.

Open-source projects and communities

Ever since computers got introduced, yeah, back in the days of ENIAC, MANIAC and so on. Back in those days, computers were not as easily programmed as they are right now. Programmed? Even there were no “a lot of” programming languages. There were just a few, FORTRAN, Assembly language, COBOL and so on. In those days, Dennis Ritchie, the great programmer at AT&T, developed C programming language because every time a new mainframe was created. He had to re-write the software for it from ground-up. He invented C, implemented the first C program and indeed used Assembly language to compile the C programs. He did not keep it to himself, he created

  1. C language
  2. First compiler for C, at that time it was written in Assembly language
  3. Unix
  4. A concept that, “Everything is a process, unless it is a file“.

He did not keep them to himself. Instead, he shared the compiler, language, operating system. That is a separate story that AT&T claimed the proprietary rights later. But, Dennis did what he could.

This way, open source community started in computer universe. Open-source, as the name states, means a project or program or algorithm, whose “source code” has been provided “openly” to the public without having them to pay anything at all, but respect! Thus open source community means a community where programmers:

  1. Look forward for real-world problems and confusions.
  2. Find a logic for that problem.
  3. Develop a solution for that problem, in a way that they can.
  4. Implement the solution for themselves.
  5. Share the solution
    In its full form. Without claiming anything, and allowing anyone to use it.
  6. Community reviews and share their opinions (positive and negative) on the solution.
  7. Community can also make changes to the solution, to make it better.
  8. Then forward the updated version.

Not only just this way helps other programmers, but it also invites more advanced genius people to contribute their ideas too, forming a big great idea!

osi
Collective thinking can result in a great idea!

I am highly convinced that every programmer who plays his part in open source community does earn something, respect. The most valuable factor in this universe. They are the unsung heroes.

open-source2
Superheroes do not need to be praised! They just do the good stuff.

If you make up your mind to contribute toward open source communities, I would recommend that you do so. It doesn’t only share your views with the world but also makes it possible for others to fix your mistakes so that you know where to focus next time.

How to contribute?

Contributing to open-source community is very simple. Create a new project and just publish it. You can:

  1. Publish the project on one of the open source communities, such as GitHub.

But before you do that, please read the terms and licenses. Even open source projects need a license so that “you continue to earn the respect“.

Open source initiative.

Cross-platform support: Meaning?

That was the discussion for open source projects. Now let us discuss a few things about cross-platform support. But first, you need to understand what a platform itself is?

native-and-cross-platform
Did you know: Cross-platform is also a platform, supporting minor platforms. 

What is a platform?

A platform is a computer hardware and software combination on which a program runs. A platform is a combination of both hardware resources, such as

  1. CPU frequency
  2. RAM size
  3. HDD space
  4. GPU capacity
  5. Much more based on your program.

… And also the software platform being provided to install on, such as:

  1. Operating system
  2. Third-party or extended framework; .NET or JVM for example.

These collectively create a single platform. You develop an application that runs on a platform, for example if you create a C# application for .NET’s WPF or WinForms platform, application will only run on that framework; .NET framework. Similarly, the applications that you develop for Windows won’t run on Linux and the ones for Linux won’t run on OS X for Mac. That is why, keeping the platform in mind is one of the most important factor to be kept in mind while programming.

What is cross-platform support?

Cross-platform support means to support and run on multiple platforms. In a sense, it means that a code is able to run on multiple frameworks, platforms, operating systems and machine architectures.

A cross-platform programming language is the one that is able to run on multiple frameworks, operating systems and machine architectures. There are many factors that cause the language or tool to be able to run on multiple machines and platforms. Compiler, language used, statements and resource consumption is one of these things that you should consider while programming.

For example, C and C++ code is cross-platform because the compiler translates the code to Assembly language for the architecture of the machine being used. Same thing happens. I will demonstrate the use of C and C++ on multiple frameworks a bit later. For now, you should only understand what cross-platform support it.

Cross-platform also means to support devices of any size, from mobile to big screen computers.

Responsive
Cross-screen development has been popular in web development.

Cross-platform support not only provides you with good experience on multiple platforms, operating systems or tools. It also provides you with a great set of audience. Cross-platform support “exponentially” increases the users for your application. Consider this, if you have an application that only runs on Windows. What if you can run the same application on Android, iOS, Xbox and so on and earn revenue from those platforms too?

That is why, it is always recommended to consider “cross-platform” standards also while developing an application. There are many great tools for cross-platform development. For example, you can build using:

  1. C# — C# can be used to develop for Windows, Linux and OS X using Mono.
  2. Java — Java is a very great language, high-level yes, and the bytecode can be executed by JVM wherever it can be installed.
  3. C or C++ — These languages just need your compiler to be translated and fine-tuned to support a platform. The languages are fully packed with excellent power and toolset to “make your computer do anything!
Exercise

Ever wondered how does the following C++ program always work on every platform in a similar manner?

#include <iostream>

int main() {
    std::cout << "Hello world from C++.\n";
    return 0;
}

Compile it on Windows, it would work. Compile it on Linux it would work on Linux too. Why? I would recommend that you find answers to these problems before I actually write and complete my next article, which is about how programs are executed on different platforms and frameworks.

See you in the next post.

How to get started in computer programming?

Introduction and Background

This article is pretty much focused toward the beginners and newbies in programming field. If you are a beginner in computer programming, have been in this field and don’t have any idea of how to turn the odds in your own favor, this post has got you covered. In this post I will try to share my own experience with you, to teach you how to get started on the right path in programming. Programming and programmers are the friendly ones you may think of. We do create a very friendly product, but it doesn’t mean we are also friendly and that we like to be bugged often. We don’t, and that is just the Rule #1!

In this post, I will share how to get started, what to learn, how to learn and in case you get trouble, what to do.

Keep calm and learn to code
Keep calm, it’s just the beginning!

How to get started?

Computer programming is a very interesting topic nowadays, many beginners just want to join computer programming for the sake of “show off”. It is not a bad thing to do, after all everyone wants to get some attention, some limelight and some fun to do. Computer programming is all of them! No one is left behind, no one is junior (unless they are hired) and everyone can share their knowledge with each other because the platform is very much concise and short.

Computer programming can be of many types, you may want to build software for native metal, you may want to build software for users, you may want to write a program that manages the networking and so on and so forth. The programming languages are also of many types, there are many paradigms involved and above all, there are many “confusing” concepts involved that may blow your mind off before you can even start. I am writing this article to categorize things a bit. 🙂

First of all, just ask yourself a question, what do you want to do with computer programming? There are many answers and every reader that reads this would have a separate opinion to be used. I understand, everyone has a separate perspective from where they see computer. The start of computer programming is by learning computer architecture. Just like cricket, to start playing cricket, you first of all learn what “cricket” is. You learn that this is a game, where two players are standing on pitch, waiting for a baller to ball and the rest are standing at random locations in the ground and so on. Then you start playing cricket, in the beginning you get out, you cannot catch the ball and many other mistakes. Which demonstrate your lack of experience. As time passes, you are experienced and you are a good player. You may be recruited by a “league” to play for them and you become professional.

In a similar manner, to start programming, you start by learning what a computer is! You start by learning about different components of computer. No computer programmer would be found, who doesn’t know where a variable is stored, what processes the commands and so on. If you are unaware of these, please read more about computer architecture.

pfig1
Computer architecture.

Not always, but mostly a computer is a machine that comprises these components. That definition, “A computer is an electronic machine that processes your input data and provides you with an output” is a very old one. Let go of it for a while and learn more about what is computer made of.

I would like to recommend some books and resources, please read them and learn more about computer architecture before diving any further.

Recommended books for Computer Architecture

  • Computer Organization and Architecture: Designing for Performance
  • Computer System Architecture by M. Morris Mano

You may also want to read some more in-depths on Wikipedia.

What is difference between program and programming?

If you are aware of computer, you would also know that a computer itself is not capable of doing anything at all. Computer needs to be taught to do something. Those instructions are “programs”. They are written in a programming language, in a way that is understood by the computer. Actually what happens is something different and in the coming sections, I will cover that.

Programming language is the language in which a program is written in. The language depends on the nature of program. If you want to create a program that controls the hardware from a very low-level, then chances are that you are going to use a programming language that is very close to the machine, otherwise, if you just want to make-up a beautiful GUI program then you will be using a high-level language. Since you are beginner, you will find it interesting to know that there are multiple language for each purpose, already defined and being used.

After all, programming is just like solving the puzzle.

images

Low-level programming vs high-level programming

In programming, you may also want to chose your side. There are types of software programs, some run in the background, where as some run in the front-end to maintain everything that user interacts with. You can then of them as services and buttons. Each button can turn on one service, user is not able to see how a service is performed, but he can see either button is turned on or off and so on.

Below are the descriptions for both, low and high level programming concepts. You can read them and consider choosing one of them wisely.

Low-level programming

Low-level programming is mostly done by “expert” programmers, they have big beard, no hairs on their head, big belly and, they have no sense of dressing. *No offense*

Low-level programming is done using a language that is very much closer to the metal itself. Machine language, Assembly language and C are a few examples of low-level programming languages. Most of the systems are written in Assembly language mixed with some of C programs. Kernel, file system managers, clock managers and similar stuff, they are all written in C.

C provides programmers with a very “solid” grasp over the hardware. You can write any program in C, that your machine is capable of executing. Most of the hardware devices, such as music players can be programmed in C itself. Linux kernel was written in C.

Characteristics of a low-level language:

  1. Smaller memory benchmark.
  2. Good performance.
  3. Easily understood by machine, thus executable.
  4. Smaller in size, not many libraries to work with.
  5. Has to be re-written for every platform.

High-level programming

Since low-level programming handles how computer actually processes, high-level programming focused on the make-over of these programs. High-level programming languages such as Java, C# or C++ focus more on how to create user-applications. Your web browsers, games etc. are written in Java or C# language.

High-level languages are human-readable and very much easy to learn and use for building daily-use applications. Java and C# for example, are very short and concise application programming languages. Languages are very much smart, most of the job is done by language itself.

Microsoft, Oracle and individual programmers have built such languages. Bjarne Stroustrup is one of such individuals. The frameworks they have built is a cross-platform platform. Which means that the same code block can execute on multiple platforms, unlike the previous languages.

Characters of high-level language:

  1. Easier to understand and use.
  2. IDEs process and manage most of the project configuration.
  3. Require compilation, before it can be executed.
  4. Cross-platform support.
  5. Memory-management and resource check-up included.

Reference and recommendation for further read:

You may consider starting learning programming languages from the following links (or books)

You may also consider reading online resources, such as from C# Corner, CodeProject or you may also read my blogs and articles. I have written a number of articles for beginners.

Great, so how to start programming?

If you have read above content, and you are reading to start programming. Please consider selecting a language. A language is more like a tool, or weapon that you are going to use on a war. Choose one wisely, master it and then use it to “program“. Below I will share my experience with some programming languages that I would suggest you to use, you can also share your own experience if you think mine is lacking something.

C programming language:

One of my favorite programming languages, ever built! C is a very powerful programming language and includes everything that you need to in a low-level environment. That’s right, C is used in low-level environment.

Compilers for C language come for free, GNU C compiler (GCC compiler) is one of these compilers. C programming language is used to write operating system kernels, where performance is a “must-have“.

// Sample Hello world program in C
#include <stdio.h>

void main() {
   printf("Hello world from C.");
}
  1. C is a very concise programming language.
  2. Performance factor is really very high!
  3. It can be used on any platform and environment. Highly portable.
  4. You need to manage the memory yourself!
  5. Can be used to write anything.

C++ programming language:

C programming language was designed to be very fast, efficient and portable. When Bjarne started working with C, he noticed that it did not include the concepts of Object-oriented programming. So, he added them in the form of classes, inheritance and overloading. Thus, C++ was born.

C++ is also a good programming language and is low-level and high-level. Both at the same time. Low-level because it is still C, it uses the same concept and philosophy, but can be used to create GUI programs on Windows, Linux and Mac OS X. That is why, it is considered both low and high language.

GNU compiler to C++ can be captured for free! Visual C++ compiler from Microsoft is also a free compiler in Express editions of Visual Studio. I would recommend using Visual C++ or G++ compiler.

// Sample hello world program in C++
#include <iostream>

void main() {
   std::cout << "Hello world from C++.";
}
  1. C++ is a great language to write programs in.
  2. Cross-platform support.
  3. Object-oriented programming language.
  4. Performance is still fast, but not as much as of C, because of the “++“.

Note: Never use Turbo C++ or Borland C++. They are not using or teaching standard C++. Read this post of mine for more on this.

Java programming language

Now we have reached a level above. High-level languages are very easy to learn, easy to write and the IDEs are very much smart that they tell you where there are problems in your source code. So you do not have to focus on anything at all, everything is managed. The code is compiled and streamed down to machine by the IDE itself.

Java was designed to be “cross-platform”, fast, portable and easy. Java uses a special type of compilation, just-in-time. Just-in-time compilation means that the code is compiled on run-time based on the architecture. This means that the code you compiled is never compiled to binary code. The code is compiled to “bytecode”, which is then compiled to machine code when application starts executing. Java uses a virtual machine to execute the code, JVM. This makes the code cross-platform, but also has a cost of performance. Java compilers can be downloaded from Oracle along with the SDK for Java.

Java also supports object-oriented programming paradigm. Java was actually developed to program sandwich toasters, not it is being used on Android operating system too. 🙂

// Sample hello world from Java
class Program {
   public static void main(String[] args) {
      System.out.println("Hello world from Java.");
   }
}
  1. Java is easy to learn and write.
  2. Java code is compiled to bytecode, which uses JIT compiler to compile to native code.
  3. Java uses memory-management to automatically clean up RAM and resources.
  4. Java is a short language, but the simplicity has costed performance a lot.
  5. JVM also requires some RAM to work, in most cases JVM costs 175MB of RAM for itself alone.

fig6_2
Process of compilation of Java source code.

C# programming language

Then comes the prodigal son, C# programming language. Initially C# was designed to work for .NET framework by Microsoft. C# gained popularity so fastly, that Microsoft started using C# for rest of their frameworks, such as Windows Runtime, ASP.NET and so on.

Just like Java, C# is also compiled down to bytecode, then it is compiled to machine code by .NET framework’s virtual machine. C# is similar to C++ in many ways, even their syntax is very much similar. Some say, C# is similar to Java, no it is not. It doesn’t even share the syntax.

C# uses Visual Studio as its IDE, Visual Studio Community edition comes free of cost for learners and self-starters. You can use Visual Studio to get started programming your applications in C# in no time. Visual Studio is one of the best things Microsoft has ever produced!

C# is used to write applications from low-level services (not kernel) to high-level GUI programs like browsers, music players and so on. C# has a great performance factor and is very easy to learn as compared to Java. I started learning programming using C# language and it was very easy for me to learn C#.

// Sample hello world from C#
using System;

namespace Example {
    class Program {
        public static void Main(string[] args) {
            Console.WriteLine("Hello world from C#.");
        }
    }
}
  1. C# is a very easy language and has a great community of helpers.
  2. C# is high-level language.
  3. C# has a great IDE, Visual Studio; world’s best IDE.
  4. C# can be used on multiple platforms (like Linux, OS X etc.) using Mono-Project.
  5. C# can be used to build web applications, software applications and many more programs.

bapp01f001
Process of compilation of C# source code.

Where to look for help?

I may sound a bit “friendly” to you, but I am not. Send me an email with subject “My code doesn’t run, says NullReferenceException”, and I will show the definition of “rage”. In such cases, when you stumble upon an error, do not ask questions. Because every programmer has went through the same stages, done the same mistakes, but they are very “egoistic” to accept that you are just like them. So am I!

In case if you get an error, please Google for it. For example the problem, “NullReferenceException error” (which is a C# exception), Google will return a number of “good” answers or solutions to this problem. You may also find my article in the Google results, What is a null error in code Execution. These articles, blogs and answers are already posted across the internet, for you to read and understand.

Programming is all about understanding. No one will ever spoon feed you! Because that is your own job, to feed yourself. If you are unaware of anything, don’t be shy. Just ask Google. Google will provide you with “excellent” articles and blogs by “expert” developers and programmers. Read them, try them and understand them.

If you still don’t get a good answer (provided that you have tried to Google for it at least once) you may continue to ask for a question at one of the following great communities.

  1. C# Corner
  2. CodeProject
  3. Stack Overflow

Chances are that you will get a good answer to your questions, very soon! 🙂

What’s next?

Computer programming doesn’t just stop there. Learning a programming language is just the beginning. The main part of computer programming is to use the concept of programming and to build something useful. There are many computer fields that require your interest.

  1. Graphics
  2. Networking
  3. Cryptography
  4. File systems
  5. Kernels

Many more similar things can be learnt, understood and built using a programming language at hand. C and C++ can be used mostly, but in many cases you might also want to use C# or Java.

Programming is all about solving a puzzle. Just the way you use Mathematics to find the area under curve, you would be using programming to solve a computer problem, like cryptography to ensure the data is secure. Once you have learnt these languages, continue to apply your knowledge and experience to these fields. That is where you belong, if you have learnt the basics of computer programming! Computer programming is all about making computers better. Computers, themselves, are just idiots. We are making them genius.

I have always focused my students on learning new things that they can do using programming languages. There are many things yet to be done, there are many things that can be done in a better way. There are many algorithms that can be made better and so on. Programming is not just about re-inventing the wheel. It is about making the wheel better in performance.

Point of Interest

Of course this won’t teach you anything, but this article would give you a good overview of learning programming, getting started and how to learn the language. I have shared my experience and “ideas” with you here. I am sure you will find your own things as you start learning!

Programming never ends, like a “cricket” match does. Once you reach a finish line or milestone, go for the next one. That is how C is turned into C++ and that is how J# is turned into C# and so on.

I wanted to tell you what these frameworks are, what high and low level languages are, I hope you get the idea. 🙂

Good luck!