Category Archives: Linux programming

Considerations for SQL Server on Linux

Introduction and Background

SQL Server has been released for Linux environments too, and after ASP.NET we can now use SQL Server to actually workout our servers on Linux using Microsoft technologies without having to purchase the licenses and pay a fortune. But that is not the case, at least for a while… Why? I will walk you through these critical aspects of the SQL Server and Linux continuum in this post, I am really looking forward to exploring a lot of things right here with you, by reading this post, you will be able to go through many areas of SQL Server on Linux and see if you really need to try it out at the moment or if you need to wait a while before diving any deeper in the platform.

I personally enjoy trying new things out… There are many out there who just try things out, I F… no, no, I dissect things up to share the in-depths of what everything has, what everything says and really is and finally, should you consider it or not. That is the most important part. After all, it is you, who is the main focus of my attention I want to tell you, share with you, what I find. Thus, by reading my post, you will get idea about many things — SQL Server is in its initial versions on Linux so, this post is primarily a feedback, overview of SQL Server and not a rant on the product in anyway.

SQL Server 2016 available on Linux

Now starts the fun part, I believe almost all of you are aware of the fact that SQL Server 2016 is available on Linux after serving Windows only since a great time, plus .NET Core is available on Linux too, and if you have been reading my past articles and blogs you are aware of fact that I am a huge fan of .NET Core framework and how it helps Microsoft to ship their products to other platforms too.

Microsoft announced SQL Server availability on Linux quite a while ago, and many have started downloading and using the product.

sql-loves-linux_2_twitter-002-640x358
Figure 1: SQL Server “heart” Linux. No pun intended. 

Of course the benefit is for Linux users and developers because they now have more options, whether they like SQL Server or not is a different thing in itself. I personally enjoy the tools, such as SQL Server Management Studio, which is a free software to manage databases using SQL Server. The tool can be used for most of the database engines, however Microsoft only engines.

There are many posts that give a good overview and introduction to SQL Server on Linux, and I am not going to dive deeper into them… As I have an exam of Database Systems tomorrow. So, help yourself with a few of,

  1. https://www.microsoft.com/en-us/sql-server/sql-server-vnext-including-Linux
  2. https://docs.microsoft.com/en-us/sql/linux/sql-server-linux-get-started-tutorial
  3. https://blogs.technet.microsoft.com/dataplatforminsider/2016/11/16/announcing-sql-server-on-linux-public-preview-first-preview-of-next-release-of-sql-server/ (This is a must read!)

Without further delay, let us go on to the installation of SQL Server on Linux section, and see how we can get our hands on those binaries.

Installation of SQL Server engine

SQL Server, like on Windows, comes separately from tools. You have to install SQL Server and then you later install the tools required to connect to the engine itself — Note: If you can use .NET Core application, then chances are that you do not even need the SQL Server Tools for Linux at the moment. You can just straight away execute the commands in the terminal, I will show you how… And in my experience I found this method really agile and as per demand.

So, fire up your machines and add the keys for packages that you are going to access, download and install.

$ curl https://packages.microsoft.com/keys/microsoft.asc | sudo apt-key add -
$ curl https://packages.microsoft.com/config/ubuntu/16.04/mssql-server.list | sudo tee /etc/apt/sources.list.d/mssql-server.list

These will set up the repositories to your machine that you can then use to start downloading the packages.

screenshot-7008
Figure 2: curl executing.

Finally, refresh the sources and start the installation,

$ sudo apt-get update
$ sudo apt-get install mssql-server

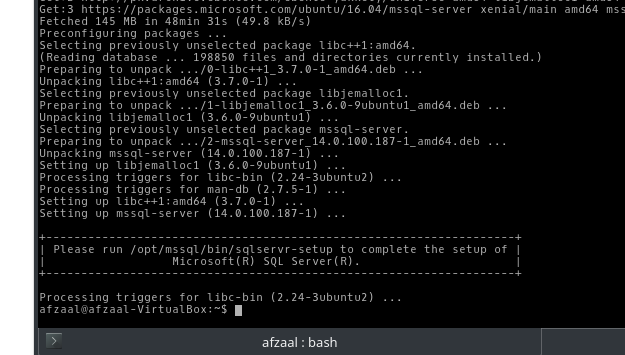
You will be prompted to enter “y” and press “Enter” key to continue the installation. This process will download and install the binaries in your system. It downloads the files and scripts that will later on set up the system for your instance, Once the setup finishes, you may execute the following script to start “installation” of SQL Server 2016 on your machine.

screenshot-7010
Figure 3: SQL Server installed on Ubuntu. 

$ sudo /opt/mssql/bin/sqlservr-setup

Authenticate this script, as it requires a lot of permissions in order to generate the server’s engine on your machine. The default hierarchy is like this,

screenshot-7007
Figure 4: Files in the installation directory, ready to install engine. 

You can see the setup script in the list, execute it in the terminal and it will guide you through setup.

screenshot-7011
Figure 5: SQL Server installer requesting user password during installation. 

You will accept the terms, enter password etc. and server will be installed. Simple as that. But yeah, do remember the password you need it later to connect — there is no Trusted_Connection property available in this one.

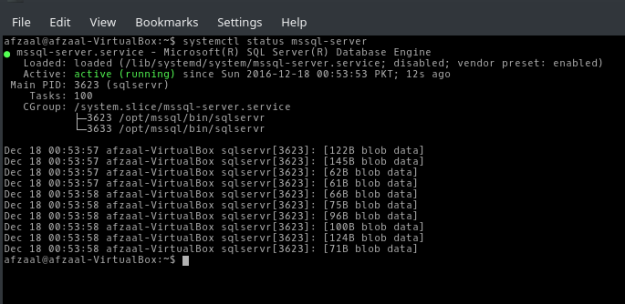
You can also test the service to see if that is running properly, or running at all by going down to your task manager and looking for the running services. First of all, you can execute the following command to see if the server is running,

$ systemctl status mssql-server

screenshot-7013
Figure 6: The screenshot shows that the response has everything required to see whether service is running or not.

In most operating systems you can find the same under processes too,

screenshot-7016
Figure 7: SQL Server collects telemetry information; the last process tells this. 

Once everything is working we can move onwards to download and install tools.

Installing SQL Server 2016 Tools

On Linux, the choice you have is very small and selected. You may download and install a few helpers and tools if you would like, such as “sqlcmd” program. Just giving a short overview of the steps required to install this package and to use it for some tinkering.

The procedure is similar to what we had, add keys, install the server,

$ curl https://packages.microsoft.com/keys/microsoft.asc | sudo apt-key add -
$ curl https://packages.microsoft.com/config/ubuntu/16.04/prod.list | sudo tee /etc/apt/sources.list.d/msprod.list

Then finally use the following command,

$ sudo apt-get update 
$ sudo apt-get install mssql-tools

The installation won’t take longer and you will be able to get the packages that you can later use, I won’t be showing these off a lot.

$ sqlcmd -S localhost -U sa

Do not enter password in the terminal at all, let the program itself ask for the password and user will enter it later, secondly user input will not be shown on the screen.

screenshot-7017
Figure 8: Result of SQL query in sqlcmd program.

This is enough and I don’t want to talk any more about this tool, plus I do not recommend this at all, why? See the result of SQL query below,

> SELECT serverproperty('edition')
> GO

screenshot-7018
Figure 9: Result of an SQL query, totally unstructured. 

The results are not properly structured so they are confusing, plus you have to scroll up and down a bit to see them properly. So, what to do then? Instead of using this I am going to teach you how to write your own programs… I already did so, and I thought I should again for .NET Core.

Writing SQL Server connector app in .NET Core

I am going to use .NET Core for this application development part, it is indeed my favorite platform there is. On the .NET world, I wrote the same article using .NET framework, you can read that article here, How to connect SQL Database to your C# program, beginner’s tutorial. That tutorial is a complete guide to SQL Server, targeted at any beginner in the platform field. However in this, I am not going to explain the basics but I am just going to show you how to write the application and how to get the output.

Note: You should read that article for more explanations, I am not going to explain this in depth. I will not be explaining System.Data.SqlClient either, it is available in that post I referred to.

You will start off by creating a new project, restoring it, and finally open it up in Visual Studio Code.

$ dotnet new
$ dotnet restore
$ code .

I ignored the new directory creation process, thinking you guys know it yourself. If you have no idea, consider reading a few of my previous posts for more on this topic, such as, A quick startup using .NET Core on Linux.

After that, add a new file to your project, name it SqlHelper, add a class with same name in it,

using System;
using System.Data.SqlClient;

namespace ConsoleApplication
{
    class SqlHelper 
    {
        private SqlConnection _conn = null;

        public SqlHelper() 
        {
            _conn = new SqlConnection("server=localhost;user id=sa;password=<password>");
            _conn.Open();
            Console.WriteLine("Connected to server.");
        }
    }
}

You still require a simple SQL connection string for your database engine, there is a website that you can use to get your connection strings. I initially told you there is no version of using trusted_connection here because there are no Windows accounts here that we can utilize. Now, call this object from your main class and you will see the result.

using System;

namespace ConsoleApplication
{
    public class Program
    {
        public static void Main(string[] args)
        {
            new SqlHelper();
        }
    }
}

screenshot-7019
Figure 10: Connected to the server.

The results are promising as they show we can connect to the server here. Now we can move onwards to actually create something useful. Let us just try to execute the commands (that we executed above) in our newly developed system, update the code to start accepting requests of SQL commands.

using System;
using System.Data.SqlClient;

namespace ConsoleApplication
{
    class SqlHelper 
    {
        private SqlConnection _conn = null;

        public SqlHelper() 
        {
            _conn = new SqlConnection("server = localhost; user id = sa; password = <password>");
            _conn.Open();
            Console.WriteLine("Connected to server.");
            _execute();
        }

        private void _execute() 
        {
            if (_conn != null ) 
            {
                Console.BackgroundColor = ConsoleColor.Red;
                Console.ForegroundColor = ConsoleColor.White;
                Console.Write("Note:");
                Console.BackgroundColor = ConsoleColor.Black;
                Console.ForegroundColor = ConsoleColor.Gray;
                Console.WriteLine(" You may enter single line queries only.");

                while(true)
                {
                    Console.Write("SQL> ");
                    string query = Console.ReadLine();
                    using (var command = new SqlCommand(query, _conn)) 
                    {
                        try {
                            using (var reader = command.ExecuteReader()) 
                            {
                                while (reader.Read()) 
                                {
                                    Console.WriteLine(reader.GetString(0));
                                }
                            }
                        } catch (Exception error) {
                            Console.WriteLine(error.Message);
                        }
                    }
                }
            }
        }
    }
}

This will start executing and will request the user to enter SQL commands, you can see how this works below,

screenshot-7020
Figure 11: Connecting and executing SQL queries on SQL Server. 

So, you have seen that even a simple .NET Core program to write and manage the queries is way better are structuring the sqlcmd program on Linux. You can update this as per needed.

Tips, tricks and considerations…

In this section I will talk about a few of the major concepts that you must know and understand before diving any deeper in SQL Server on Linux at all, if you don’t know these, then chances are you don’t know SQL Server too. So, pay attention.

1. Default Directory?

There are so many articles out there already, yet no one seems to be interested in telling the world where the server gets installed. Where to find the files? How to locate database logs etc?

In Linux, the default directory is, “/var/opt/mssql/<locked out>“. You need to have admin privileges to access and read the content of this directory. So, I got them and entered the directory.

$ sudo dolphin /var/opt/mssql/

“dolphin” is the file manager program in KDE, sorry the display was not so much clear so I selected everything for you too what is inside.

screenshot-7021
Figure 12: Data in the “data” directory under “mssql” directory.

You can surf the rest of the directory on your own, I thought I should let you know where things actually reside. On your system, in future, it might change. But, until then, enjoy. 😉

2. Edition Installed

On Windows, you are typically asked for edition that you need to install on your machine. On Linux that was not the case and it installed one for us. The default one (and at the moment, only possible one) is SQL Server Developer edition. This edition is free of cost, and it has everything that Enterprise edition has.

To confirm, just execute,

SELECT serverproperty('edition')

Or, have a look above in figure 9 or 11, you can see the edition shown. All of recent products of Microsoft based on .NET Core are x64 only. ARM and x86 are left for future, for now.

3. Usage Permissions

Yes, you can feel free to download, use and try this product out, but remember you cannot use it in production or with production data. This is the only difference in Enterprise and Developer edition of SQL Server 2016.

If you head over to SQL Server 2016 editions, you can see the chart clearly.

screenshot-7022
Figure 13: No production rights are available in Developer edition.

Thus you should not consider this to be used with production data. You can, until a time when it is allowed, you should stick with Windows platform and download Express edition. It has more than enough space for small projects.

4. Should you use it?

Finally, if you are a learner like me, if you want to try something new out, then yes of course go ahead and try it out. You can install a Ubuntu on a VirtualBox to try this thing out if you’d like.

If you find something new, message me and we can chat on that. 🙂

Creating and hosting ASP.NET Core application on Linux — Nothing Third-Party

Introduction and Background

It has been a while since I wanted to write something about ASP.NET Core hosting stuff, and Kestrel was something that was interesting from my own perspective. Previously I have written a bunch of stuff to cover up the basics of ASP.NET Core programming and in this one I will guide you on hosting the ASP.NET Core application natively, using the .NET Core libraries that you download while installation process. Secondly, it has been a while since I have had written anything at all and I might have forgotten the interests of my readers so excuse me if I miss out a few things.

image_60140ec0-ce46-4dbf-a14f-4210eab7f42c
Figure 1: Image captured from Scott Hanselman’s blog.

There is a lot of stuff to share in this post today, so stay tuned and hold your breath basically. I will be covering the following steps in this article:

  1. Installation of the latest version of .NET Core on Linux environment
    • If you already have a .NET Core framework installed, upgrade your system if that doesn’t support ASP.NET programming as of now.
    • In the previous versions, web development wasn’t support in .NET Core for Linux operating systems. In the recent versions, it has been added to the recent versions now so that is why I insist that before continuing you at least install the latest version of .NET Core.
  2. Setup an ASP.NET Web Application in your Linux environment.
    • I will guide you through many stages, such as development, editing, maintenance and using an IDE for all of these things.
    • I will walk you through many different areas (not the ASP.NET Area!) in ASP.NET web application’s file hierarchy, plus I will tell you what is back and what is about to change (or subject to change in the hierarchy).
  3. Build and run the project
    • In this section, I will guide you through a few of the tips that would deem helpful to you.
    • Before running, I will give you an overview of Kestrel — web server for ASP.NET 5.
    • I will then move onwards to using the website, which has the same feel as it had in Windows operating system, while developing ASP.NET web applications.
    • Tip: I will then give you a tip, by default, application is uploaded at 5000 port, which you would require to change in many cases, I will show you how to change the port of the web application’s hosting service.
  4. Finally, I will head over to final words that I put at the end of every post that I write on any of the platform that I have to write about.

Installing or upgrading .NET Core

I wrote an article that covered how you can start using .NET Core on Linux environments, you can read it here. That article was written entirely, to give you a concept of the .NET Core architecture, and a few commands that you can use to do most of the stuff. The only difference between the older article and this section of the post is that this would just contain a later version of .NET Core to be installed on the system. Whereas in the previous one you had to install the older one.

Try the following,

sudo apt-get update && dist-upgrade

If that doesn’t work, or it doesn’t show the updates, head over to the main website for .NET Core, and install the latest version from there.

Creating a new web application

Previously, .NET Core only supported creating libraries or console applications. At the moment, it supports ASP.NET web application development too, it supports the templates for ASP.NET too, at the moment just a simple ASP.NET MVC oriented web application is created, and I don’t think there is any need for other templates like Web API, SignalR, single page applications etc. I believe that is complete at the moment.

To create a new web application, create the new project in .NET Core and pass the type parameter as a web application, which would guide .NET Core (dotnet) to create a new application with the template of web application.

screenshot-3007
Figure 2: Creation of a new .NET Core project using web template. 

As you can see in the command above, we are passing a type (-t parameter) to the command to create a new web templated application. The content is as following,

screenshot-3008
Figure 3: ASP.NET Web application files and directories in .NET Core. 

The project looks similar to what we have on Windows environment. Just a difference of one thing: It includes, web.config as well as project.json file. Remember that Microsoft is mostly moving back to MSBuild and of course a few of the hosting modules are based on IIS servers so that is why web.config file is available in the project. However, the project at the moment uses project.json file for project-level configuration and (as we have heard mostly during these days) these would be migrated to MSBuild way of managing the project and other related stuff.

Editing and updating the web application

Microsoft has been pushing the limits since a while, of course on Linux you already had a few of the best tools for development but Visual Studio Code is still a better tool. In my previous posts, I said that I don’t like it enough — I still don’t like it very much, it needs work! — but it is better than many tools and IDEs available for C# or .NET-related programming. Since in this post I said that I won’t be talking about anything third-party, so Visual Studio Code is the tool that I am going to suggest, support and use in this case.

You can install Visual Studio Code from their official website, note one thing, the Debian packages take a little longer for installation, so if you also don’t like to wait too much like me then I would recommend that you download the archive packages and install the IDE from them. There is no installation required at all, you just move the extracted files to a location where you want to store it. FInally, you create a symbolic link to your executable, which can be done like this,

sudo ls -s /home/username/Downloads/VSCode-linux-x64/code /usr/local/bin/code

This would create link and you can use Visual Studio Code IDE just by executing this “code” command anywhere in the directory (using the terminal), it would then load the directory itself as a project in the IDE which you can then use to update your application’s source code and other stuff that you want to.

Tip: Install the C# extension from market place for a greater experience.

Once this is done, head over to the directory where you create the project. Execute the following command,

code .

This would trigger Visual Studio Code to load your directory as the project in the IDE. This is how my environment looks like,

screenshot-3009
Figure 4: Visual Studio Code showing the default ASP.NET directory as a project.

The rest is history — I mean the rest is the similar effect, and feeling that you can get on Windows environment. First of all, when you work this way and follow my lead you will get the following errors in the IDE window.

screenshot-3010
Figure 5: Error messages in Visual Studio Code.

We will fix them in a moment. But at first, understand that these are meant to act like this. If you have had ever programmed in .NET Core, you must have known that before anything else you need to restore the NuGet packages for your project before even building the project. Visual Studio Code uses the same IntelliSense and tries to tell you what is going wrong. In doing so, it requires the binaries which are not available so you are shown that last error message. Above two are optional, middle one is a bit optional-required.

Build and run the project

Until this point we have had created the project. But now we need to restore the dependencies for our project which are going to be used by the .NET Core to actually execute our code. By default a lock file is not generated, so we need to create a new file and after that we would be able to build the project.

Execute the following command,

dotnet restore

After this, .NET Core would automatically generate the lock file and building process can be easily triggered.

screenshot-3012
Figure 6: Project.lock.json file created after restoring the project.

We can continue to building the project. I want you to pay attention to this point now. See what happens.

screenshot-3013
Figure 7: Build and run process of ASP.NET web application on .NET Core.

Now notice a few things in the above terminal window. First of all, notice that it keeps logging everything. Secondly, notice that it has a port “5000” appended. We didn’t train it to use that at all, and that also didn’t come from Program.cs file either (you can see that file!). But before I dig any deeper in explanation of how to change that, I want you to praise KestrelThe web server of ASP.NET 5. Kestrel is the implementation of libuv async I/O library that helps hosting the ASP.NET applications in a cross-platform environment. The documentation for kestrel and the reference documentation is also available, and you can get started reading most of the documentation about Kestrel, on the namespace Microsoft.AspNetCore.Server.Kestrel at the ASP.NET Core reference documentation website.

This is the interesting part because ASP.NET Core can run even on a minimal HTTP listener that can act as a web server. Kestrel is a new web server, it isn’t a full feature web server but adapts as community needs updates. it supports HTTP/1 only as of now but would support other features in the coming days. But remember, pushing every single feature and module in one server would actually kill the major purpose of using the .NET Core itself. .NET Core isn’t developed to push everything on the stack, but instead it is developed to use only the modules and features that are required.  Yes, if you want to add a feature you can update the code and build the service yourself. It is open sourced on GitHub.

Changing the port number of application

In many cases, you might want to change the port number where your server listens or you may also want to make this server the default server for all of your HTTP based communication on the network. In such cases, you must be having a special port number assigned (80-for default).

For that, head over to your Program.cs file, that is the main program file (main function of your project), and that is responsible for creating a hosting wrapper for your web application in ASP.NET Core environment. The current content for this object is,

screenshot-3015
Figure 8: Source code for the Program.cs file.

In that chain of “Use” functions, we just need to add one more function call to use a special URL. The function of “UseUrls(“”)” would allow us to update the URLs that are to be used for this web application. So I am just going to use that function here so that it would let us simply select which URL (and port) to use.

screenshot-3017
FIgure 9: URLs being managed.

Now, if you try to run the application you will run into the following problem in Linux-based system.

screenshot-3019
Figure 10: Unable to bind to the URL given, error message.

That is pretty much simple — it doesn’t have permission to do the trick. So what on Linux systems is done is that it simply is performed using the superuser credentials and account.

sudo dotnet run

It would prompt you for your password, enter your password and this time application would run on the localhost:80. In the cases where you have to upload the website to the servers, Azure App Services etc. In these cases, you are requires to have the application running under the server that acts as the default server, so in those cases you must handle the default TCP port for HTTP communication for the requests. Otherwise, you might require to work at the backends of NGINX or Apache servers etc. But that is a different story.

screenshot-3020
Figure 11: Web server running at port 80.

Now that our server is running, we can now go to a web browser to test it out. I am going to use Firefox, you can use any web browser (even a terminal-based).

screenshot-3021
Figure 12: ASP.NET Core web application being rendered in Firefox, running in Linux using Kestrel web server.

As you can see, the web application runs smoothly. Plus, it also logs any event that takes place. The terminal keeps a record of that, it can also allow you to actually transfer the output from main terminal’s output to a file stream to store everything. But that is a topic for a different post.

screenshot-3022
Figure 13: ASP.NET web application’s log in terminal window.

As requests come and responses are generated, this window will have more and more content.

Final words

I have wanted since a while, to write my own next web application for my own blog and stuff, in ASP.NET Core. At the moment, the framework is “almost” ready for production, but just not yet. Maybe in a couple of next builds it will be ready. There are many things that they need to look into. For example, the web server needs to be more agile — the features needs to be provided. That is not it, VIsual Studio Code must be fully integrated with ASP.NET Core tooling. At the moment it just allows us to edit the code, then we have to go back to the terminal to do the rest. It should provide us with the ability to do that.

To Microsoft’s team related to .NET Core: Why isn’t .NET Core being published on Linux? I am pretty much sure the framework is fully function, despite the bugs. But there are bugs in the main .NET framework too, there are some minor issues every here and there. My major concern here is to be able to do, “sudo apt-get install dotnet”. I can’t remember the longer version names.

To readers: If you are willing to use ASP.NET Core for your production applications, wait for a while. Althought ASP.NET Core is a better solution than many other solutions available. But my own recommendation is to stick to ASP.NET 4.6 as of now because that is more stable version as compared to this one.

A quick startup using .NET Core on Linux

I know you may be thinking… This post is another rhetoric post by this guy, yes it is. 🙂 .NET Core is another product that I like, the first one being, .NET framework itself. It was last year when .NET Core got started and Microsoft said they are going to release the source code as a part of their open source environment and love. By following the open source project environment and ethics, Microsoft has been working very hard in bringing global developers toward their environments, platforms and services. For example, .NET framework works on Windows, C# language is used to build Windows Store applications, C# is also the primary language in Microsoft’s web application development framework, ASP.NET and much more. The online cloud service of Microsoft is also programmed in C#; primarily. These things are interrelated to each other. Thus, when Microsoft brings all of this as an open source project, things start to get a lot better!

Everyone knows about the background of .NET Core, if you don’t know, I recommend that you read the blog post on Microsoft, Introducing .NET Core. The(ir) basic idea was to provide a framework that would work with any platform, any application type and any framework to be targeted.

Introduction and Background

In this quick post, I will walk you through getting started with .NET Core, installing it on a Linux machine and I will also give my views as to why install .NET Core on a Linux machine instead of Windows machine, I will then walk you through different steps of .NET Core programming and how you can use terminal based environment to perform multiple tasks. But first things first.

I am sure you have heard of .NET Core and other of the cool stuff that Microsoft has been releasing these years, From all of these services the ones that I like are:

  1. C# 6
    • In my own opinion, I think the language looks cleaner now. These sugar-coated features make the language easier to write too. If you haven’t yet read, please read my previous blog post at, Experimenting with C# 6’s new features.
  2. .NET Core
    • Of course, who wouldn’t love to use .NET on other platforms.
  3. Xamarin acquisition
    • I’m going to try this one out tonight. Fingers crossed.
  4. Rest are all just “usual” stuff around.

In this post I am going to talk about .NET Core on Linux because I have already talked about the C# stuff.

Screenshot (898)
Figure 1: .NET Core is a cross-platform programming framework by Microsoft.

Why Linux for .NET Core?

Before I dive any deeper, as I had said, I will give you a few of my considerations for using .NET Core on Linux and not on Windows (yet!) and they are as following. You don’t have to take them seriously or to always consider them, they are just my views and my opinions, you are free to have your own.

1. .NET Core is not yet complete

It would take a while before .NET gets released as a public stable version. Until then, using this bleeding edge technology on your own machines won’t be a good idea and someday sooner you will consider removing the binaries. In such cases, it is always better to use it in the virtual machine somewhere. I have set up a few Linux (Ubuntu-based) virtual machines for my development purposes, and I recommend that you go the same.

  1. Install VirtualBox (or any other virtualization software that you prefer; I like VirtualBox for its simplicity).
  2. Set up an Ubuntu environment.
    • Remember to use Ubuntu 14.04. Later ones are not yet supported yet.
  3. Install the .NET Core on that machine.

If something goes wrong. You can easily revert back where you want to. If the code plays dirty, you don’t have to worry about your data, or your machine at all.

2. Everything is command-line

Windows OS is not your OS if you like command-line interfaces. I am waiting for the BASH language to be introduced in Windows as in Ubuntu, until then, I am not going to use anything that requires a command-line interface to be used on my Windows environment. In Linux, however, everything almost has a command-line interface and since the .NET Core is a command-based program by Microsoft that is why I have enjoyed using it on Linux as compared to Windows.

Besides, on command-line interface, creating, building and running a .NET Core project is as simple as 1… 2… 3. You’ll see how, in the sections below. 🙂

3. I don’t use Mac

Besides these points, the only valid point left is then why shouldn’t we use Mac OS for .NET Core is because I don’t use it. You are free to use Mac OS for .NET Core development too. .NET Core does support it, its just that I don’t support that development environment. 😀

Installation of .NET Core

Although it is intended that soon, the command would be as simple as:

$ sudo apt-get install dotnet

Same command is used on Mac OS X and other operating systems other than Ubuntu and Debian derivatives. But until the .NET Core is in development process that is not going to happen. Until then, there are other steps that you can perform to install the .NET Core on your own machine. I’d like to skip this part and let Microsoft give you the steps to install the framework.

Installation procedure of .NET Core on multiple platforms.

After this step, do remember to make sure that the platform has been installed successfully. In almost any environment, you can run the following command to get the success message.

> dotnet --help

If .NET is installed, it would simply show the version and other help material on the screen. Otherwise, you may want to make sure that that procedure did not incur any problems during the installation of the packages. Before I get started, I want to show you the help material provided with “dotnet” command,

afzaal@afzaal-VirtualBox:~/Projects/Sample$ dotnet --help
.NET Command Line Tools (1.0.0-preview1-002702)
Usage: dotnet [common-options] [command] [arguments]

Arguments:
 [command]      The command to execute
 [arguments]    Arguments to pass to the command

Common Options (passed before the command):
 -v|--verbose   Enable verbose output
 --version      Display .NET CLI Version Number
 --info         Display .NET CLI Info

Common Commands:
 new           Initialize a basic .NET project
 restore       Restore dependencies specified in the .NET project
 build         Builds a .NET project
 publish       Publishes a .NET project for deployment (including the runtime)
 run           Compiles and immediately executes a .NET project
 test          Runs unit tests using the test runner specified in the project
 pack          Creates a NuGet package

So, you get the point that we are going to look deeper into the commands that dotnet provides us with.

  1. Creating a package
  2. Restoring the package
  3. Running the package
    • Build and Run both work, run would execute, build would just build the project. That was easy.
  4. Packaging the package

I will slice the stuff down to make it even more clearer and simpler to understand. One thing that you may have figured is that the option to compile the project natively is not provided as an explicit command in this set of options. As far as I can think is that this support has been removed until further notice. Until then, you need to pass a framework type to compile and build against.

Using .NET Core on Linux

Although the procedure on both of the environments is similar and alike. I am going to show you the procedure in Ubuntu. Plus, I will be explaining the purpose of these commands and multiple options that .NET provides you with. I don’t want you feel lonely here, because most of the paragraphs here would be for Microsoft team working on .NET project, so I would be providing a few suggestions for the team too. But, don’t worry, I’ll make sure the content seems to be and remain on-topic.

1. Creating a new project

I agree that the framework development is not yet near releasing and so I think I should consider passing on my own suggestions for the project too. At the moment, .NET Core supports creating a new project in the directory and uses the name of the directory as the default name (if at all required). Beginners in .NET Core are only aware of the commands that come right after the “dotnet”. However, there are other parameters that collect a few more parameters and optional values such as:

  1. Type of project.
    • Executable
      • At the moment, .NET only generates DLL files as output. Console is the default.
    • Dynamic-link library
  2. Language to be used for programming.

To create a new project, at the moment you just have to execute the following command:

$ dotnet new

In my own opinion, if you are just learning, this is enough for you. However, if you execute the following command you will get an idea of how you can modify the way project is being created and how it can be used to modify the project itself, including the programming language being used.

$ dotnet new --help
.NET Initializer

Usage: dotnet new [options]

Options:
 -h|--help Show help information
 -l|--lang <LANGUAGE> Language of project [C#|F#]
 -t|--type <TYPE> Type of project

Options are optional. However, you can pass those values if you want to create a project with a different programming language such as F#. You can also change the type, currently however, Console applications are only supported.

I already had a directory set up for my sample testing,

Screenshot (899)
Figure 2: Sample directory open. 

So, I just created the project here. I didn’t mess around with anything at all, you can see that the .NET itself creates the files.

Screenshot (900)
Figure 3: Creating the project in the same directory where we were.

Excuse the fact that I created an F# project. I did that so that I can show that I can pass the language to be used in the project too. I removed that, and instead created a C# program-based project. This is a minimal Console application.

In .NET Core applications, every project contains:

  1. A program’s source code.
    • If you were to create an F# project. Then the program would be written in F# language and in case of default settings. The program is a C# language program.
  2. A project.json file.
    • This file contains the settings for the project and dependencies that are to be maintained in the project for building the project.

However, once you are going to run you need to build the project and that is what we are going to do in the next steps.

2. Restoring the project

We didn’t delete the project. This simply means that the project needs to be restored and the dependencies need to be resolved before we can actually build to run the project. This can be done using the following command,

$ dotnet restore

Note: Make sure you are in the working directory where the project was created.

This command does the job of restoring the packages. If you try to build the project before restoring the dependencies, you are going to get the error message of:

Project {name} does not have a lock file.

.NET framework uses the lock file to look for the dependencies that a project requires and then starts the building and compilation process. Which means, this file is required before your project can be executed to ensure “it can execute”.

After this command gets executed, you will get another file in the project directory.

Screenshot (902)
Figure 4: Project.lock.json file is now available in the project directory.

And so finally, you can continue to building the project and to running it on your own machine with the default settings and setup.

3. Building the project

As I have already mentioned above, the native compilation support has been removed from the toolchain and I think Ubuntu developers may have to wait for a while and this may only be supported on Windows environment until then. However, we can somehow still execute the project as we would and we can perform other options too, such as publishing and NuGet package creation.

You can build a project using the following command,

$ dotnet build

Remember that you need to have restored the project once. Build command would do the following things for you:

  1. It would build the project for you.
  2. It would create the output directories.
    • However, as I am going to talk about this later, you can change the directories where the outputs are saved.
  3. It would prompt if there are any errors while building the project.

We have seen the way previous commands worked, so let’s slice this one into bits too. This command, too, supports manipulation. It provides you with optional flags such as:

  1. Framework to target.
  2. Directory to use for output binaries.
  3. Runtime to use.
  4. Configuration etc.

This way, you can automate the process of building by passing the parameters to the dotnet script.

4. Deploying the project

Instead of using the term running the project, I think it would be better if I could say deploying the project. One way or the other, running project is also deployed on the machine before it can run. First of all, the project I would show to be running, later I will show how to create NuGet packages.

To run the project, once you have built the project or not, you can just execute the following command:

$ dotnet run

This command also builds the project if the project is not yet built. Now, if I execute that command on my directory where the project resides, the output is something like this on my Ubuntu,

Screenshot (904)
Figure 5: Project output in terminal.

As seen, the project works and displays the message of, “Hello World!” on screen in terminal. This is a console project and a simple project with a console output command in C# only. That is why the program works this way.

Creating NuGet packages

Besides this, I would like to share how you can create the NuGet package from this project using the terminal. NuGet packages have been in the scene since a very long time and they were previously very easy to create in Visual Studio environment. Process is even simpler in this framework of programming. You just have to execute the following command:

$ dotnet pack

This command packs the project in a NuGet package. I would like to show you the output that it generates so that you can understand how it is doing everything.

afzaal@afzaal-VirtualBox:~/Projects/Sample$ dotnet pack
Project Sample (.NETCoreApp,Version=v1.0) was previously compiled. 
Skipping compilation.
Producing nuget package "Sample.1.0.0" for Sample
Sample -> /home/afzaal/Projects/Sample/bin/Debug/Sample.1.0.0.nupkg
Producing nuget package "Sample.1.0.0.symbols" for Sample
Sample -> /home/afzaal/Projects/Sample/bin/Debug/Sample.1.0.0.symbols.nupkg

It builds the project first, if the project was built then it skips that process. Once that has been done it create a new package and simply generates the file that can be published on the galleries. NuGet package management command allows you to perform some other functions too, such as updating the version number itself, it also allows you to specify framework etc. For more, have a look at the help output for this command,

afzaal@afzaal-VirtualBox:~/Projects/Sample$ dotnet pack --help
.NET Packager

Usage: dotnet pack [arguments] [options]

Arguments:
 <PROJECT> The project to compile, defaults to the current directory. 
 Can be a path to a project.json or a project directory

Options:
 -h|--help Show help information
 -o|--output <OUTPUT_DIR> Directory in which to place outputs
 --no-build Do not build project before packing
 -b|--build-base-path <OUTPUT_DIR> Directory in which to place temporary build outputs
 -c|--configuration <CONFIGURATION> Configuration under which to build
 --version-suffix <VERSION_SUFFIX> Defines what `*` should be replaced with in version 
  field in project.json

See the final one, where it shows the version suffix. It can be used to update the version based on the build version and so on. There is also a setting, which allows you modify the way building process updates the version count. This is a widely used method for changing the version number based on the build that produced the binary outputs.

The NuGet package file was saved in the default output directory.

Screenshot (905)
Figure 6: NuGet package in the default output directory.

Rest is easy, you can just upload the package from here to the NuGet galleries.

Final words

Finally, I was thinking I should publish a minimal ebook about this guide. The content was getting longer and longer and I was getting tired and tired, however since this gave me an idea about many things I think I can write a comparison of .NET Core on Windows and Linux and I think I have enough time to do that.

Secondly, there are few suggestions for end users that I want to make.

  1. Do not use .NET Core for commercial software. It is going to change sooner,
  2. .NET Core is a bleeding edge technology and well, since there is no documentation, you are going to waste a lot of time in learning and asking questions. That is why, if you are considering to learn .NET framework, then learn the .NET framework and not .NET Core. .NET framework has a great amount of good resources, articles, tips and tutorials.
  3. If you want cross-platform features and great support like .NET framework, my recommendation is Mono Project over .NET Core maybe because it is yet not mature.

I have a few feedback words on the framework itself.

  1. It is going great. Period.
  2. Since this is a cross-platform framework, features must not be available Windows-only such as that “dotnet compile –native” one. They must be made available to every platform.

At last, the framework is a great one to write programs for. I enjoyed programming for .NET Core because it doesn’t require much effort. Plus, the benefit of multiple programming languages is still there, Besides, Visual Studio Code is also a great IDE to be used and the C# extension makes it even better. I will be writing a lot about these features these days since I am free from all of the academics stuff these days. 🙂

See you in the next post.

From zero to hero in JSON with C#

Introduction and Background

I have been reading many posts and articles about JSON and C# where every article tries to clarify the purpose of either one thing, or the other thing: JSON or C# libraries. I want to cover both of these technologies in one post so that if you have no idea of JavaScript Object Notation (JSON), and the C# libraries available for processing and parsing the JSON files you can understand these two concepts fully. I will try my best to explain each and every concept in these two frameworks and I will also try to publish the article on C# Corner and to share an offline copy of this post as an eBook, so excuse me if you find me sliding through different writing formats because I have to stick to both writing styles in order to qualify this post as an article and as a miniature guide.

When I started to do a bit of programming, I knew there were many data-interchange formats, serialization and deserialization techniques and how objects can be stored including their states in the disk to fetch the same data back for further processing and further working on the same objects that you just left while you were going outside. Some of these techniques are tough to be handled and understood while others are pretty much framework-oriented. Then comes JSON into the image, JSON provides you with a very familiar and simple interface for programming the serialization and deserialization of the objects on runtime so that their states can be stored for later use. And we are going to study JSON notation of data-interchange and how we can use this format in C# projects for our applications.

What is JSON?

I remember when I was starting to learn programming there was this something called, Extensible markup language, or as some of us know it as, XML. XML was used to convert the runtime data of the objects or the program states or the configuration settings into a storable string notation. These strings were human-readable. Programmers could even modify these values when they needed to, added more values or removed the values they didn’t want to see in the data.

Introduction of XML

For a really long time and even today, XML is being used as the format for data-interchange. Many protocols for communication are built on the top of XML, most notably SOAP protocol. XML didn’t even power a few of the protocols, it even kick-started many of the most widely known and used markup languages, of which HTML and XAML are the ones that most of you are already familiar with.

xml-file
Figure 1: XML file icon.

History has it, XML has been of a great use to many programmers for building applications that share the data across multiple machines. The world wide web started with the pages written in a much XML-oriented way, markup language called, HTML.

The purpose of XML entirely was to design the documents in plain-text that can be human-readable and can be used by the machines to define the state of applications, program or interfaces.

  1. State of applications: You can store the object states, which can be loaded later for further processing of the data. This would allow you to maintain the states of the applications too.
  2. Program: XML can be used to define the configuration of the programs when they start up. Microsoft has been using web.config and machine.config files to define how a program would start. Programmers and developers can easily modify the files as they needed them to. This would alter the design of the way program starts.
  3. Interfaces: HTML is being used to define how the user-interface would look like. Windows Presentation Foundation uses XAML as the major language for designing the interfaces. Android supports XML-based markup language for defining the UI controls.
<?xml version="1.0" encoding="UTF-8"?>

Empty XML documents are not meant to contain any blank object or document tree. They can be omitted.

This is not it. XML is much more than this, WCF, for example supports SOAP communication. Which means that you can download and upload the data in XML format. ASP.NET Web API supports data transfer in the form of XML documents.

Usage of XML

I want to show you how XML is used, then why shouldn’t I used something that comes from a real-world example. RSS for example, uses XML-based documents for delivery of feeds to the clients. I am using the same technology feature on my blog to deliver the blog posts to readers and other communities. The basic XML document for a single post would look like this,

<?xml version="1.0" encoding="UTF-8"?>
<rss version="2.0"
    xmlns:atom="http://www.w3.org/2005/Atom"
    xmlns:media="http://search.yahoo.com/mrss/">

<channel>
    <title>Learn the basics of the Web and App Development</title>
    <atom:link href="https://basicsofwebdevelopment.wordpress.com/feed/" rel="self" type="application/rss+xml" /> 
    <link>https://basicsofwebdevelopment.wordpress.com</link>
    <description>The basics about the Web Standards will be posted on my blog. Love it? Share it! Found an error, ask me to edit the post! :)</description>
    <lastBuildDate>Fri, 03 Jun 2016 09:48:29 +0000</lastBuildDate>
    <language>en</language>
    <generator>http://wordpress.com/</generator>
    <cloud domain='basicsofwebdevelopment.wordpress.com' port='80' path='/?rsscloud=notify' registerProcedure='' protocol='http-post' />
    <image>
         <url>https://s2.wp.com/i/buttonw-com.png</url>
         <title>Learn the basics of the Web and App Development</title>
         <link>https://basicsofwebdevelopment.wordpress.com</link>
    </image>
    <atom:link rel="search" type="application/opensearchdescription+xml" href="https://basicsofwebdevelopment.wordpress.com/osd.xml" title="Learn the basics of the Web and App Development" />
    <atom:link rel='hub' href='https://basicsofwebdevelopment.wordpress.com/?pushpress=hub'/>
    <item>
        <title>Hashing passwords in .NET Core with tips</title>
        <link>https://basicsofwebdevelopment.wordpress.com/2016/06/03/hashing-passwords-in-net-core-with-tips/</link>
        <comments>https://basicsofwebdevelopment.wordpress.com/2016/06/03/hashing-passwords-in-net-core-with-tips/#respond</comments>
        <pubDate>Fri, 03 Jun 2016 08:42:49 +0000</pubDate>
        <dc:creator><![CDATA[Afzaal Ahmad Zeeshan]]></dc:creator>
        <category><![CDATA[Beginners]]></category>
        <category><![CDATA[C# (C-Sharp)]]></category>
        <guid isPermaLink="false">https://basicsofwebdevelopment.wordpress.com/?p=1313</guid>
        <description>
            <![CDATA[Previously I had written a few stuff for .NET framework and how to implement basic security concepts on your applications that are working in .NET environment. In this post I want to walk you to implement the same security concepts in your applications that are based on the .NET Core framework. As always there will be […]<img alt="" border="0" src="https://pixel.wp.com/b.gif?host=basicsofwebdevelopment.wordpress.com&blog=59372306&post=1313&subd=basicsofwebdevelopment&ref=&feed=1" width="1" height="1" />]]>
        </description>
    </item>
</channel>
</rss>

Of course I snipped out most of the part, but you get the point of XML here. This data can be read by humans themselves, and if the machine is set to parse this data it can provide us with runtime association of data with the objects. In a much similar manner, we can share the data from one machine to another by serializing and deserializing the objects.

What is the need of JSON, then?

JSON comes into the frame back in 1996 or around that time. The purpose of XML and JSON is similar: Data-interchange among multiple devices, networks and applications. However, the language syntax is very much similar to what C, C++, Java and C# programmers have been using for their regular day “object-oriented programming“; pardon me C programmers. The language syntax is very similar to what JavaScript uses for the notation of objects. JSON provides a much compact format for the documents for storing the data. JSON data, as we will see in this guide, is much shorter as compared to XML and in many ways can be (and should be…) used on the network-based applications where each byte can be a bottleneck to your application’s performance and efficiency. I wanted to take this time to disgust XML, but I think your mind will consider my words as personal and bias views. So, first I will talk about JSON itself how it is structured and then I will talk about using the time to show the difference between JSON and XML and which one to prefer.

JSON format and specifications were shared publicly as per ECMA-404. The document guides the developers to find their APIs in such a way that they work as per the teachings of the standard. API developers, programmers, serialization/deserialization software developers can get much help from the documentation in understanding how to define their programs to parse and stringify the JSON content.

Structure of JSON

JSON is an open-standards document format for human-readable and machine-understandable serialization and deserialization of data. Simply, it is used for data-interchange. The benefit of JSON is that it has a very compact size as compared to XML documents of the same purpose and data. JSON stores the data in the form of key/value pairs. Another benefit of JSON is (just like XML) it is language-independent. You can work with JSON data in almost any programming language that can handle string objects. Almost every programming framework that I can think of most of the programming frameworks support JSON-based data-interchange. For example, ASP.NET Web API supports JSON format data transfer to-and-from the server.

The basic structure of JSON document is very much simple. Every document in JSON must have either an object at its root, or an array. Object and array can be empty there is no need for it to contain anything in it, but there must be an object or an array.

A sample, and simple JSON document can be the following one:

{ }

What that means, is something that I am going to get into a bit later. At the moment just understand that this is a blank JSON document about any object in the application. A JSON document can contain other data in the form of key/value pairs, that are of the following types:

  1. Object
  2. Array
  3. String; name or character.
  4. Integer; numeric
  5. Boolean; true or false
  6. Null.

Note that JSON doesn’t support all of the JavaScript keywords, such as you cannot use “undefined” in a valid JSON schema. Nothing is going to stop you from using it in your files, but remember that valid JSON schema should not include such values. One more thing to consider is that JSON is not executable file, although it shares the same object notation but it doesn’t allow you to create variables. If you try to add a few variables to it, it would generate errors. Now I would like to share a few concepts for the valid data types in JSON and what they are and how you should use them in your own JSON data files.

JSON data types

JSON data types are the valid values that can be used in JSON files. In this section I want to clarify the values that they can hold, how you can use them in your own project data-interchange formats.

JSON Object

At the root of the JSON document, there needs to be either a JSON object or a JSON array. In JavaScript and in many other programming languages an object is denoted by curly braces; “{ }”. JSON uses the same notation for denoting the objects in the JSON file. In JSON files, objects only contain the properties that they have. JSON can use other properties, other data types (including objects) as the value for their properties. How that works, I will explain that later in this course guide, but for now just consider that each of the runtime object is mapped to one JSON object in the data file.

In the case of an object, there are properties and their values that are enclosed inside the opening and closing curly braces. These are in the form of a key/value pair. These key value sets are separated using a colon, “:” and multiple sets are separated using a comma, “,”. An example of the JSON object is as follows:

{
  "name": "Afzaal Ahmad Zeeshan",
  "age": 20
}

Even the simplest of the C#, Java or C++ programmers would understand what type these properties are going to hold. It is clear that the “name” property is of “string” type and the “age” property is of integer type.

There are however a few things that you may need to consider at the moment:

  1. An object can contain any number of properties in it.
  2. An object can omit the properties; being an empty object.
  3. All the property names (keys) are string values. You cannot omit the quotation around the key name. It is required, otherwise JSON would claim that it was expecting a string but found undefined.
  4. Key/value sets are separated by a colon character, whereas multiple sets are separated using a comma. You cannot add trailing commas in the JSON format, some of the APIs may through error. For example, JSON.parse(‘[5, ]’); would return an error.

I will demonstrate the errors in a later section because at the moment I want to show you and teach you the basics of JSON. But, I will show you how these things work.

By now the type of the JSON object is clear to you. One thing to keep in mind is that JSON object is not only meant to be used as the root of the JSON document. It is also used as a value for the properties of the object, which allows the JSON document to contain the entire data in the form of relationship with objects; only difference being that the objects are anonymous.

JSON Arrays

Like JavaScript, JSON also supports storing the objects in a sequence, series or list; what-ever you would like to put it as. Arrays are not complex structures in JSON document. They are:

  1. Simple.
  2. Start with a square bracket, and end on the same.
  3. Can contain values in a sequence.
  4. Each value is separated by a comma (not a colon).
  5. Value can be of any type.

A sample JSON array would look something like this,

[ "Value 1", "Value 2" ]

You can store any type of value in the array, unlike other programming language such as C# or C++. The type of the values is not mandatory to be similar. That is something that pure C# or C++ programmers cannot fathom in the first look. But, guys, this is JavaScript. I used JSONLint service to verify this, later I will show you how it works in JavaScript.

Screenshot (1642)
Figure 2: JSONLint being used for verification of JSON validity.

In JavaScript, the type doesn’t need to be matched of the arrays. So, for example you can do the following thing and get away with it without anything complaining about type of the objects.

var arr = [ "Hello", 55, {} ];

So, JSON being a JavaScript-derived document format, follows the same convention. JSON leaves the idea of type casting to the programmer, because this is performed only in the context of strongly typed programming languages such as C++, C# etc. JavaScript, being weakly typed doesn’t care about the stuff at all. So, it can take any type in an array as long as it doesn’t violate other rules.

Upcoming data types are similar to what other programming languages have, such as strings, integers and boolean values. So, I will try to not-explain them as much as I have had explained these two.

JSON Strings

String typed values are the values which contain the character-type values. In many programming environments, strings are called, arrays of characters. In JavaScript, you can use either single quotes or double quotes to wrap the string values. But, in JSON specification you should always consider using double quotation. Using single quotation may work and should work in JavaScript environment but in the cases when you have to share the data over the network to a type-safe programming environment such as where C++ or C# may be used as the programming language. Then your single quotes may cause a runtime error when their parsers would try to read a string starting as a character.

In JSON, strings are similar and you have been watching strings in the previous code samples. A few common examples of string values in JSON are as following:

// Normal string
"Afzaal Ahmad Zeeshan"

// Same as above, but do not use in JSON
'Afzaal Ahmad Zeeshan'

// Escaping characters, outputs: "\"
"\"\\\"" 

// Unicode characters
"\u0123"

In the above example, you see that we can use many characters in our data. We can:

  1. Build normal strings such as C# or C++ strings.
    • JSON standard forbids you from using the single quotation because you may be sending the data over to other platforms.
  2. Escaping the characters is required in strings. Otherwise, the string would result in undefined behavior. You can use the similar string escaping provided in other languages such as:
    • \”
    • \\
    • \/
    • \b
    • \f
    • \n
    • \r
    • \t
    • \u-4-hex-numbers
  3. Unicode characters (as specified in the last element of above list) are also supported in JSON, you can specify the Unicode character code here.

One thing to consider is that your objects’ attributes (properties) are also keyed using a string value.

{
    "key": 1234
}

The value of a property can be anything, but the key must always be a string. The strings in JSON, JavaScript, C++, C# and Java are all alike and have the same value for each of the sentence. Unicode characters are supported and need not to be escaped. For original JSON website, I got this image,


Figure 3: JSON string structure.

Thus, the strings are similar in JSON and other frameworks (or languages).

JSON Integers

Just like strings, integers are also the literal values in the JSON document that are of numeric type. They are not wrapped in quotations, if they are then they are not numeric types, instead they are of string type.

A few examples of integer values are:

// Simple one
1234

// Fractional
12.34

// Exponential
12e34

You can combine fractional and exponential too. You can also append the sign of the number (negative – or positive +) with the number itself. In JSON these types can also be used as the values. If you take a look at the example above in a few sections above, you can see that I had used the age as an integer value for my property. A few things that you should consider while working with JSON data is:

  1. In exponential form, “e” and “E” are similar.
  2. It must never end with “e”.
  3. Number cannot be a NaN.
  4. Number encoding and variable size should be considered. JavaScript and other language may differ in encoding the variable size for the numberics and may cause an overflow.

JSON Boolean

Boolean values indicate the results of a conditional operation on an expression. Such as, “let him in, if he is adult”. JSON supports storing values in their literal boolean notation. They are similar to what other programming languages have in common. They must also not be wrapped in quotation as they are literals. If a boolean value is wrapped in quotation then it is not a boolean value but instead it is a string value.

// Represents a true result
true

// Represents a false result
false

These must be written as they are because JavaScript is case-sensitive and so is JSON. You can use these values to denote the cases where other types cannot make much sense compared to what this can make, sense. For example, you can specify the gender of the object.

{
    "name": "Afzaal Ahmad Zeeshan",
    "age": 20, 
    "gender": true
}

I didn’t use “male”, instead I used “true”. On the other side I can then translate this condition to another type such as,

if(obj.gender) {
    // Male
} else {
    // Female
}

This way, other than strings and numeric values we can store boolean values. These would help us structure the document in a much simpler, cleaner and programmer-readable format.

JSON null

C based programmers understand what a null is. I have been programming in programming languages such as, C, C++, C#, Java, JavaScript and I have used this keywords where the objects do not exist. There are other programming languages such as Haskell, where this doesn’t make much sense. But, since we are just talking about JavaScript and languages like it, we know what null is. Null just represents when an object doesn’t exist in the memory. In JavaScript, this means the “intentional absence” of the object. So in JavaScript environment a null object does exist but has no value. In other languages it is the other way around; it doesn’t even exist.

It just has a single notation,

null

It is a keyword and must be typed as it is. Otherwise, JavaScript-like error would pop up, “undefined“. This can help you in sending the data which doesn’t exist currently. For example, in C# we can use this to pass the values from database who are nullable. There are nullable types in C#, which we can map to this one.  For example, the following JSON document would be mapped to the following C# object:

{
    "name": "Afzaal Ahmad Zeeshan",
    "age": null
}

C# object structure (class)

class Person {
    public string Name { get; set; }
    public int? Age { get; set; }      // Nullable integer.
}

And in the database if the field is set to be nullable, we can set it to that database record. This way, JSON can be used to notably denote the runtime objects in a plain-string-text format for data-interchange.

Examples of use

I don’t want to stretch this one any longer. JSON has been widely accepted by many companies even Microsoft. Microsoft was using the web.config file in XML format for configuration purposes of the application. However, since a while they have upgraded their systems to parse and use the settings provided in a much JSON way. JSON is very simpler and easier to handle.

Microsoft started to use JSON format to handle the settings for their Visual Studio Code product. JSON allows extension of the settings, which helps users to add their own modifications and settings to the product.

I have been publishing many articles about JSON data sources and I think, if I started to use JSON then it was a sign of success of JSON over XML. 🙂

  1. Creating a “customizable” personal blog using ASP.NET
  2. Understanding ASP.NET MVC using real world example, for beginners and intermediate

There are many other uses of JSON and my personal recommendation is with JSON if you can use JSON over XML. However, if you are interested in XML or are supposed to use XML such as when using SOAP protocol. Otherwise, consider using JSON.

Errors in JSON

No, these are not errors in the JSON itself, but a few errors that you may make while writing the JSON documents yourself. This is why, always consider using a library.

Trailing commas

As already mentioned above, the trailing commas in the JSON objects or arrays cause a problem. The parser may think that there is another property to come but unexpectedly hits a terminating square or curly bracket. For example the following are invalid JSON documents:

{ "k": "v",  }    // Ending at a comma

[ 123, "", ]      // Ending at a comma

These can be overcame if you:

  1. First of all, write your own parsers.
  2. Make them intelligent enough to know that if there is no property, they can ignore adding a property, simply.
  3. If there is no more value in the array after the comma, it means the array ended at the previous token.

However, present parsers are not guaranteed to be intelligent enough so my recommendation is to ignore this.

Ending with an “e” or “E”

If you end your numbers in exponential form with a e, you are likely to get an error of undefined. You know what that means, don’t you? It is always better to end it is a proper format following the specification.

Undefined

Each property name must be a string token. In JavaScript you can do the both of the following:

var obj = { "name": "Afzaal Ahmad Zeeshan" };

// OR
var obj = { name: "Afzaal Ahmad Zeeshan" };

But in JSON you are required to follow the string-based-key-names method of creating and defining the object properties. In JSON, if you do the following you will get error,

{ 
   name: "Afzaal Ahmad Zeeshan"
}

Because, name is undefined. Parser may consider it to be a variable somewhere but JSON documents cannot be executed so there is no purpose of JavaScript variables to be there. Some libraries may render the results for your documents even if you leave your property names un-stringed. But, don’t consider everything to be server always follow the specifications.

C# side of article

To this point I hope that JSON is as simple as 1… 2… 3. for you! If not, please let me know so that I can make it even more clear. But, in this section I want to talk about using JSON in your C# projects. In this section I am going to talk about the libraries that are available in C#, or more specifically I am going to talk about JSON.NET library. I will use this library to explain how JSON can be used to save the state of the objects. How you can create a JSON file, how you can parse it to create objects on runtime and how serialization and deserialization works.

This section will be a real world section covering the methods and practices that you can use to use JSON in your own applications. I will cover most of the C# programming part in this section so that you can understand and learn how to program JSON in your .NET environment.

JSON.NET library

I am specifically just going to walk you through JSON.NET library. JSON.NET is a widely used JSON parser for .NET framework. I have been using this library for a very long time and I personally this is one of the best APIs out there for JSON parsing.

Screenshot (1669)
Figure 4: Json.NET comparison with other popular JSON serializers.

I will use the objects provided in this library just to demonstrate how you can parse JSON files to runtime objects, and how you can create JSON strings (serialize the objects) using the objects provided to the serializer. By the end of this post you will be able to create your own JSON-oriented-and-backed applications in .NET framework (or any framework that supports C# programming).

Creating the object for this guide

In C#, we create classes to work around with real-world objects. We can then use this library to convert the runtime structure of that object to a storable JSON document that can be used to:

  1. Send over the network.
  2. Save on the disk.
  3. Save for loading the object in that state later.

Many other uses. The counterpart of this process is the deserialization of the objects in runtime structures from their JSON notation. First of all, I will create a sample class that we are going to use to convert to JSON format and from the JSON format.

class Person
{
    public int ID { get; set; }
    public string Name { get; set; }
    public bool Gender { get; set; }
    public DateTime DateOfBirth { get; set; }
}

This object has the following diagram.

Screenshot (1670)
Figure 5: Person class diagram.

Frankly speaking, this object can be created in C++, it can be created in Java and it can be created in JavaScript too. If we use JSON for serializing this object, or the number of objects that can be transmitted over the network to the peers on the networks. Since we have stringified the data in JSON notation, we now can parse the string data in other languages too. Every other programming language has a JSON parser library.

We can redefine the structures in other programming languages and then use a JSON parser library to convert this string over the network in those machines too. I am going to cover C# part of programming only.

A few things that you might want to know here before we move forward. I have used the datatype of “DateTime” because I wanted to show how derived types are converted to when they are being serialized to JSON notation. So, let’s begin the C# programming to understand the relative stuff in their C# counterparts.

Serializing the objects

In programming, serialization is the process of converting the runtime objects to a plain-text string format. In other words, it converts the object structure from memory to a format that can be stored on the disk. Serialization just translates the state of the objects, which is that it just translates the properties of the object to the format that can be used to store them for later use. You can think of it as synchronization process, where you store the current state of the objects on the disk so that you can load the data later and start your work from the state where you left it instead of starting from scratch again.

Since we are talking about JSON here, we are interested in the conversion of objects in their JSON notation for storage (serialization) and then in the upcoming section to convert the JSON document into runtime objects and data structures (deserialization). Simply, we are going to see how to convert the JSON into objects and vice versa.

To serialize the object, you need an object that holds the data in itself. The object would have a state in the application. We then call the library functions to serialize the objects in their JSON notation. Like this,

// Create the person
Person myself = new Person { 
                    ID = 123, 
                    Name = "Afzaal Ahmad Zeeshan", 
                    Gender = true, 
                    DateOfBirth = new DateTime(1995, 08, 29) 
                };

// Serialize it.
 string serializedJson = JsonConvert.SerializeObject(myself);

// Print on the screen.
 Console.WriteLine(serializedJson);

The function is called to serialize the object which (as clearly seen) return a string object. This object holds the JSON notation for the object. The output returned was like this, (yes, I formatted the JSON document for readability)

{
    "ID": 123,
    "Name": "Afzaal Ahmad Zeeshan",
    "Gender": true,
    "DateOfBirth": "1995-08-29T00:00:00"
}

We create store the data in a file, send it on the network or do what we have to. I am not going to cover that part because I think (and believe) that this is totally relative to your application design and how it is expected to work. Now, we need to understand how it happened.

The ID, Name and Gender are the types that you have already seen. However the last field was actually of type DateTime which got translated to string type in JSON. Why? The answer is simple, JSON doesn’t provide a native DateTime object to store the date and time values. Instead, they use string notation to store the date value. The string value is very much self-explanatory as to what the year is, what month and what value date has. The time part is also clearly visible.

One thing to note here is that C# and JSON can agree on using the “null” value for objects too. Thus if the name is set to a null value, JSON can support the same value of null in its own document format. In the next section, we will study how JSON is mapped to the objects.

Deserializing the JSON

In data-interchange, this is the counterpart of the serialization process. In this process, we take the JSON document and parse it the runtime object (collection). There are many libraries available that can be used for parsing purposes however I am going to talk about the same one that I had been using to demonstrate the usage in C# programming environment. The method is very simple in this case too, However, I am going to use a JSON formatted string variable to use to parse it to the object.

Note: You can use values from files, networks, web APIs and other resources from where you can get the JSON formatted document. Just for the sake of simplicity I am going to use a string variable to hold the values.

The sample JSON data can be like the following,

string data = "{\"ID\": 123,\"Name\": 
               \"Afzaal Ahmad Zeeshan\",\"Gender\": 
               true,\"DateOfBirth\": \"1995-08-29T00:00:00\"}";

I used the following code to deserialize the JSON document.

// Serialize it.
Person obj = JsonConvert.DeserializeObject<Person>(data);

// Print on the screen.
Console.WriteLine(obj.ID);

Now notice one thing here. This “DeserializeObject” function has two versions.

  1. A plain non-generic version.
  2. A generic version.

If you use the non-generic version, then in C# you are going to use the dynamic object creation in C# and then we will be using the properties. For example, like the code below:

dynamic obj = JsonConvert.DeserializeObject(data);

Console.WriteLine(obj.ID);

Using that dynamic keyword would allow you to bypass the compile time check and allow you to get the “ID” property at a later time. This can be handy when you don’t want to create a class and deserialize against.

However, the version that I am using at the moment is different. It uses a type-parameter that is passed as a generic parameter; angled brackets, and Json.NET deserializes the JSON document and fills up our objects. We can also have array of objects, this way instead of “convincing” the program to iterate over the collection. We can first of all have the JSON parsed as an array of objects and so on. This would help us shorten the code and to check the stuff at all.

var listOfObjects = JsonConvert.DeserializeObject<List<Person>>(data);

Notice that we are passing a “List<>” object. Library would convert the stuff into the list of the objects and we can then use the collection for iterative purposes.

Some errors

There are a few errors that I would like to raise here, which might help you in understanding how JSON works. I will update this section later as I collect more data on this topic.

Type mismatch

If you try to deserialize the JSON of one type (such as, an object) into a type where it cannot be converted to (such as, an array). Library will raise an error. So do the following:

  1. Either make sure which type to convert to. Or
  2. Do not convert to a generically passed type, instead use dynamic keyword to deserialize the object and then check its type later on runtime. That still doesn’t guarantee it to work.

My recommendations

Finally, I want to give you a few of my own personal experience tips. In my experience I started to work with data on a database system; SQL Server CE I remember. But later I had to create applications which required a bit complex structures and were not going to last another weak. So in such conditions, using a database table was not a good idea. Instead, I had to use a sample and temporary data source. During those days, XML was a popular framework as per my peers. JSON was something that most didn’t understand. So, in my own humble opinion, you should go with JSON, where:

  1. Data needs to be shared cross-platform, cross-browser and cross-server. Databases may be helpful, but even they need serialization and stuff like that.
  2. You just need to test the stuff. You can target your Model to the JSON parsers and then in release mode change them to the actual data sources.

That is not it, the size of JSON is “amazingly” compact as compared to XML. For example, have a look here:

// JSON
{
 "name": "Afzaal Ahmad Zeeshan",
 "age": 20,
 "emptyObj": { }
}

// XML
<?xml version="1.0" encoding="UTF-8" ?>
<name>Afzaal Ahmad Zeeshan</name>
<age>20</age>
<emptyObj />

Even in the cases where JSON has nothing in it, XML is bound to have that declaration line. Then other problems come around, such as sending an array, or sending out a native type object. In JSON you can do this,

true

In XML, you don’t have any “true” type. So, you are bound to send something extra. Which can cause to be a bottleneck in the networking transmission. I have been writing many articles, blogs and guides and most of them are based on JSON if not on SQL Server.

Hashing passwords in .NET Core with tips

Previously I had written a few stuff for .NET framework and how to implement basic security concepts on your applications that are working in .NET environment. In this post I want to walk you to implement the same security concepts in your applications that are based on the .NET Core framework. As always there will be 2 topics that I will be covering in this post of mine, I did so before but since that was for .NET itself, I don’t think that works with .NET Core. Besides, .NET Core is different in this matter as compared to .NET framework, one of the major reasons being that there is no “SHA256Managed” (or any other _Managed types in the framework). So the framework is different in this manner. This post would cover the basic concepts and would help you to understand and get started using the methodologies for security.

Security_original
Figure 1: Data security in your applications is the first step for gaining confidence in clients.

First of all, I would be covering the parts of hashing and I will give you a few of my tips and considerations for hashing the passwords using .NET Core in your applications. Before I start writing the article post, I remember when I was working in Mono Project and the platform was very easy to write for. I was using Xamarin Studio as IDE and the Mono was the runtime being used at that time, in my previous guide although the focus was on the Mono programming on Ubuntu whereas in this post I will covering the concepts of same but with .NET Core. .NET Core is really beautiful, although it is not complete, yet it is very powerful. I am using the following tools at the moment so in case that you want to set up your own programming environment to match mine, you can use them.

  1. IDE: Visual Studio Code.
  2. C# extension: For C# support and debugging
  3. Terminal: Ubuntu provides a native terminal that I am using to execute the command to run the project after I have done working with my source code.

Screenshot (967)
Figure 2: Visual Studio being used for C# programming using .NET Core.

You can download and install these packages on your own system. If you are using Windows, I am unaware as to what Visual Studio Code has to offer, because since the start of Visual Studio Code I have just used it on Ubuntu and on Windows systems my preference is always Visual Studio itself. Also, I am going to use the same project that I had created and I am going to start from there, A Quick Startup Using .NET Core On Linux.

So, let’s get started… 🙂

Hashing passwords

Even before starting to write it, I am considering the thunderstorm of comments that would hit me if I make a small and simple mistake in the points here, such as:

  1. Bad practices of hashing.
  2. Not using the salts.
  3. Bad functions to be used.
  4. Etc.

However, I will break the process down since it is just a small program that does the job and there is no very less exaggeration here. Instead of talking about that, I will walk you through many concepts of hashing and how hackers may try to get the passwords where hashing helps you out.

Until now I have written like 3 to 4 articles about hashing, and I can’t find any difference in any of these codes that I have been writing. The common difference is that there are no extra managed code stuff around. .NET Core removed everything redundant in the code samples. So we are left with the simple ones now that we would be using.

What I did was that I just created a simple minimal block of the SHA256 algorithm that would hash the string text that I am going to pass. I used the following code,

// SHA256 is disposable by inheritance.
using (var sha256 = SHA256.Create()) {
    // Send a sample text to hash.
    var hashedBytes = sha256.ComputeHash(Encoding.UTF8.GetBytes("hello world"));
 
    // Get the hashed string.
    var hash = BitConverter.ToString(hashedBytes).Replace("-", "").ToLower();
 
    // Print the string. 
    Console.WriteLine(hash);
}

This code is a bit different from the one being used in .NET framework. In the case of .NET framework the code starts as:

using (var sha256 = new SHA256Managed()) {
     // Crypto code here...
}

That is the only difference here, rest of the stuff is almost alike. The conversion of bytes into string text is upto you. You can either convert the bytes to hexadecimal strings or you can use the BitConverter helper to convert that to the text that is being represented.

The result of this code is,

Screenshot (968)
Figure 3: Result of the above shown code in C# being executed in Ubuntu terminal on .NET Core runtime. 

There is one another constraint here, “Encoding.UTF8“, if you use another encoding for characters then the chances are your hashed string would be different. You can try out other flavors of the character encodings such as:

  1. ASCII
  2. UTF-8
  3. Unicode (.NET framework takes Unicode encoding as UTF-16 LE)
  4. Rest of the encodings of Unicode etc.

The reason is that they provide a different byte ordering and this hashing function works on the bytes of the data that are passed.

Tips and considerations

There are generally two namespaces rising, one of them is the very old familiar .NET’s namespace, System.Security.Cryptography, whereas another one is Microsoft.AspNet.Cryptography which is a part of ASP.NET Core and are to be released. Anyways, here are a few of the tips that you should consider before handing the passwords.

Passwords are fragile — handle with care

I can’t think of any online service, offline privacy application, API hosts where passwords are not handled with care. If there is, I would still act as I never knew of it. Passwords must always be hashed before saving in the database. Hashing is done because hashing algorithms are created with one thing in mind, that they are hard (if not impossible) to convert back to plain-text passwords. This makes it harder for the hackers to get the passwords back in the real form. To explain this fact, I converted the code into a functional one and printed the hash with a little change in the text.

private static string getHash(string text) {
    // SHA512 is disposable by inheritance.
    using (var sha256 = SHA256.Create()) {
        // Send a sample text to hash.
        var hashedBytes = sha256.ComputeHash(Encoding.UTF8.GetBytes(text));
   
        // Get the hashed string.
        return BitConverter.ToString(hashedBytes).Replace("-", "").ToLower();
    }
}

I will execute this function and get the hashed string back for the text that have very less difference in them.

string[] passwords = { "PASSWORD", "P@SSW0RD", "password", "p@ssw0rd" };
 
foreach (var password in passwords) {
    Console.WriteLine($"'{password}': '{getHash(password)}'");
}

Although they seem to look alike but have a look at the avalanche effect that happens due to such small changes. Even have a look at the differences in the capital case and small case.

Screenshot (972)
Figure 4: Password hashes being shown in the terminal. 

This helps in many ways, because it is harder to guess what the possible plain-text alternate would be for this hashed string. Remember the constraints again,

  1. The character encoding is UTF-8; others would provide a different character encoding bytes ordering.
  2. Hash algorithm being used in SHA256, others would produce even different results.

If you don’t hash out the passwords, hackers may try to use most common attacks on your database system to gain privileges of access. A few common type of attacks are:

  1. Brute force attack
  2. Dictionary attack
  3. Rainbow table attack

Rainbow table attack work in a different manner, it tries to convert the hash back to the plain-text based on the database where a password/hash combination is present. Brute force and dictionary attacks use a guessing and commonly used passwords respectively, to gain access. You need to prevent these attacks from happening.

Besides there are cases where your password hashing is useless. Such as when you want to use MD5 hashing algorithms. MD5 algorithms can be easily cracked and the tables for entire password look up are already available and hackers can use those tables to crack your passwords that are hashed using MD5. Even SHA256, SHA512 don’t work as you are going to see in the following section. In such cases you have to add an extra layer of security.

Bonus: how to break it?

Before I continue further, I wanted to share the point of these passwords and their hashes being weaker. There are many hacking tools available, such as reverse look ups. Let us take our first password and see if that can be cracked. I used CrackStation service to crack the password and convert it back to its original text form,

Screenshot (975)
Figure 5: SHA256 based password converted back to its original form. 

See how inefficient even these tricks happen to be. In a later section I will show you how to salt the passwords and what the effect is. Although we had hashed it using SHA256, the reverse lookup table already has that password of ours. Hackers would just try to use that hash and get the real string value in the plain-text to be used for authentication purposes.

Slower algorithms

On networks where hackers are generally going to attack your websites with a script. You should have a hashing algorithm that is (not very) significantly slow. About half a second or 3rd of a second should be enough. The purpose is:

  1. It should add a delay to the attacker if they are trying to run a combination of passwords to gain access.
  2. It should not affect the UX.

There are many algorithms that keep the iterations to a number of 10,000 or so. The namespace that I had talked of, Microsoft.AspNet.Cryptography has the objects that allow you to specify the iteration, salt addition etc.

Remember: For online applications, do not increase the iteration count. You would indirectly cause a bad UX for the users who are waiting for a response.

Add salt to the recipe

I wonder who started the terminology of salt in cryptography. He must have a good taste in computers, I’d say. I did cover most of the parts of adding the salts in the article that I have added in the references section, please refer to that article. However, I would like to share the code that I have used to generate a random salt for the password. Adding the salt would help you randomize the password itself. Suppose, a user had a password of, “helloserver”, another one had the same password too. By default the hash would be alike but if you add a random salt to it, it would randomize the password.

In .NET Core, you can use the “RandomNumberGenerator” to create the salt that can be used for the password.

private static string getSalt() {
    byte[] bytes = new byte[128 / 8];
    using (var keyGenerator = RandomNumberGenerator.Create()) {
        keyGenerator.GetBytes(bytes);
 
        return BitConverter.ToString(bytes).Replace("-", "").ToLower();
    }
}

This would create a few random bytes and then would return them to be used for the passwords.

string[] passwords = { "PASSWORD", "P@SSW0RD", "password", "p@ssw0rd" };
 
foreach (var password in passwords) {
    string salt = getSalt();
    Console.WriteLine($@"{{
       'password': '{password}', 
       'salt': '{salt}',
       'hash': '{getHash(password + salt)}'
       }}"
    );
}

This shows how the passwords with “random salt” differ.

Screenshot (974)
Figure 6: Passwords with their salts being hashed. 

Have a look at the hashes now. The hashes differ from what they were before. Also, notice that the function returns a different salt every time which makes it possible to generate different hashes for even the similar passwords. One of the benefits of this is, that your passwords would be secure from a rainbow table attack.

Test: We saw that unsalted passwords are easy to be reverse looked up. In this, case, we salted the password and we are going to test the last of our password to see if there is a match.

Screenshot (976)
Figure 7: Password not found.

Great, isn’t it? The password was not matched against any case in the password dictionary. This gives us an extra layer of security because hacker won’t be able to convert the password back to their original form by using a reverse look up table.

Using salt: the good way

There is no good way of using the salt, there is no standard to be followed while adding the salt to the password. It is just an extra “random” string to be added to your password strings before their are hashed. There are many common ways, some add salt to the end, some prepend it some do the both.

Do as you please. 🙂 There are however a few tips that you should keep in mind while salting the passwords.

  1. Do not reuse the salts.
  2. Do not try to extract the salts from the passwords or usernames.
  3. Use suitable salt size; 128-bit?
  4. Use random salt.
    • You should consider using a good library for generating the salts.
  5. Store the salts and passwords together. Random salts won’t be created again (in a near future).

References:

  1. Avalanche effect
  2. Hashing Passwords using ASP.NET’s Crypto Class
  3. Guide for building C# apps on Ubuntu: Cryptographic helpers
  4. What are the differences between dictionary attack and brute force attack?

Final words

In this post, I demonstrated the hashing techniques in .NET Core, although the procedure is similar and very much alike. There are a few differences that the objects are not similar. The object instantiation is not similar and in my own opinion, this is also going to change sooner.

I gave you a good overview of password hashing, how to crack them (actually, how an attacker may crack them) and how you can add an extra layer of security. Besides, you should consider adding more security protocols to your own application to secure it from other hacking techniques too.

Why to use C# and when to prefer other languages?!

Introduction and Background

Either it is Quora, or is it C# Corner or is it CodeProject, beginners and novice users are always asking questions like, “Which one to use, C++ or C#?”, and many more similar questions. It is harder to provide an answer to such questions on multiple platforms and to multiple questions. That is why, I thought, why not post a blog post to cover most of the aspects of the question. In this post I am going to cover a few of the concepts that you may want to understand to chose either language from the most widely used languages:

  1. C or C++
  2. Java
  3. C# (or .NET framework itself)

Basically, my own preference in many cases is C#, but that depends on what I am going to build. I have been using C, C++, Java and C# in many applications depending on their needs, depending on how they allow me to write the programs and depending on whether it is the suitable programming language for this type of project and application architecture.

The way, I do that, is just a trick. Which, I am going to share with you, in this blog post. Among these a few of the very basic things to consider are:

  1. How simple and easy it would be to use this language in the program?
  2. What is the productivity of that language in your scenario!
  3. Difficulty level and how many people know the language!

I will be talking about these things points in this post, so to make it clear where to use which programming language. But my major concern in this post would be to cover the aspects of C# programming language.

Productivity of language

First thing to always consider about the language is the productivity that a programming language can provide your team with. Productivity of the language depends on many factors, such as:

  1. How programs are built in that language?
  2. How fast and reliable is it to build the project regularly?
  3. Is the program’s source code readable for other members on the team?
  4. Is the language itself suitable for the case that we are going to use it in.

Productivity of the language, in my opinion, is the first thing to consider as the valid candidate to always discuss in the team and not just talk about in a black room. You should manage to get your teams up in a conference room, and then talk about a language. There may be many aspects where one language may fall short and other may get well. There would be many factors that most of the programmers don’t know but talking about them one of the geek would stand up and raise another important point that may guide your team to walk on the correct paths to build greater applications.

Let’s talk a bit graph.

chart
Figure 1: Productivity graph of most widely used programming languages.

In this chart we can see that C is the most productive programming language, of which we are interested in; C, C++, Java and C#. C++ and C# are competing with each other, whereas Java is a bit behind than C# and so on.

In the above graph, it is clear that C# is an average programming language. The average doesn’t mean it is below the requirement. But it means that it can be used in any case, and its performance won’t fall as the data increases. The successful run graph shows that C# programs are much successful in many cases. That is why, in many cases, C# proves to be the valid candidate in many cases, since it is a general purpose programming language.

Then the question arises, “Productive in which sense?

That is the most important part here. Now, this topic may take a bit more of the time to explain how productive a language is. For that, I have dedicated the topic, “Choosing the right language for the right task“. The right programming language for the right task would always help you to elevate the speed of the programming of your team! But among other aspects, the most important ones are:

  1. What sort of project this is?
    • Of course you don’t want to use knife to unscrew a screw.
  2. What are the IDE and compilation tools present?
    • Even a program written in C can go wrong if compile is buggy or inefficient.
  3. How your team would like to manage the projects?
    • Does the language support good software engineering concepts?
    • Can it be used to generate good diagrams: Use-case, activity, class and other diagrams.

Thus, you should always consider thinking about the productivity of your development team while guessing which language to be used.

Choosing the right language for the right task

It is always stated to use the best tool for the best jobs! Then, why not use the best programming language for your projects, to get the best possible results? Before I continue any further, there is one thing I want to mentioned… “There is no best programming language ever built.” Every time a programming language is built for a purpose, another group of programmers jump in to create a new programming language, for the sake of fixing the errors in the previous language. What do you think motivated Bjarne to create C++ when there was C language and Scala already in the market?

In this section, there are many things to consider, from the performance and benefits to the clients, to the perk packages for the employees to the efficiencies of the project repositories and the tools provided for that programming languages.

C# was created by Microsoft and therefore, in my opinion, has, by far, the most efficient tools for programming. I mean, Visual Studio, alone is the beast in this game.

visual-studio-2013-logo
Figure 2: Visual Studio logo.

I am a huge fan of Visual Studio, and i would doubt someone who isn’t a fan of Visual Studio. C# has a better support and benefit of using the best IDE out there. Java has also a number of IDE, so does C++ and many of the C programs are written in minimal environments, like a small program to manage and compile the C programs; no offence geeks!

2013-12-27-csharp-for-systems-programming
Figure 3: Graph of performance to safety ratio.

Now, if you look at this graph, it’s pretty much clear as to what it is trying to guide you with. Of course, as I had mentioned in the starting paragraph here, that there is no best programming language.

In many cases, C# and Java rule over C++ (and C) and in many cases, they rule over C# and Java. There are many factors, like the programming paradigms, performance of the code that is generated; Just-in-time compilation, memory-management delay and so on. While C# and Java may provide the best environment to build “managed” programs in, there are many cases where C# and java don’t work well, like writing a low-level program. Java developers wanted to build a Java OS, but they had to give up because something’s aren’t meant to be done in Java. 🙂

Always consider to search before making the final call. There are many companies working in the similar field that you are going to work in. There would be many packages and languages built for your own field that may help you to get started in no time!

top201020programming20languages-100422646-orig
Figure 4: Top 10 programming languages.

But, I think these are a bit backwards. I think, C is on the top because it causes a lot of trouble to beginners, so everyone is searching for “How to do {this} in C” on Google, raising the rankings. 😉

Selecting the best framework

I don’t totally agree with people when it comes to talk about frameworks like, Java, Qt (which I do like in many cases; like Ubuntu programming), and other programming frameworks available for programming applications to be run despite the architecture of the machine. In this case, my recommendation and personal views for .NET framework are very positive. As, already mentioned, I have programmed on Qt framework for Android, Ubuntu and Linux itself. It was a really very powerful framework to build applications on. But the downside was it was tough to learn, their compilers were modified, their C++ was tinkered.

While selecting the best framework for application development by choices are below:

  1. How much flexible a framework is?
  2. What language does it support?
    • Some frameworks support multiple languages, like .NET framework, it supports C#, VB.NET, Visual C++, JavaScript applications.
  3. Is it cross-platform?
  4. If not cross-platform, then does it support multiple architectures, at least?

Java framework is cross-platform, and entirely framework oriented. You simply have to target the framework despite the operating system or architecture being used. .NET framework on the other hand is a very beautiful framework to write applications on. It uses C#, VB.NET and C++ (no Java!) to write the applications, and then the compiled binaries can be executed on many machines that can support .NET framework. This provides an excellent cross-architecture support.

C# however, does not support Mac OS X, at the moment. Microsoft has started to roll out cross-platform binaries for C# programs. .NET Core has been a great success and once it gets released to a public version, I am sure most of the companies would start to target it. That is not going to happen, in a near future. In which case, Java and C++ are better than C#.

If you are interested in C# programming on multiple platforms, consider using Mono Project instead. You can read about that, on my blog here: Using C# for cross-platform development.

spectrum
Figure 5: Top languages and their platforms of usage.

Java may be supported 100% in the rankings, but C# is also supporting multiple platforms and is rapidly growing making the language better than the rest. With the release of C# 6, Microsoft has proved that the language is much better than the rest in the race. There are many features that I like C# 6:

  1. String interpolation
  2. Getter-only auto-properties as lambdas
  3. Improvements to lambdas

There are a few things Java still doesn’t have. For example, one statement code to write the data to the files and to extract the data. You have to get messy in the streams, or you have to write an entirely non-intuitive code with Files object and then to get the data from there… Yuk!

Performance of the compiled code

Writing the source code may be different in many ways:

  1. Syntax of the programming language.
  2. The way their objects and procedures are imported in the source code.
  3. How clean the source code looks. Many programming languages are just nightmares.

But the major concern comes to mind when we are going to execute the programs. In many cases, or should I say in all the cases, the language which are bytecoded languages, lag behind than the languages that are compiled to native codes or Assembly codes. For example, C or C++ codes are faster, because they are not compiled to a bytecode instead they are generated as machine codes for a platform or architecture. C# or Java programs are compiled down to a bytecode which causes a JIT to occur when the programs are executed. This takes time.

However, you can see the following charts from https://attractivechaos.github.io/plb/ and see for yourself, the way bytecoded languages are similar and how much compiled languages are different, see for yourself.

plb-lang
Figure 6: Mathematical calculations.
plb-lib
Figure 7: Pattern matching and machine learning.

Which makes it pretty much clear, how much compiled language are faster than bytecoded, and then come the ones that are interpreted, like Ruby.

In many cases, there are other factors too, which cause bad performance:

  1. Bad compiler.
  2. A lot of resources being allocated.
  3. Slow hardware resources; bad combination of CPU, RAM and other peripherals.
  4. Bad programmer and bad code being used.
  5. Bad practices of programming.
  6. Keeping CPU halted for most of the times.

Much more are a valid candidates for the halting processes.

Finally… Final words

As I have already mentioned that there is no best programming language out there. One language is best in one case, other is best in another case and so on and so forth. In such cases, it is always better to communicate with your development team and then ask them questions and ask for their feedbacks. Choosing the good tools for your projects is always a good approach and good step in the process of programming.

If your software engineer or software architect are trying to find a good solution, ask them to work on the following questions:

  1. What are the teams and developers qualified for?
    • Asking a team of C++ programmers to leave C++ and join Java or C# programming teams is not a good idea!
    • Always consider the best approach.
    • Time is money — Manage it with care.
    • Recruit more programmers with skills.
  2. Is the programming language long lived, or a minor one?
  3. Is programming language capable of making your application work?
    • I have used many programming languages, and thus I can decide which language to use. This is the job of your software architect to decide which languages to select.

If you follow these rules, you will save yourself from many of the future questions that cause a lot of problems. Many times developers ask questions like, “I have an application in Java, how to migrate it to C#?” Many web developers ask questions like, “I have a PHP application, how to convert PHP code to ASP.NET?” These questions have only answer. “Re-write the applications”.

There are many things that you should consider before designing the applications. Facebook is stuck with PHP, because it was written in PHP. Even if they wanted to migrate to ASP.NET, they won’t. Instead, they have found a work around the PHP bugs and downsides.

This is why, you should always consider using a conference or meeting to decide how to start the project, which programming language to use, what frameworks to target, who would lead the team and much more. These few days of discussion and designing would save you a lot of money and time in future.

Guide for building C# apps on Ubuntu: Graphical applications using Windows Forms

Introduction and Background

I took more than necessary break in posting the content and articles for Ubuntu programming in C#. Anyways, I am continuing from the same place where I left and, as already taught that we were at the final stages of sharing the guide for programming C# on Ubuntu; which can be thought of as a Linux environment. The previous posts can be found easily on my blog and on some of the networks that I support.

Previously, we had already talked about NuGet gallery packages, cryptographic helpers and much more. Whereas, in this post I am going to walk you people through using Windows Forms framework on Mono framework.

Windows Forms framework

Now, who doesn’t know Windows Forms framework in today’s world? If you have ever wanted to or have developed the C# programs or .NET applications. Then you are already familiar with Windows Forms application. Windows Forms is an old framework with graphical capabilities, and has been in the game for a more than a decade by now! It has started to get replaced by Windows Presentation Foundation, but nonetheless, it is still very popular and is being used widely by many software developers and many software development companies are still relying on it.

There are many benefits of using Windows Forms in your regular development teams,

  1. It supports graphics, not just the CPU and RAM processing.
  2. It can be used with resources for localization support is excellent.
  3. Provides a better way for drawing graphics on canvas.
  4. Event handling, delegate generation.
  5. Asynchronous programming patterns.
  6. Good data binding support provided.

I am going to provide you with some good references that you can use to learn more about Windows Forms, if sadly, you have no idea about the Windows Forms framework. However, one thing is for granted. Using Windows Forms is one of the easiest ways of building the graphical applications in ,NET environment.

References

Follow the following links and learn more about Windows Forms:

  1. Windows Forms
  2. Getting Started with Windows Forms
  3. Windows Forms Overview

Graphical applications in Mono Project

We have until now, discussed and learnt how to build small programs and some very common applications that use special kind of algorithms, such as cryptographic helpers which can be used to encrypt and decrypt the data in Ubuntu using C#. Now, until this we haven’t covered graphical applications development in Mono, because that is where this framework lags behind.  So, in this post we would like to learn how to build applications with graphical capabilities too. But, first, let’s talk about the frameworks provided in Mono Project itself.

  1. GTK#
    • Which is a similar one to the GTK+ that C++ programmers have. This is a graphical toolkit that compiles down to the native code generation. It supports the native look and feel and can be used. But, it is somewhat difficult to learn!
      Banshee1
      Figure 1: GTK# control application example.
  2. Windows Forms
    • This is the topic that we are going to cover in this post.
  3. Other tools?
    • Not yet, Mono Project is not ready to implement other frameworks yet.

The thing is, Mono Project doesn’t have an excellent UI designer as we have in Visual Studio.

Screenshot (3062)
Figure 2: Visual Studio UI Designer.

In Mono Project and Xamarin Studio, you are not provided with the similar tools until now. However, the designer is just the wrapper around the back-end code available. Xamarin Studio does have a good designer, but that works with GTK# tools and controls only. Not in the case of Windows Forms.

Applying a quick hack!

If you have ever programmed for Windows Forms, then you would know that Windows Forms is actually a bunch of objects with many fields and properties, which run and work to render the graphics on the screen. The same is applicable here. We would be using the codes to render the stuff on the screen. Basically, everything that you have on the screen is a field in the backend class, such as “Button”, “TextBox”, “Label” etc. These are all going to be used, but, we are going to write the codes for this, instead of having a designer build them up for us.

Building the UI with Windows Forms

So, I hope using the hack is clear to you, after all, it is not a hack it is the actual way in which Windows Forms applications are constructed, built and executed. Only difference is that on Windows we also get to use the UI designer. In case of Mono Project, we would have to craft the UI with our own codes and then re-implement it if there is a changing to be performed on the screen later. Thus, putting it simply, we are going to implement it the hard way since there is no, “Drag-and-drop” method here.

To get started, you need to understand that a Windows Forms application is a C# application too. So, only thing to understand is C# language itself and the .NET framework. We are going to use the same concepts of .NET framework and then implement the same concepts to Mono to get our graphical applications ready.

Create project — Any type

I had chosen to build this application on the top of Console application. You can select other types too. But, my recommendation is using the Console application.

Screenshot (3064)
Figure 3: Selecting the console project as the type.

Enter the names and details and create the project.

Screenshot (3065)Figure 4: Entering the details for the project.

At this moment, you will be at the same stage where you were in the beginning of this module, and the previous ones. You will have an empty project, that only renders, “Hello world”. That is the start, from here we will continue to build the larger and complex stuff.

Screenshot (3066)
Figure 5: Hello world!

This program is the default program that every time we were shown. Now, we need to add the graphics to the console. That’s simple. All we need to do is… Read the next section. 😉

Adding graphics to the console

Adding the graphics to the console is pretty much simple, you just need to do the trick as:

  1. Include the System.Windows.Forms namespace to the project.
  2. Include the System.Drawing namespace to the project.
  3. Import the packages to your source code.
  4. Write the code yourself; since we do not have the designer.
  5. Run the program, and you will see the program start up.

But, I am going to show you how to do that in a minute or two. But first, let us understand why Windows Forms can be build using the code itself. The thing is, the Windows Forms applications are started on a thread, the thread gets the graphics objects and bitmaps which are rendered on the screen later. The objects are simply instances of the classes, for instance of Button class. These are all passed to the Application object, and they are executed, upon execution they render the graphics on the screen.

Another thing to understand and note is that Windows Forms uses System.Drawing to draw the native code in Mono. Mono targets the objects using the assemblies provided in System.Drawing namespace, and then renders the objects on the screen. At the moment, Mono supports on Win32 theme for the objects. In the end of this post, you will see how your objects are going to look. Remember, the objects are instances… 🙂

Open the references and add the references to System.Windows.Forms and System.Drawing namespaces,

Screenshot (3067)
Figure 6: Initially references are like this.

Screenshot (3068)
Figure 7: Adding the references to the namespaces. 

Now that we have everything set up, we can now continue to create a new Windows Form. This method is not similar to what we had in the previous IDEs, like Visual Studio. Instead, we are going to just mimic having a Windows Form.

Adding the Windows Form to your project

First thing to note is that there is no way of creating the form by itself in Mono Project. So, we are going to create a new object, and then we are going to turn it into the form and then render it using the main function. That’s just similar to what happens in Visual Studio too. You create the form, whose graphics are rendered separately in a designer, and the codefile is generated separately. Visual Studio maintains everything for you, which is why you do not feel anything different.

Step 1:

Create a new class, name it what you like, I chose MyForm and then write the following code to it.

using System;
using System.Windows.Forms;

namespace GraphicalApp
{
    public class MyForm : Form
    {
        // No properties.

        public MyForm ()
        {
            // Default constructor
        }

        // No functions.
    }
}

This is it. This is out, Windows Form now.

Step 2:

Before running the program, you also need to make sure that the main function now calls this form to be executed in the application too.

// In the references
using System.Windows.Forms;

// In the main function
Application.Run(new MyForm());

Now, run the project and you will (should!) see the following window with no controls, but with a graphical notation and rendering.

Screenshot (3069)
Figure 8: Sample empty Windows Form application.

This shows that our project is ready to accept the objects for graphical components. We can now write the code for the objects that we need to render. For example and for the sake of simplicity I would like to create a sample form that renders the form, which would ask me about my name and then would greet me once I click on the button.

All of these are core C# programming concepts and this has nothing to do with the Windows Forms or any other fundamental concept. Instead, these are very simple and yet easy features of C# programming language itself.

Step 3:

Anyways, to update, we can just update the MyForm class and write the code that we would need to have in order to render the form.

using System;
using System.Windows.Forms;
using System.Drawing;

namespace GraphicalApp
{
    public class MyForm : Form
    {
        // Properties.
        private Label label;
        private TextBox myName;
        private Button btn;

        public MyForm ()
        {
            // Call the function to render the objects.
            Text = "Windows Forms app";

            this.Size = new Size(300, 350);
            render();
        }

        private void render() {
            label = new Label { Text = "Your name: ", Location = new Point(10, 35) };
            myName = new TextBox { Location = new Point(10, 60), Width = 150 };
            btn = new Button { Text = "Submit", Location = new Point(10, 100) };
            btn.Click += Btn_Click; // Handle the event.

            // Attach these objects to the graphics window.
            this.Controls.Add(label);
            this.Controls.Add(myName);
            this.Controls.Add(btn);
        }

        // Handler
        void Btn_Click (object sender, EventArgs e)
        {
            MessageBox.Show ("Hello, " + myName.Text + "!");
        }
    }
}

Now again run the program, and you will see the following graphical application being rendered on the screen for you!

Screenshot (3070)
Figure 9: This is the Windows Forms application on Ubuntu. 

Screenshot (3071)
Figure 10: Entering the data and seeing that it works. 

Now, if you have been an old geek for Microsoft and Windows, then you would know that this style existed for decades in Windows environment. This style was typically adopted for Windows programming with C++, especially Win32 and then later C# was introduced and they had a different style; create a WPF app and look for yourself!

This is how Mono does the trick for Windows Forms. It does support Windows Forms and can use the same power of .NET framework to provide the similar ways to build the graphical applications for Linux environment. The benefit is that, you can now execute, build and run these graphical applications on Windows, Linux (every distro that supports Mono runtime) and Mac OS X. What more could you ask for? 🙂

Points of Interest

In this post, i have walked you through different stages of building the graphical applications on Ubuntu using C# in Mono Project. The benefit of using graphical applications is that you can do more in less area, because “A picture worth a thousand words!”. Windows Forms is a framework that has been widely used by programmers of C# language and is still being used. If you can port your applications of Windows Forms to other platforms, it would be much better.

In this post, I have shown you how to do that. You can port your Windows Forms application, by porting the code for that application project, and then building it under Mono compilers.

The Mono runtime however, only supports Win32 theme for controls and however, provides a versatile amount of features, incredibly, they support all the new features of Windows Forms too. Which means, you can work around with:

  1. Graphics
  2. Multimedia
  3. Content management
  4. Data binding
  5. Event handling
  6. Asynchronous programming

And much more. There are more posts about Mono framework to come, but we are getting closer to having the guide completed and to be ready as a complete guide for “Programming C# on Linux”; or Ubuntu, what-ever you prefer. 🙂

Guide for building C# apps on Ubuntu: NuGet packages

Introduction and Background

If you have been programming C# applications, then chances are you are pretty much aware of what NuGet packages are. However, if you don’t know what that is, it is an online storage for dynamic-link libraries (.dll) for .NET programs. Most programmers (including me) have contributed toward the total packages currently available on NuGet. NuGet allows developers to reference the libraries from third-party programmers, easily, all by typing a command!

In the previous posts, I had already talked about the basics of Ubuntu programming using Mono, in this short piece I am going to talk about NuGet packages in Mono. NuGet packages are of great use in Visual Studio, you can download the most wanted packages from NuGet to increase the productivity of your application. I have personally used Newtonsoft.Json package many times to introduce data sources in my applications based on JSON files and C# code, a usual example of this can be LoginKeys framework that I wrote for authentication systems. There are many other useful packages that you would like to use while programming, in this post I am going to talk about, methods to include the package in your application development project.

Managing the NuGet packages

In this section, I will demonstrate two things:

  1. How to manage the repositories, from where to fetch from.
  2. How to install the packages and use them.

So that you can have a good understanding of NuGet packages, package management and how to use them in your projects.

Configuring the IDE

First step is to configure the IDE, by default, IDE is configured to capture the packages from NuGet’s current API version, which is, https://www.nuget.org/api/v2/. In future that may change, so that is why you may need to configure the IDE… Just showing, the settings are available under IDE settings.

Screenshot (5864)
Figure 1: NuGet package gallery management.

You can edit this to configure the IDE to capture the packages from the actual location. You can also open these settings from the NuGet package management window itself, by selecting “Configure sources”.

Screenshot (5865)
Figure 2: Options available for currently provided NuGet galleries and option to configure the sources.

This would allow you to alter the sources and other settings, you can also change the names for the galleries. However, that is pretty much simple, and I am sure you can manage to do that all by yourself. Now, let us consider installing and using the packages in our applications.

Installing the packages

Fun part starts! The packages, can be easily installed using the GUI window provided to us by MonoDevelop itself. We can search for the packages, or install the most popular ones that are shown in the listview itself. It is very much simple, to install the package.

I have demonstrated the procedure in the following image:

Screenshot (5867)
Figure 3: NuGet package management window.

Now, what I have done is that I have introduced steps required to install the package. You can follow the same steps to install any package.

  1. Find the package in the list. I have selected, Json.NET package.
  2. If you find yourself confused while selecting a package, you can check for the explanation of the package in the right side, name, version, description and author details are shared here. You can make sure you are selecting the “correct” version of library.
  3. Click on “Add Package” to add it.
  4. This option is not required, and is used to turn on and off beta versions, pre-releases.

Now, once you have clicked on the “Add Package” button, MonoDevelop would take a minute or two and then add the library package to your application. In my system, it took ~5 seconds, so don’t worry it would download and install the packages, in a while. Once that is installed, your references would look like this:

Screenshot (5868)
Figure 4: Newtonsoft.Json package installed to the project.

Json.NET library is the Newtonsoft.Json library, so it gets added to the project under “From Packages” category. This has been added to the project, and you can then get to use it in your project. Before, I do that, let me show you how to search for the project packages in NuGet.

Where on file system are they stored?

This is another interesting thing, in Mono environment, the project packages that are downloaded from the galleries, are stored in the same package directory. For more on package directories, please read my previous post: Guide for building C# apps on Ubuntu: Project files and output. In the directory, a new folder, “packages” would be created and then your newly referenced package will be stored there for later references.

Screenshot (5873)
Figure 5: “packages” folder in the project directory.

You will find the code, and other files all in this folder. This is done so that you can use the package later, the packages in NuGet are online and thus you cannot bear to pay the price of network latencies each time you want to build the project, downloading the assemblies is the easiest method.

Searching for a library

Search bar is also provided in NuGet management window, that you can use to search for the libraries. The list shows only the popular ones, but if you want to search for third-party average project libraries, that are not in the use of people more often, you can use the search box to search for those libraries and window would bring up the matches that it finds on the gallery. You can then select from those results and get what you want to install in your application project. For example, to install LoginKeys package, you can write the keyword in the search box and NuGet package manager would bring the results, so that you can select from the search results.

Screenshot (5869)
Figure 6: LoginKeys package being shown in the search results.

You can see that the GUI window has shown the results, and also, it has provided me with the details so that I can know that I am installing the correct version of library, from the author I trust (do I trust myself? Nah!), then I can follow the same steps and install this package to my project too.

Updating and restoring packages

In Mono, updating and restoring the NuGet packages is also very simple, and takes just a click! Yes, have a look below:

Screenshot (5874)
Figure 7: Options to update or restore the NuGet packages.

These are the options provided, to update or restore the packages, just click on the option and Mono would do it for you! There are many other options also available along with these.

Referencing the package namespace

Once you have added the package to your project, you need to reference it in your source files too, although the assembly is available, but to be able to reference the functions in your source file, you also need to add the using statement in your project. We are having the Newtonsoft.Json package, to be able to consume the library, we would need to reference it and then build the application.

Have a look at the following code:

Screenshot (5871)
Figure 8: Compiler error shown.

The problem, you are right, is raised because we have not yet referenced the namespace to include the object JsonConvert in our project. So, we write the code like this:

using System;
using Newtonsoft.Json; // Adding the reference

namespace NugetPackages
{
    class MainClass
    {
        public static void Main (string[] args)
        {
            /*
             * We do not need to create a new class, instead
             * we can create anonymous types. 
             */
            object anon = new { Name = "Afzaal Ahmad Zeeshan", Age = 20 };

            // Now the function would serialize the anon object
            var serialized = JsonConvert.SerializeObject (anon);

            // We then print the JSON format on screen.
            Console.WriteLine (serialized);
        }
    }
}

This code would compile and execute safely. The output of this code is like this (I think, you already know),

Screenshot (5872)
Figure 9: Result of the above code.

Pretty simple, I don’t need to explain it at all, because Newtonsoft.Json namespace is already very famous and widely used package.

Points of Interest

THis is another post in the series of “Programming C# on Ubuntu” category of articles. In this post, you were taught to use NuGet packages in your Mono projects on Ubuntu. The post was intended for absolute noobs and beginners in Mono programming on Ubuntu, and hopefully, you have been taught to program applications on Ubuntu.

This was somehow a short descriptive post for NuGet packages only. In later post, you will be taught to develop libraries and re-use them in other projects. Stay tuned for the upcoming post. 🙂

Guide for building C# apps on Ubuntu: Cryptographic helpers

Introduction and Background

In the previous posts, I had shown how you can use MonoDevelop IDE of Mono Project to get started programming C# applications on Linux environment and for the operating system I used Linux distro, Ubuntu operating system. However, since all of the topics are covered already and I am just skimming through the snippets and small portions of the data that I can share, this is another post in the series before I continue to write a guide for this, in a compiled form. In this post, I am going to talk about cryptographic support provided in Mono itself, for Ubuntu. However, you can always write your own compiled modules that run the cryptographic services and you can also write your own modules that represent the procedures and steps shown in the certified algorithms for cryptography. But, in this post I will talk about the built-in classes and objects provided to you for these services.

I have also talked about security tweaks a lot before, and I would like you to read my previous posts about security in .NET framework too, A few tips for security in .NET framework. Since this is much more about Ubuntu and C# programming using Mono Project. I recommend that you read the previous posts in this series of articles.

  1. Guide for building C# apps on Ubuntu: MonoProject Introduction
  2. Guide for building C# apps on Ubuntu: Language quickies
  3. Guide for building C# apps on Ubuntu: Project files and output

So basically this is another post in the series of Ubuntu programming using C# language, Mono Project has been a great tool for C# geeks. In this post I am going to talk about the hashing algorithms, and what else Mono Project has for us!

Security APIs in Mono

No wonder Mono is influenced based on .NET’s philosophy and C# language, but still it lacks many things when it comes to the core APIs, such as security API. It does not have a full package of the APIs in it. For example, on .NET framework the support has been increased to SHA256, SHA512 and more, where as on Mono there are not much flavors currently added and you only have to stick to either one of the provided, or you would have to manage the base algorithms and write your own implementation of the algorithms. Which, definitely, would be hard job! Until Mono introduces some new algorithms, let’s stick to the provided ones and learn about them, how to use them and what they can serve us with.

In Mono APIs, you get two namespaces for security algorithms. The algorithms can be for simple encryption and decryption or it may be for the password hashing purposes. Now, these two are different in many ways, however they are categorized under “Cryptography” in computer science.

  1. Encrypting/decrypting: is a process in which you encode the data in such a way, that a special secret key is required to bring the data back in its original form. It is used while securing the data from potential spywares, because each time you have to access the data, you need to pass a special secret key with it.
  2. Hashing: is a process, typically used for passwords, but is not only restricted to passwords. Hashing is a technique, in which data is encrypted, in such a way that it is impossible to be converted back to its original form.

Mono namespaces provide you with objects that allow you to work around with these functions and add a layer of security to your applications. Now, let us first of all, talk about password hashing and then we will get into the encryption and decryption techniques provided in Mono runtimes for developers.

During the article, I will only focus on the objects provided in System.Security.Cryptography, however you can still use Mono.Security.Cryptography, but the recommended one is the native .NET framework’s cryptography namespace.

Hashing the passwords

Hashing the passwords has been widely used in every network based application, or online application. Hashing is a process, that is not just restricted to the passwords, as I have already said, the hashing has been widely used to determine the file consistency. Most of the software packages are introduced with MD5 or SHA hash values, they are used to determine if the file is in its real form or if it has been tampered with on its way to your machine. This ensures that the software package that you are installing is actually the “safe” package and has not been mixed with any malware or spyware content. The code from open source communities, such as Ubuntu, Linux and other open-source projects are widely exposed to such attacks, and if you install such packages they make expose your private data and even ask you for some revenue, that happens in cases of ransomware, Linux.Encoder.1 was one of such viruses, that encrypted the user data and then asked them to pay revenue to get their data back. However, hashing is a very simple task in .NET framework at least.

Usually, there are many algorithms provided in every framework that can be used in your applications, most commonly used are:

  1. MD5
  2. SHA-128
  3. SHA-256
  4. SHA-512
  5. So on…

Now, before I move any further, I should warn that you should never ever use MD5 for hashing the passwords. MD5 algorithm is very weak and a simple rainbow table attack would expose the passwords. In many cases, you should use SHA-128, or SHA-512. But the recommended one is SHA-256, because of the digest that it creates and the security that it has. I would personally recommend that you use SHA-256, if you want to store a small size of digest (hashed password string; in hex), otherwise, my personal advice is to store SHA-512.

The benefit of having SHA-512 over SHA-256, is that you can minimize the chances of collisions  while generating the hashes for the passwords. A collision would typically occur when the hash results are similar for different values. The thing is that the hash function would return a hashed string to a limited size, but it can get an input of any size. Bigger files of larger byte arrays may result in a collision. So, to overcome the collision you may want to generate a hash of bigger size.

Now, talking of hashing the passwords, let me share how to hash the passwords in C#. The procedure is actually similar, if you have a code for .NET on Windows, same would be used on Mono on Ubuntu. Have a look below:

// Function to hash the passwords
public static string HashPassword(string message) {
   // Create a new instance of the SHA-256, 
   // you should use SHA256Managed instead of SHA256 object.
   using (var algo = new SHA256Managed ()) {
       var bytes = System.Text.Encoding.UTF8.GetBytes (message);
       var hashedBytes = algo.ComputeHash (bytes);

       // The hash has been computed, to convert those bytes to string
       // I will use the following code, you may use your own
       // code to convert the byte array to string
       System.Text.StringBuilder builder = new System.Text.StringBuilder ();
       foreach (byte bite in hashedBytes) {
          builder.Append (bite.ToString("x2"));
       }

       // Return it to the caller, to write it.
       return builder.ToString ();
   }
}

So, basically, what I have done is that I have just used that algorithm and I have got what I was expecting from it. Now, the way we call it defines how we use it. In this sample, I will be calling it to write the hash of it, to the screen and nothing else.

Console.WriteLine ("Enter the string to work on:");

// Get the message
string message = Console.ReadLine ();

// Hash the password.
string hashedStr = Crypto.HashPassword (message);
Console.WriteLine ("Hashed string is: " + hashedStr);

Basically, we have already created the function that does the thing for us. So we are only calling it in this code. So, if I run the above code it would be something like this…

Screenshot (5858)
Figure 1: Working of the hashing algorithm on the word, “Afzaal”.

You would store this hashed string in your database when you want to save it. Never save the passwords or sensitive information that you do not want to get back in the actual form, in plain-text form.

Adding some salt to the hash

Now since we are talking about hashing the passwords, it is necessary to add a specific string text to the actual string, which acts as salt to the data. The procedure is very much simple and straightforward, you simply add extra string to the actual string and then find the hash for it. Where you add the salt is your choice, you can append it, prepend it, or insert it at the medians or what-so-ever, that is your choice.

HashPassword (password + salt);             // OK
HashPassword (salt + password);             // OK
HashPassword (salt + password + salt);      // OK

But only thing that you should consider is that you should use the same method to get the hash again, because if you calculate hash differently, their hash value would be different.

2a3a25c485162eb7767a9ce20a52febf
Figure 2: Demonstration of the hashing a string message using salt.

When to use hashing?

You can use the following list items to determine when to use hashing functions on your data.

  1. When you want to secure your data from potential sights.
  2. When your data is valuable only for comparison and not required in its raw form. Passwords are a good example of this type of data.
  3. When you want to check if the file system is tampered with.

References:

If you want to learn more about hashing functions, you should go and read the following links:

  1. Security in .NET Framework
  2. System.Security.Cryptography namespace on MSDN
  3. SHA-2 on Wikipedia

Encryption and decryption of data

Now that we have already talked about the hashing of the passwords and the data, we can now continue to talk about the encryption and decryption of data in Mono using C#. Encryption and decryption techniques are used to hide the data from unwanted users. It can be shared with other users, and they can also view it, but any user who is not required to be using or viewing the information can be removed from the list of viewers.

r4VtMoZ
Image courtesy: This image demonstrates how encryption and decryption is done.

Now we will talk about the coding practices in encryption and decryption. The plain-image, pseudocode and algorithm is very much easy, however, the coding in .NET environment is also very much easy. In the coming sections, you will be shown and taught how to use .NET objects, to perform security restrictions in your applications.

As far as the algorithms are concerned, just like in case of hashing, there are a lot of encryption and decryption algorithms: AES, Rijndael, DES etc. All of them are used, but there are some problems with the later ones and that is why AES algorithm is recommended. However, in my case, I will use Rijndael algorithm, you can change it to AES (and you should change it to AES, I am only using it for demonstration purposes!).

What we do, is that we actually divide the process in a number of steps:

  1. Create the object for algorithm; Rijndael in this case.
  2. Case the memory stream to hold the data.
  3. Create a cryptostream for that memory stream.
  4. Create a stream writer/reader based on encryption or decryption process undergoing.
  5. Return the encrypted or decrypted text.

Each encryption algorithm would require you to pass a special “Key” that would be used for encryption and decryption. The key is the backbone. Without that key, data cannot be converted back to its original form. That is why, keys are kept secretly, in safe places so that potential hackers cannot get to the data. So for demonstration, let’s use the IDE to write some code in it.

1. Encryption function

First of all, let us write a function that encrypts the data as we mentioned in the steps above. A hash function would return an array of bytes, so we would define our custom function to do the same, so that later when working with the values, we can change the data in any form, or save it just the way that it is.

public static byte[] Encrypt(string data) {
    byte[] bytes = null;
 
    // Instantiate the algorithm
    using (var rjndl = new RijndaelManaged ()) {
       // Set up the properties
       rjndl.Key = key;
       rjndl.IV = iv;

       // Create the memory stream
       using (MemoryStream stream = new MemoryStream ()) {
          // Create the crypto stream
          using (CryptoStream cStream = new CryptoStream(stream, rjndl.CreateEncryptor(), CryptoStreamMode.Write)) {
             // Create the stream writer to write the data.
             using (StreamWriter writer = new StreamWriter (cStream)) {
                writer.Write (data);
             }
          }

          // Convert the stream of encrypted text, to array.
          bytes = stream.ToArray ();
      }
   }

   // Return the bytes.
   return bytes;
}

This function is enough,  this would encrypt the data and would provide us with the bytes of the data, in encrypted form. We can then convert those bytes to string, or save then in BLOB format or what-so-ever as required. I will demonstrate the usage in a later section, currently I just want to jump to the decryption part.

2. Decryption function

As name suggests, it is an inverse of the encryption function. The steps required are similar, only that we create a decryptor object for the cryptostream and then start reading the stream in a decryptor object using the same key that was used to encrypt the data in this bytes form. If you use a different key, results are “unknown”.

The following code does the thing for us:

public static string Decrypt (byte[] data) {
    string message = null;

    // Instantiate the algorithm
    using (var rjndl = new RijndaelManaged ()) {
        // Set up the properties
        rjndl.Key = key;
        rjndl.IV = iv;

        // Create the memory stream with the bytes of data
        using (MemoryStream stream = new MemoryStream (data)) {

            // Create the stream with the decryptors
            using (CryptoStream cStream = new CryptoStream (stream, rjndl.CreateDecryptor (), CryptoStreamMode.Read)) {

               // Create a stream reader for the crypto stream
               using (StreamReader reader = new StreamReader (cStream)) {
                   // Read the data to the end.
                   message = reader.ReadToEnd ();
               }
           }
       }
   }

   // Return the message.
   return message;
}

We now have the counterpart of our encryption/decryption algorithm or service (call it what you like!). Now that we have both of our functions ready, we can now test the function and see if it works in our cases for encryption and decryption.

I am going to enter my name, and then I will get the encrypted text plus the decryption function would be executed to get the data back.

Following is the main function,

Console.WriteLine ("Enter the string to work on:");

// Get the message
string message = Console.ReadLine ();
Crypto.Setup (); // Look at the code block below!

// Run the logic
var encrypted = Crypto.Encrypt (message);
var decrypted = Crypto.Decrypt (encrypted);

string encryptedStr = null;
StringBuilder strBuilder = new StringBuilder ();
foreach (var b in encrypted) {
   strBuilder.Append (b.ToString("x2"));
}

encryptedStr = strBuilder.ToString ();

Console.WriteLine ("Original text was '" + message + "', it was encrypted to: \n" + encryptedStr);
Console.WriteLine ("Decrypted text is: " + decrypted);

The output of this program was,

Screenshot (5859)
Figure 4: Encryption and decryption function on “Afzaal Ahmad Zeeshan” string.

Pretty simple, right? 🙂 So, finally we have encrypted and decrypted the text in Ubuntu using Mono Project…

Tips:

  1. Consider changing the Rijndael to AES.
  2. Keep a strong key, use the provided functions to generate a “strong” random key.
  3. Decrypt when needed.
Using Rijndael or AES?

Rijndael and AES can be confusing somehow. Don’t worry, I was also confused as to which is better and which is not. The thing is, Rijndael algorithm was developed along with numerous other algorithms, to come on top as “best algorithm for encryption and decryption“. Rijndael won, and was selected as AES algorithm.

Does that make sense? It should… If that doesn’t, read this blog post.

Points of Interest

This is another post in the series of “Programming C# on Ubuntu” articles. In this, I have talked about cryptographic programming in Mono Project on Ubuntu. The services are similar to what we have in .NET framework on Windows operating system. However, there are some other namespaces provided by Mono itself, but still, .NET namespaces rule them out. The services that you can find in .NET are amazing, and C# language itself is just perfect language to be used for any project! I am writing this guide, to share the beauty of C# on cross-platform environments too, for those who are unaware of this currently.

In this post, you were given a few tips and you were shown how to perform cryptographic functions on your data, including hashing the passwords, encrypting and decrypting the data on your machine. Cryptography can greatly influence your application’s performance, and your users would like the privacy and other services that you have for them, such as encryption and decryption of the data, using which they can save their data from unwanted users, and yes, hackers!

In later post, I will talk about NuGet package managements, and then I will head over to writing a guide, in the form of a book itself. See you in the later posts. 🙂

Guide for building C# apps on Ubuntu: Project files and output

Introduction and Background

In the previous posts for the series I talked about the IDE itself, I talked about the tools provided in the MonoDevelop and the Mono Project for C# developers that would help them do their jobs quickly. You may want to read those posts first and then continue to read this post, or the either way as I have tried to abstract the posts enough.

  1. Guide for building C# apps on Ubuntu: MonoProject Introduction
  2. Guide for building C# apps on Ubuntu: Language quickies

Later, you can continue to read this post. This post has a primary focus on the project files, compiled assemblies and the executable files generated after the build process. So, although this would be a very short guide, I would try to explain every aspect of it. You can however, do let me know if you find something missing here.

I assume that you already have an idea of C# project files, typically they are:

  1. One solution file (.sln)
  2. A folder for the project itself.
  3. Properties files
  4. Binary and object files folder.

You will find this template for a project of C# everywhere, from Console to any graphical application that you may be using. The template is chosen to make sure you can always skim through the file system and find the required item there. So now let’s talk about these items in detail…

Project files and output locations

If you have ever programmed in C# on Windows, using Visual Studio you may know the common folders and locations for the project and the generated binaries. For each of the project that you create, Visual Studio creates a quite similar project directory and puts the source code, project settings files, and others in that directory.

MonoDevelop does the same for you! MonoDevelop would ask for a location to create the directory for the project and would then use that location to create new files, and to place the compiled executables. We are going to talk about a few of these locations and the files generated there.

1. Project directory itself…

First of all, let us talk about the project directory that gets created. This location is chosen by you, you are given full permissions to chose a location to select the directory at. You can enter the location and then MonoProject would use the same location to perform the actions, like creating and adding new files, resources and source files, also the same location is used to generate and place the binaries and object code files. So, this directory is used throughout the project life, chose it wisely.

So, for example, when we created the project (in the previous sections), we entered the following location to be selected as the project directory.

Screenshot (5241)
Figure 1: Creating the project and entering the location for the project directory. 

Have a look at the “Location” field in the above window. We can change it from here, we can also browse for a new location and well, you get the idea that we can create the directory anywhere that we find it helpful and easy to be found!

Remember: Projects is also a manual location in Ubuntu, by default the home folder for users do not contain a folder named Projects.

Once we create the project, the files are generated at that location and the project window opens. However, we are only interested in viewing the directory itself and not the project code. The files that are generated here, are very much similar to Visual Studio’s files, it also contains the solution file, Solution files typically hold the information for the project, files and other settings and configurations that you make in the project; like architecture support. Only these files are provided along with the templates because IDEs use a special project file to determine the configuration and the files for the project.

By default, the directory has 1 sub-directory and 2 files:

Screenshot (5708)
Figure 1: Root level of the project, one folder and solution and preferences files in the directory.

As already discussed, the directory is used to hold the files and references for the projects and also holds the generated binaries and executable files. However, before diving any deeper. Let us talk about the files that we can see right here. These files contain the settings for the project and for the user sessions.

Solution file

First of all, let us talk about the solution file itself. The solution file is basically the settings and overall configurations that you make to the project itself. The project is what you create when you start Mono and go ahead creating something. Things that you create in a project are files, resources and source code files etc.

We can open the file up in the text editor, the code in this file is simply commands and settings that would train the environment to set up the configuration for build and a few others, like the name of the project (obviously!)

This file contains the information about:

  1. Project itself.
    • Name
    • Package identifier. Sometimes a GUID.
  2. Build configurations.
    • They are written in the global scope for the environment.
    • Active build configurations for debug and release mode.
    • Extra configurations.
    • CPU architectures used.
  3. Project details file name and other minimal files used for project management.

So, this file is created and is maintained throughout the project. You can also start the project by double-clicking the file for C# project in the same directory (make sure you do not open it in text editor itself). For more on Solution files please refer MSDN, as they describe the file in a much better way: Solution (.Sln) File.

User preferences

Ever wondered how does your IDE know where to start and which line you were previously working on? This file holds the information for that, this file holds the information for currently active file, currently active line and even the column where your cursor was!

So, basically this file holds the information for your currently active session and when you reload the IDE and the same project, your IDE would know where to get you started from. This saves a lot of time of developers as the source code file and the line is already active, they can just continue to work from where they left it.

This file also keeps a hold of your breakpoints. So, everything and every change that you make in the files (not the project!) is saved here. This file is checked against when a new instance is starting so that your sessions are started without any trouble.

This ends here. I think the purpose of these files is pretty much clear. The next step is to go inside the folder and look there… Next I will simply just talk about the files, and the output folders where you would find your assemblies being generated.

2. Inside the project directory

Inside the project directory, the required files for the project building procedure are available. The source files, project building libraries, executables and other binaries are all managed and collected to be placed here. Each new file that you create is created here, and the project knows which files you currently hold and which files that you have removed. So overall the directory is just to hold the files for the project. This directory is used as the location for the files and resources when the build process starts.

Screenshot (5710)
Figure 2: Inside the project directory.

Now these are the entire files required to run our sample project! The project files, solution files and user preferences are all found here and… Well, there is another a simple Program.cs file found too. All of these files are used to generate the assemblies (which are later placed in the bin folder, displayed above). Technically, if either one of these files are missing (the ones that are required at the compile-time), your project cannot compile. You will get errors and you would either have to create a new project, or edit the profile itself to make sure that the errors are minimized. So it is recommended that you do not tamper with these files and let the IDE do what it is intended to do.

Properties

This is another folder in the project itself and well technically it contains the properties for your project. The properties are of the assembly, the information about the assembly, versioning etc are found here. Currently, this folder contains just one file, “AssemblyInfo.cs”.

Screenshot (5835)
Figure 3: Properties folder.

This file is used when referencing the assemblies in the projects. You can get more information from MSDN or any other resource that talks about Assembly Information in C# applications.

bin and obj folders

These folders are used when IDE has finished building a project. They are used to maintain the executables for the project. However, they are not required to be there. Your IDE would itself create these folders when you run the build process, if you have deleted them before.

Just for the sake of demonstration, please see the following image, the executable can be found in the following folder:

Screenshot (5836)
Figure 4: Debug executable found in the bin folder.

This “.exe” file can be used to execute the code that we just wrote in the application. But remember, if you previously deleted the folders, you still need to build the project again to find the executables here. Otherwise, the folder would be empty.

Points of interest

This is another post in the series of Programming C# on Ubuntu. In this post, I have talked about the overview of the project file and directory structure. Where are your executables placed, what files are provided in the templates and which are optional locations.

This was just an introductory post and that is why is much concise. In upcoming post, I will talk about cryptographic services provided by MonoDevelop for C# programming on Ubuntu. So, stay tuned for the next publication.