Tag Archives: mono project

Why to use C# and when to prefer other languages?!

Introduction and Background

Either it is Quora, or is it C# Corner or is it CodeProject, beginners and novice users are always asking questions like, “Which one to use, C++ or C#?”, and many more similar questions. It is harder to provide an answer to such questions on multiple platforms and to multiple questions. That is why, I thought, why not post a blog post to cover most of the aspects of the question. In this post I am going to cover a few of the concepts that you may want to understand to chose either language from the most widely used languages:

  1. C or C++
  2. Java
  3. C# (or .NET framework itself)

Basically, my own preference in many cases is C#, but that depends on what I am going to build. I have been using C, C++, Java and C# in many applications depending on their needs, depending on how they allow me to write the programs and depending on whether it is the suitable programming language for this type of project and application architecture.

The way, I do that, is just a trick. Which, I am going to share with you, in this blog post. Among these a few of the very basic things to consider are:

  1. How simple and easy it would be to use this language in the program?
  2. What is the productivity of that language in your scenario!
  3. Difficulty level and how many people know the language!

I will be talking about these things points in this post, so to make it clear where to use which programming language. But my major concern in this post would be to cover the aspects of C# programming language.

Productivity of language

First thing to always consider about the language is the productivity that a programming language can provide your team with. Productivity of the language depends on many factors, such as:

  1. How programs are built in that language?
  2. How fast and reliable is it to build the project regularly?
  3. Is the program’s source code readable for other members on the team?
  4. Is the language itself suitable for the case that we are going to use it in.

Productivity of the language, in my opinion, is the first thing to consider as the valid candidate to always discuss in the team and not just talk about in a black room. You should manage to get your teams up in a conference room, and then talk about a language. There may be many aspects where one language may fall short and other may get well. There would be many factors that most of the programmers don’t know but talking about them one of the geek would stand up and raise another important point that may guide your team to walk on the correct paths to build greater applications.

Let’s talk a bit graph.

chart
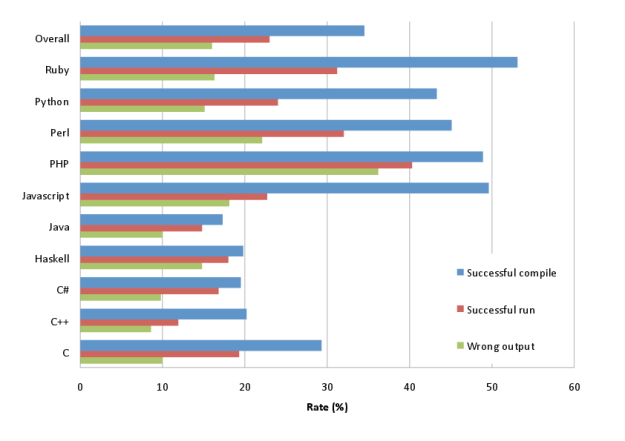
Figure 1: Productivity graph of most widely used programming languages.

In this chart we can see that C is the most productive programming language, of which we are interested in; C, C++, Java and C#. C++ and C# are competing with each other, whereas Java is a bit behind than C# and so on.

In the above graph, it is clear that C# is an average programming language. The average doesn’t mean it is below the requirement. But it means that it can be used in any case, and its performance won’t fall as the data increases. The successful run graph shows that C# programs are much successful in many cases. That is why, in many cases, C# proves to be the valid candidate in many cases, since it is a general purpose programming language.

Then the question arises, “Productive in which sense?

That is the most important part here. Now, this topic may take a bit more of the time to explain how productive a language is. For that, I have dedicated the topic, “Choosing the right language for the right task“. The right programming language for the right task would always help you to elevate the speed of the programming of your team! But among other aspects, the most important ones are:

  1. What sort of project this is?
    • Of course you don’t want to use knife to unscrew a screw.
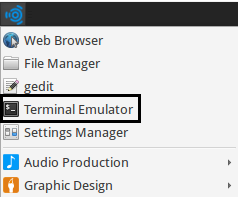
  2. What are the IDE and compilation tools present?
    • Even a program written in C can go wrong if compile is buggy or inefficient.
  3. How your team would like to manage the projects?
    • Does the language support good software engineering concepts?
    • Can it be used to generate good diagrams: Use-case, activity, class and other diagrams.

Thus, you should always consider thinking about the productivity of your development team while guessing which language to be used.

Choosing the right language for the right task

It is always stated to use the best tool for the best jobs! Then, why not use the best programming language for your projects, to get the best possible results? Before I continue any further, there is one thing I want to mentioned… “There is no best programming language ever built.” Every time a programming language is built for a purpose, another group of programmers jump in to create a new programming language, for the sake of fixing the errors in the previous language. What do you think motivated Bjarne to create C++ when there was C language and Scala already in the market?

In this section, there are many things to consider, from the performance and benefits to the clients, to the perk packages for the employees to the efficiencies of the project repositories and the tools provided for that programming languages.

C# was created by Microsoft and therefore, in my opinion, has, by far, the most efficient tools for programming. I mean, Visual Studio, alone is the beast in this game.

visual-studio-2013-logo
Figure 2: Visual Studio logo.

I am a huge fan of Visual Studio, and i would doubt someone who isn’t a fan of Visual Studio. C# has a better support and benefit of using the best IDE out there. Java has also a number of IDE, so does C++ and many of the C programs are written in minimal environments, like a small program to manage and compile the C programs; no offence geeks!

2013-12-27-csharp-for-systems-programming
Figure 3: Graph of performance to safety ratio.

Now, if you look at this graph, it’s pretty much clear as to what it is trying to guide you with. Of course, as I had mentioned in the starting paragraph here, that there is no best programming language.

In many cases, C# and Java rule over C++ (and C) and in many cases, they rule over C# and Java. There are many factors, like the programming paradigms, performance of the code that is generated; Just-in-time compilation, memory-management delay and so on. While C# and Java may provide the best environment to build “managed” programs in, there are many cases where C# and java don’t work well, like writing a low-level program. Java developers wanted to build a Java OS, but they had to give up because something’s aren’t meant to be done in Java. 🙂

Always consider to search before making the final call. There are many companies working in the similar field that you are going to work in. There would be many packages and languages built for your own field that may help you to get started in no time!

top201020programming20languages-100422646-orig
Figure 4: Top 10 programming languages.

But, I think these are a bit backwards. I think, C is on the top because it causes a lot of trouble to beginners, so everyone is searching for “How to do {this} in C” on Google, raising the rankings. 😉

Selecting the best framework

I don’t totally agree with people when it comes to talk about frameworks like, Java, Qt (which I do like in many cases; like Ubuntu programming), and other programming frameworks available for programming applications to be run despite the architecture of the machine. In this case, my recommendation and personal views for .NET framework are very positive. As, already mentioned, I have programmed on Qt framework for Android, Ubuntu and Linux itself. It was a really very powerful framework to build applications on. But the downside was it was tough to learn, their compilers were modified, their C++ was tinkered.

While selecting the best framework for application development by choices are below:

  1. How much flexible a framework is?
  2. What language does it support?
    • Some frameworks support multiple languages, like .NET framework, it supports C#, VB.NET, Visual C++, JavaScript applications.
  3. Is it cross-platform?
  4. If not cross-platform, then does it support multiple architectures, at least?

Java framework is cross-platform, and entirely framework oriented. You simply have to target the framework despite the operating system or architecture being used. .NET framework on the other hand is a very beautiful framework to write applications on. It uses C#, VB.NET and C++ (no Java!) to write the applications, and then the compiled binaries can be executed on many machines that can support .NET framework. This provides an excellent cross-architecture support.

C# however, does not support Mac OS X, at the moment. Microsoft has started to roll out cross-platform binaries for C# programs. .NET Core has been a great success and once it gets released to a public version, I am sure most of the companies would start to target it. That is not going to happen, in a near future. In which case, Java and C++ are better than C#.

If you are interested in C# programming on multiple platforms, consider using Mono Project instead. You can read about that, on my blog here: Using C# for cross-platform development.

spectrum
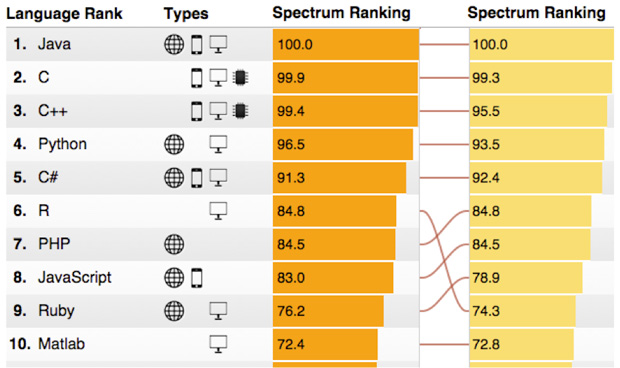
Figure 5: Top languages and their platforms of usage.

Java may be supported 100% in the rankings, but C# is also supporting multiple platforms and is rapidly growing making the language better than the rest. With the release of C# 6, Microsoft has proved that the language is much better than the rest in the race. There are many features that I like C# 6:

  1. String interpolation
  2. Getter-only auto-properties as lambdas
  3. Improvements to lambdas

There are a few things Java still doesn’t have. For example, one statement code to write the data to the files and to extract the data. You have to get messy in the streams, or you have to write an entirely non-intuitive code with Files object and then to get the data from there… Yuk!

Performance of the compiled code

Writing the source code may be different in many ways:

  1. Syntax of the programming language.
  2. The way their objects and procedures are imported in the source code.
  3. How clean the source code looks. Many programming languages are just nightmares.

But the major concern comes to mind when we are going to execute the programs. In many cases, or should I say in all the cases, the language which are bytecoded languages, lag behind than the languages that are compiled to native codes or Assembly codes. For example, C or C++ codes are faster, because they are not compiled to a bytecode instead they are generated as machine codes for a platform or architecture. C# or Java programs are compiled down to a bytecode which causes a JIT to occur when the programs are executed. This takes time.

However, you can see the following charts from https://attractivechaos.github.io/plb/ and see for yourself, the way bytecoded languages are similar and how much compiled languages are different, see for yourself.

plb-lang
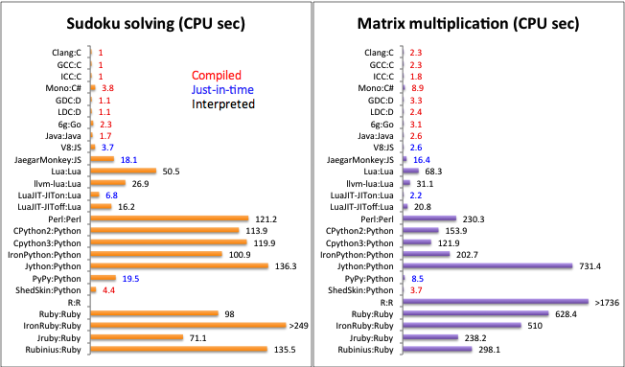
Figure 6: Mathematical calculations.
plb-lib
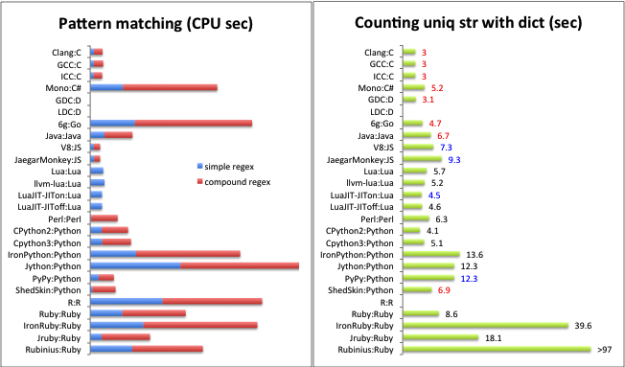
Figure 7: Pattern matching and machine learning.

Which makes it pretty much clear, how much compiled language are faster than bytecoded, and then come the ones that are interpreted, like Ruby.

In many cases, there are other factors too, which cause bad performance:

  1. Bad compiler.
  2. A lot of resources being allocated.
  3. Slow hardware resources; bad combination of CPU, RAM and other peripherals.
  4. Bad programmer and bad code being used.
  5. Bad practices of programming.
  6. Keeping CPU halted for most of the times.

Much more are a valid candidates for the halting processes.

Finally… Final words

As I have already mentioned that there is no best programming language out there. One language is best in one case, other is best in another case and so on and so forth. In such cases, it is always better to communicate with your development team and then ask them questions and ask for their feedbacks. Choosing the good tools for your projects is always a good approach and good step in the process of programming.

If your software engineer or software architect are trying to find a good solution, ask them to work on the following questions:

  1. What are the teams and developers qualified for?
    • Asking a team of C++ programmers to leave C++ and join Java or C# programming teams is not a good idea!
    • Always consider the best approach.
    • Time is money — Manage it with care.
    • Recruit more programmers with skills.
  2. Is the programming language long lived, or a minor one?
  3. Is programming language capable of making your application work?
    • I have used many programming languages, and thus I can decide which language to use. This is the job of your software architect to decide which languages to select.

If you follow these rules, you will save yourself from many of the future questions that cause a lot of problems. Many times developers ask questions like, “I have an application in Java, how to migrate it to C#?” Many web developers ask questions like, “I have a PHP application, how to convert PHP code to ASP.NET?” These questions have only answer. “Re-write the applications”.

There are many things that you should consider before designing the applications. Facebook is stuck with PHP, because it was written in PHP. Even if they wanted to migrate to ASP.NET, they won’t. Instead, they have found a work around the PHP bugs and downsides.

This is why, you should always consider using a conference or meeting to decide how to start the project, which programming language to use, what frameworks to target, who would lead the team and much more. These few days of discussion and designing would save you a lot of money and time in future.

Guide for building C# apps on Ubuntu: Graphical applications using Windows Forms

Introduction and Background

I took more than necessary break in posting the content and articles for Ubuntu programming in C#. Anyways, I am continuing from the same place where I left and, as already taught that we were at the final stages of sharing the guide for programming C# on Ubuntu; which can be thought of as a Linux environment. The previous posts can be found easily on my blog and on some of the networks that I support.

Previously, we had already talked about NuGet gallery packages, cryptographic helpers and much more. Whereas, in this post I am going to walk you people through using Windows Forms framework on Mono framework.

Windows Forms framework

Now, who doesn’t know Windows Forms framework in today’s world? If you have ever wanted to or have developed the C# programs or .NET applications. Then you are already familiar with Windows Forms application. Windows Forms is an old framework with graphical capabilities, and has been in the game for a more than a decade by now! It has started to get replaced by Windows Presentation Foundation, but nonetheless, it is still very popular and is being used widely by many software developers and many software development companies are still relying on it.

There are many benefits of using Windows Forms in your regular development teams,

  1. It supports graphics, not just the CPU and RAM processing.
  2. It can be used with resources for localization support is excellent.
  3. Provides a better way for drawing graphics on canvas.
  4. Event handling, delegate generation.
  5. Asynchronous programming patterns.
  6. Good data binding support provided.

I am going to provide you with some good references that you can use to learn more about Windows Forms, if sadly, you have no idea about the Windows Forms framework. However, one thing is for granted. Using Windows Forms is one of the easiest ways of building the graphical applications in ,NET environment.

References

Follow the following links and learn more about Windows Forms:

  1. Windows Forms
  2. Getting Started with Windows Forms
  3. Windows Forms Overview

Graphical applications in Mono Project

We have until now, discussed and learnt how to build small programs and some very common applications that use special kind of algorithms, such as cryptographic helpers which can be used to encrypt and decrypt the data in Ubuntu using C#. Now, until this we haven’t covered graphical applications development in Mono, because that is where this framework lags behind.  So, in this post we would like to learn how to build applications with graphical capabilities too. But, first, let’s talk about the frameworks provided in Mono Project itself.

  1. GTK#
    • Which is a similar one to the GTK+ that C++ programmers have. This is a graphical toolkit that compiles down to the native code generation. It supports the native look and feel and can be used. But, it is somewhat difficult to learn!
      Banshee1
      Figure 1: GTK# control application example.
  2. Windows Forms
    • This is the topic that we are going to cover in this post.
  3. Other tools?
    • Not yet, Mono Project is not ready to implement other frameworks yet.

The thing is, Mono Project doesn’t have an excellent UI designer as we have in Visual Studio.

Screenshot (3062)
Figure 2: Visual Studio UI Designer.

In Mono Project and Xamarin Studio, you are not provided with the similar tools until now. However, the designer is just the wrapper around the back-end code available. Xamarin Studio does have a good designer, but that works with GTK# tools and controls only. Not in the case of Windows Forms.

Applying a quick hack!

If you have ever programmed for Windows Forms, then you would know that Windows Forms is actually a bunch of objects with many fields and properties, which run and work to render the graphics on the screen. The same is applicable here. We would be using the codes to render the stuff on the screen. Basically, everything that you have on the screen is a field in the backend class, such as “Button”, “TextBox”, “Label” etc. These are all going to be used, but, we are going to write the codes for this, instead of having a designer build them up for us.

Building the UI with Windows Forms

So, I hope using the hack is clear to you, after all, it is not a hack it is the actual way in which Windows Forms applications are constructed, built and executed. Only difference is that on Windows we also get to use the UI designer. In case of Mono Project, we would have to craft the UI with our own codes and then re-implement it if there is a changing to be performed on the screen later. Thus, putting it simply, we are going to implement it the hard way since there is no, “Drag-and-drop” method here.

To get started, you need to understand that a Windows Forms application is a C# application too. So, only thing to understand is C# language itself and the .NET framework. We are going to use the same concepts of .NET framework and then implement the same concepts to Mono to get our graphical applications ready.

Create project — Any type

I had chosen to build this application on the top of Console application. You can select other types too. But, my recommendation is using the Console application.

Screenshot (3064)
Figure 3: Selecting the console project as the type.

Enter the names and details and create the project.

Screenshot (3065)
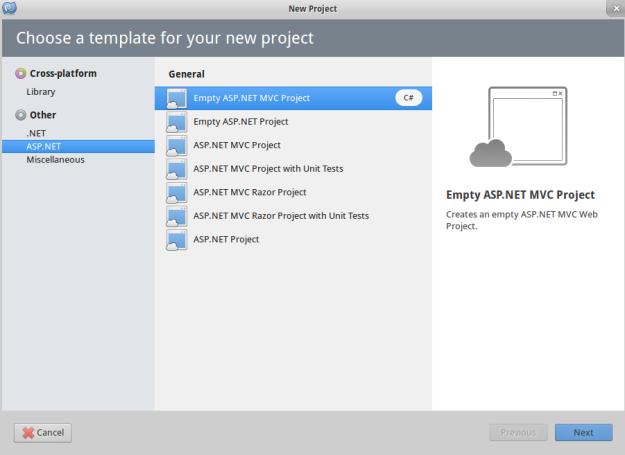
Figure 4: Entering the details for the project.

At this moment, you will be at the same stage where you were in the beginning of this module, and the previous ones. You will have an empty project, that only renders, “Hello world”. That is the start, from here we will continue to build the larger and complex stuff.

Screenshot (3066)
Figure 5: Hello world!

This program is the default program that every time we were shown. Now, we need to add the graphics to the console. That’s simple. All we need to do is… Read the next section. 😉

Adding graphics to the console

Adding the graphics to the console is pretty much simple, you just need to do the trick as:

  1. Include the System.Windows.Forms namespace to the project.
  2. Include the System.Drawing namespace to the project.
  3. Import the packages to your source code.
  4. Write the code yourself; since we do not have the designer.
  5. Run the program, and you will see the program start up.

But, I am going to show you how to do that in a minute or two. But first, let us understand why Windows Forms can be build using the code itself. The thing is, the Windows Forms applications are started on a thread, the thread gets the graphics objects and bitmaps which are rendered on the screen later. The objects are simply instances of the classes, for instance of Button class. These are all passed to the Application object, and they are executed, upon execution they render the graphics on the screen.

Another thing to understand and note is that Windows Forms uses System.Drawing to draw the native code in Mono. Mono targets the objects using the assemblies provided in System.Drawing namespace, and then renders the objects on the screen. At the moment, Mono supports on Win32 theme for the objects. In the end of this post, you will see how your objects are going to look. Remember, the objects are instances… 🙂

Open the references and add the references to System.Windows.Forms and System.Drawing namespaces,

Screenshot (3067)
Figure 6: Initially references are like this.

Screenshot (3068)
Figure 7: Adding the references to the namespaces. 

Now that we have everything set up, we can now continue to create a new Windows Form. This method is not similar to what we had in the previous IDEs, like Visual Studio. Instead, we are going to just mimic having a Windows Form.

Adding the Windows Form to your project

First thing to note is that there is no way of creating the form by itself in Mono Project. So, we are going to create a new object, and then we are going to turn it into the form and then render it using the main function. That’s just similar to what happens in Visual Studio too. You create the form, whose graphics are rendered separately in a designer, and the codefile is generated separately. Visual Studio maintains everything for you, which is why you do not feel anything different.

Step 1:

Create a new class, name it what you like, I chose MyForm and then write the following code to it.

using System;
using System.Windows.Forms;

namespace GraphicalApp
{
    public class MyForm : Form
    {
        // No properties.

        public MyForm ()
        {
            // Default constructor
        }

        // No functions.
    }
}

This is it. This is out, Windows Form now.

Step 2:

Before running the program, you also need to make sure that the main function now calls this form to be executed in the application too.

// In the references
using System.Windows.Forms;

// In the main function
Application.Run(new MyForm());

Now, run the project and you will (should!) see the following window with no controls, but with a graphical notation and rendering.

Screenshot (3069)
Figure 8: Sample empty Windows Form application.

This shows that our project is ready to accept the objects for graphical components. We can now write the code for the objects that we need to render. For example and for the sake of simplicity I would like to create a sample form that renders the form, which would ask me about my name and then would greet me once I click on the button.

All of these are core C# programming concepts and this has nothing to do with the Windows Forms or any other fundamental concept. Instead, these are very simple and yet easy features of C# programming language itself.

Step 3:

Anyways, to update, we can just update the MyForm class and write the code that we would need to have in order to render the form.

using System;
using System.Windows.Forms;
using System.Drawing;

namespace GraphicalApp
{
    public class MyForm : Form
    {
        // Properties.
        private Label label;
        private TextBox myName;
        private Button btn;

        public MyForm ()
        {
            // Call the function to render the objects.
            Text = "Windows Forms app";

            this.Size = new Size(300, 350);
            render();
        }

        private void render() {
            label = new Label { Text = "Your name: ", Location = new Point(10, 35) };
            myName = new TextBox { Location = new Point(10, 60), Width = 150 };
            btn = new Button { Text = "Submit", Location = new Point(10, 100) };
            btn.Click += Btn_Click; // Handle the event.

            // Attach these objects to the graphics window.
            this.Controls.Add(label);
            this.Controls.Add(myName);
            this.Controls.Add(btn);
        }

        // Handler
        void Btn_Click (object sender, EventArgs e)
        {
            MessageBox.Show ("Hello, " + myName.Text + "!");
        }
    }
}

Now again run the program, and you will see the following graphical application being rendered on the screen for you!

Screenshot (3070)
Figure 9: This is the Windows Forms application on Ubuntu. 

Screenshot (3071)
Figure 10: Entering the data and seeing that it works. 

Now, if you have been an old geek for Microsoft and Windows, then you would know that this style existed for decades in Windows environment. This style was typically adopted for Windows programming with C++, especially Win32 and then later C# was introduced and they had a different style; create a WPF app and look for yourself!

This is how Mono does the trick for Windows Forms. It does support Windows Forms and can use the same power of .NET framework to provide the similar ways to build the graphical applications for Linux environment. The benefit is that, you can now execute, build and run these graphical applications on Windows, Linux (every distro that supports Mono runtime) and Mac OS X. What more could you ask for? 🙂

Points of Interest

In this post, i have walked you through different stages of building the graphical applications on Ubuntu using C# in Mono Project. The benefit of using graphical applications is that you can do more in less area, because “A picture worth a thousand words!”. Windows Forms is a framework that has been widely used by programmers of C# language and is still being used. If you can port your applications of Windows Forms to other platforms, it would be much better.

In this post, I have shown you how to do that. You can port your Windows Forms application, by porting the code for that application project, and then building it under Mono compilers.

The Mono runtime however, only supports Win32 theme for controls and however, provides a versatile amount of features, incredibly, they support all the new features of Windows Forms too. Which means, you can work around with:

  1. Graphics
  2. Multimedia
  3. Content management
  4. Data binding
  5. Event handling
  6. Asynchronous programming

And much more. There are more posts about Mono framework to come, but we are getting closer to having the guide completed and to be ready as a complete guide for “Programming C# on Linux”; or Ubuntu, what-ever you prefer. 🙂

Programming C# on Mac — One post guide

Introduction and Background

I have dedicated most of my time to C# and C# programmers, I have already written a brief description and guide for C# programmers to be able to port their applications, develop them, build them and install them on Ubuntu… Which indirectly focusses on all of the Linux environments. Basically, C# is a Windows programming language and many frameworks like .NET, Windows Runtime, ASP.NET etc. are all using C# as their “popular” programming language. But developers have also worked very hard to provide a cross-platform support for C# programming language, using Mono you can develop C# applications and build and deploy C# applications on non-Windows environments too. If you are interested in the basic post, please read this post: Using C# for cross-platform development. You will be shown how Mono can help you, how you can build the applications on multiple frameworks and use them on those frameworks, operating systems too, and not just on Windows or .NET framework environments.

In this post, I am going to demonstrate how you can use C# for programming a Mac environment. I have never been a “huge” fan of Apple products, however, since I love C# so I think it should also be promoted on Mac environments and among Mac developers! C# can highly leverage the performance of their applications. If you are interested in using Mono framework, I recommend that you read the guide for C# programming on Ubuntu, the framework and features are similar. However, the installation is somewhat different and that is the topic for my post and I will explain the methods and steps required to install, run and test the Mono project, then I will also show how you can install Xamarin Studio (the IDE for Mono on Mac). So basically, this post is about setting up the environment for C# programming on Mac. I remember, when Siddharth Koya asked me whether I can write a guide for Mac or not, I told him that it would take some time… However, Sid! It is here. You can read this and then continue to read the related Ubuntu guides for Mono programming.

Information about Mono platform

So, before I move further, there are some prerequisites to the platform, too! You need to make sure you are using the correct platform of Mac OS and also that you are having required packages installed. Otherwise, Mono may not work! Mono supports, Mac OS 10.7 and onwards. You must at least have 10.7, otherwise, you should upgrade your systems.

Setting up the environment

The method for installing the Mono on Mac is somewhat different from others, however is also very easy at the same time. You need to have internet connection before you can continue to install the packages. The packages are free for download, install and then use. So basically, all you need to do is, just capture those packages, run and install them and there, you will have C# environment installed on your Mac in no time! First of all, I will show you how to install the packages, starting by showing you the URL address of the website, later I will show you to check if environment is set up or not, later I will show you how to install the IDE for Mono.

Mono is basically a set of compilers, debuggers and assemblies required to compile and build the projects. However, there are some GUI applications which integrate the components and present you with an IDE (Integrated development environment), which can be used to develop and build applications rapidly, without having to execute scripts each time to make your project work, you are provided with a clean and intuitive interface that can be used to create, modify and build the projects. IDEs also allow you to debug the applications in case you want to fine tune them, remove bugs or make them performance efficient.

So basically, what IDEs are meant to do is that they provide you with controls, that you can use to perform your actions that typically are done using scripts.

Downloading and installing the packages

First of all, I will talk about installing the packages and assemblies of Mono project. Now, in Ubuntu we did that using the terminal, in Mac, you are going to download the package itself and then install it using the GUI installer. The process is analogous to what we have on Windows environment, however, there are a few security steps that you would have to undergo before you can install the package itself. So, let’s start with downloading and installing the packages.

You can follow the same URL for Mono Project, and download the packages for Mac instead. Go to Mono Project’s Download web page and download the packages for Mac. If you are on Mac, the website will automatically load the page for Mac.

Screenshot (6191)
Figure 1: Mono downloads for Mac.

Typically, you are going to install using the 32-bit version. However, you can also install the packages for 64-bit environment. It would take some time depending on your network, once that is downloaded. Open it, and it would give you an installer. The installer would lead you through the procedure and you will have your packages installed successfully!

Screenshot (6192)
Figure 2: Package being downloaded.

Once this gets downloaded, open it…

Screenshot (5898)
Figure 3: Mono framework installer.

This installer is actually going to guide you through different steps, that you require to install Mono project on your Mac, however just for the sake of formality I am going to describe these stages. Once you click continue and move forward a bit, you will be shown the license information about the product. You “should” read the license terms before you click “I Agree”. Even though the license and product are free, you should know how much freedom you actually have. So, read the license and then continue.

Screenshot (5899)
Figure 4: Must read the license terms before you continue and click Agree. 

Continue to the next steps now. Once you have entered the details for disk usage, drive selection and others, you will be asked for security check, your password! Enter the password and continue with installation of the package.

Screenshot (5901)
Figure 5: Security check before installation.

You will then continue to install the package. The installation process would take some time, and after a while it would show you a success message. This message tells that the package has been indeed installed.

Screenshot (5902)
Figure 6: Mono framework is installed.

Although the packages have been installed. But, I would “recommend” that you test the packages and the framework itself. So, in the next section I am going to show you how to test if everything is OK!

Simple hello world!

In this section, I am going to show you a simple hello world program, using which you can determine if framework is installed correctly, or if there were some troubles during your installation process. You are all already very much aware and familiar with the hello world programs, so basically I am going to use that one program and I am going to demonstrate how you can test the C# environment easily, using the terminal.

Remember: Without IDE, you are going to use terminal, so I would recommend that you go and learn terminal scripting. Otherwise, just follow the scripts I share and then install Xamarin Studio if you don’t feel easy with terminal.

Anyways, you would require to create a new file… What I do is that I try to create a separate folder for each new project, you should do the same. Create a new folder, anywhere, (I chose desktop) and then create a new file in it, name it “Program.cs”. To do so, you would use the following shell script. Uh huh, before you write the code, open the terminal… For most of Apple users, it is found under Utilities in Application tab.

Screenshot (6194)
Figure 7: Terminal program in the Utilities tab.

Once you have opened the terminal, go to the location where your folder is created. Currently, it would be like this:

Screenshot (6193)
Figure 8: Program directory empty at the moment.

Initially the directory is empty, so we would create the file here. In that directory, create a new file, I used the following shell script to create a new file:

echo "" > Program.cs

This would create a new file, named Program.cs in your currently active directory (make sure it is the directory that you want!), the file would be created. Have a look below:

Screenshot (6195)
Figure 9: Shell script for pwd; “present working directory”.

Just to ensure that we are on the right directory. Later, enter that shell script to create the file. Shell won’t tell you what happened, it would just create the file there.

Screenshot (6196)
Figure 10: Shell.

As already mentioned, Shell didn’t reply or show a message. It just executed that statement, command or what-ever you want to call it.

Screenshot (6197)
Figure 11: Directory, file and the shell visible. A new file “Program.cs” created in the directory.

All three of our items are visible here! Our file has been created and we can now edit the file to write a C# program.

using System;

namespace Text {
   class Program {
      public static void Main(string[] args) {
         Console.WriteLine(25);
      }
   }
}

Sadly, Mac wouldn’t allow me to use double quotation marks and would turn them into something else, generating a compiler error. That is why I had to use an integer value and not a string message. However, to compile this program… Go to your directory, open up terminal, enter the following commands:

mcs Program.cs
mono Program.exe

These are the commands to compile and execute the programs.

  1. mcs Program.cs
    • This command would compile and build the program. Generating the executables in the same directory.
    • mcs == Mono C Sharp compiler.
  2. mono Program.exe
    • mcs would generate the executable (.exe) in the same directory, and this command would execute it under mono runtime!

The output would also be shown right under the command itself, in the terminal.

Screenshot (6199)
Figure 12: Program and build output shown.

You can see the program output and build output! Program output is shown in the terminal, where as build output is shown in the directory. However, this shows that our environment is set up and that we can continue to install other stuff, or use this and start building our C# projects to run on Mac itself.

Installing IDE

I don’t recommend going terminal. IDE is a great tool, that can help you in many things…

  1. Syntax highlighting: You can see in the code above, it is hard to see what is going on, unless you are experienced.
  2. Code suggestions.
  3. Keyboard shortcut to compile, build and debug.
  4. Debuggers and breakpoints.
  5. Integrated environment.
  6. Configurations for project files and output directories.

Much more! So I would recommend that you start by installing an IDE on your machine, instead of doing all this yourself by a terminal. Which takes a lot of time, I would say.

The IDE for Mac is different from what we had in Ubuntu, in Ubuntu we had MonoDevelop, however on Mac we have Xamarin Studio. They are both provided by Mono Project (which is led by Xamarin). You will now need to download Xamarin Studio from their download web page, download the package for Mac and install it.

It would start and Mac would try to run a security check and other package checks,

Screenshot (5931)
Figure 13: Verification of the Xamarin Studio package.

This would take a while, let it take a while. Later, you know what to do! Drag and drop the application to install it.

Screenshot (5932)
Figure 14: Drag and drop the Xamarin Studio to install.

Drag and drop it in Applications, it would copy the files and then your IDE would be installed for you on your machine.

Screenshot (5936)
Figure 15: Xamarin Studio installed on Mac.

Click on it to start it! Mac would attempt to tell you that this application was downloaded from Internet and that you should not trust everyone on internet, just continue to the next step.

Screenshot (5937)
Figure 16: Security warning by Mac.

Open it and then you would have your IDE active in front of you!

Screenshot (5939)
Figure 17: Xamarin Studio active window.

You can now create a new project, and then continue to use the Mono Project in your environment to create applications in C#!

Points of Interest

This is a very short post about Programming C# on Mac, which covers the required topics about setting up the environment for C# programming on Mac, however to continue learning more about Mono Project, what it offers you, how you can program C# on other platforms, I recommend that you check out my previous posts about “Programming C# on Ubuntu”! I am sure you are going to enjoy those posts, if you like C#.

Programming C# on Linux or Mac is similar to using C# on Windows platform like .NET or Windows Runtime. Mono Project brings the same efficiency, same flexibility and same power to other platforms too, so that you can build your C# programs on Mac and Linux too. However, remember, that the programs built using Mono are executed on “mono” environment, or “mono runtime”. Mono runtime would be required before you can execute those applications, because Mono runtime provides the underlying foundation for this cross-platform support. Without this, you won’t be able to execute the programs, which is similar to installing .NET framework on Windows!

Anyways, this was to help you get started in Mac too, now you can check out the rest of posts! Hope to see you there too. 🙂

Guide for building C# apps on Ubuntu: NuGet packages

Introduction and Background

If you have been programming C# applications, then chances are you are pretty much aware of what NuGet packages are. However, if you don’t know what that is, it is an online storage for dynamic-link libraries (.dll) for .NET programs. Most programmers (including me) have contributed toward the total packages currently available on NuGet. NuGet allows developers to reference the libraries from third-party programmers, easily, all by typing a command!

In the previous posts, I had already talked about the basics of Ubuntu programming using Mono, in this short piece I am going to talk about NuGet packages in Mono. NuGet packages are of great use in Visual Studio, you can download the most wanted packages from NuGet to increase the productivity of your application. I have personally used Newtonsoft.Json package many times to introduce data sources in my applications based on JSON files and C# code, a usual example of this can be LoginKeys framework that I wrote for authentication systems. There are many other useful packages that you would like to use while programming, in this post I am going to talk about, methods to include the package in your application development project.

Managing the NuGet packages

In this section, I will demonstrate two things:

  1. How to manage the repositories, from where to fetch from.
  2. How to install the packages and use them.

So that you can have a good understanding of NuGet packages, package management and how to use them in your projects.

Configuring the IDE

First step is to configure the IDE, by default, IDE is configured to capture the packages from NuGet’s current API version, which is, https://www.nuget.org/api/v2/. In future that may change, so that is why you may need to configure the IDE… Just showing, the settings are available under IDE settings.

Screenshot (5864)
Figure 1: NuGet package gallery management.

You can edit this to configure the IDE to capture the packages from the actual location. You can also open these settings from the NuGet package management window itself, by selecting “Configure sources”.

Screenshot (5865)
Figure 2: Options available for currently provided NuGet galleries and option to configure the sources.

This would allow you to alter the sources and other settings, you can also change the names for the galleries. However, that is pretty much simple, and I am sure you can manage to do that all by yourself. Now, let us consider installing and using the packages in our applications.

Installing the packages

Fun part starts! The packages, can be easily installed using the GUI window provided to us by MonoDevelop itself. We can search for the packages, or install the most popular ones that are shown in the listview itself. It is very much simple, to install the package.

I have demonstrated the procedure in the following image:

Screenshot (5867)
Figure 3: NuGet package management window.

Now, what I have done is that I have introduced steps required to install the package. You can follow the same steps to install any package.

  1. Find the package in the list. I have selected, Json.NET package.
  2. If you find yourself confused while selecting a package, you can check for the explanation of the package in the right side, name, version, description and author details are shared here. You can make sure you are selecting the “correct” version of library.
  3. Click on “Add Package” to add it.
  4. This option is not required, and is used to turn on and off beta versions, pre-releases.

Now, once you have clicked on the “Add Package” button, MonoDevelop would take a minute or two and then add the library package to your application. In my system, it took ~5 seconds, so don’t worry it would download and install the packages, in a while. Once that is installed, your references would look like this:

Screenshot (5868)
Figure 4: Newtonsoft.Json package installed to the project.

Json.NET library is the Newtonsoft.Json library, so it gets added to the project under “From Packages” category. This has been added to the project, and you can then get to use it in your project. Before, I do that, let me show you how to search for the project packages in NuGet.

Where on file system are they stored?

This is another interesting thing, in Mono environment, the project packages that are downloaded from the galleries, are stored in the same package directory. For more on package directories, please read my previous post: Guide for building C# apps on Ubuntu: Project files and output. In the directory, a new folder, “packages” would be created and then your newly referenced package will be stored there for later references.

Screenshot (5873)
Figure 5: “packages” folder in the project directory.

You will find the code, and other files all in this folder. This is done so that you can use the package later, the packages in NuGet are online and thus you cannot bear to pay the price of network latencies each time you want to build the project, downloading the assemblies is the easiest method.

Searching for a library

Search bar is also provided in NuGet management window, that you can use to search for the libraries. The list shows only the popular ones, but if you want to search for third-party average project libraries, that are not in the use of people more often, you can use the search box to search for those libraries and window would bring up the matches that it finds on the gallery. You can then select from those results and get what you want to install in your application project. For example, to install LoginKeys package, you can write the keyword in the search box and NuGet package manager would bring the results, so that you can select from the search results.

Screenshot (5869)
Figure 6: LoginKeys package being shown in the search results.

You can see that the GUI window has shown the results, and also, it has provided me with the details so that I can know that I am installing the correct version of library, from the author I trust (do I trust myself? Nah!), then I can follow the same steps and install this package to my project too.

Updating and restoring packages

In Mono, updating and restoring the NuGet packages is also very simple, and takes just a click! Yes, have a look below:

Screenshot (5874)
Figure 7: Options to update or restore the NuGet packages.

These are the options provided, to update or restore the packages, just click on the option and Mono would do it for you! There are many other options also available along with these.

Referencing the package namespace

Once you have added the package to your project, you need to reference it in your source files too, although the assembly is available, but to be able to reference the functions in your source file, you also need to add the using statement in your project. We are having the Newtonsoft.Json package, to be able to consume the library, we would need to reference it and then build the application.

Have a look at the following code:

Screenshot (5871)
Figure 8: Compiler error shown.

The problem, you are right, is raised because we have not yet referenced the namespace to include the object JsonConvert in our project. So, we write the code like this:

using System;
using Newtonsoft.Json; // Adding the reference

namespace NugetPackages
{
    class MainClass
    {
        public static void Main (string[] args)
        {
            /*
             * We do not need to create a new class, instead
             * we can create anonymous types. 
             */
            object anon = new { Name = "Afzaal Ahmad Zeeshan", Age = 20 };

            // Now the function would serialize the anon object
            var serialized = JsonConvert.SerializeObject (anon);

            // We then print the JSON format on screen.
            Console.WriteLine (serialized);
        }
    }
}

This code would compile and execute safely. The output of this code is like this (I think, you already know),

Screenshot (5872)
Figure 9: Result of the above code.

Pretty simple, I don’t need to explain it at all, because Newtonsoft.Json namespace is already very famous and widely used package.

Points of Interest

THis is another post in the series of “Programming C# on Ubuntu” category of articles. In this post, you were taught to use NuGet packages in your Mono projects on Ubuntu. The post was intended for absolute noobs and beginners in Mono programming on Ubuntu, and hopefully, you have been taught to program applications on Ubuntu.

This was somehow a short descriptive post for NuGet packages only. In later post, you will be taught to develop libraries and re-use them in other projects. Stay tuned for the upcoming post. 🙂

Guide for building C# apps on Ubuntu: Cryptographic helpers

Introduction and Background

In the previous posts, I had shown how you can use MonoDevelop IDE of Mono Project to get started programming C# applications on Linux environment and for the operating system I used Linux distro, Ubuntu operating system. However, since all of the topics are covered already and I am just skimming through the snippets and small portions of the data that I can share, this is another post in the series before I continue to write a guide for this, in a compiled form. In this post, I am going to talk about cryptographic support provided in Mono itself, for Ubuntu. However, you can always write your own compiled modules that run the cryptographic services and you can also write your own modules that represent the procedures and steps shown in the certified algorithms for cryptography. But, in this post I will talk about the built-in classes and objects provided to you for these services.

I have also talked about security tweaks a lot before, and I would like you to read my previous posts about security in .NET framework too, A few tips for security in .NET framework. Since this is much more about Ubuntu and C# programming using Mono Project. I recommend that you read the previous posts in this series of articles.

  1. Guide for building C# apps on Ubuntu: MonoProject Introduction
  2. Guide for building C# apps on Ubuntu: Language quickies
  3. Guide for building C# apps on Ubuntu: Project files and output

So basically this is another post in the series of Ubuntu programming using C# language, Mono Project has been a great tool for C# geeks. In this post I am going to talk about the hashing algorithms, and what else Mono Project has for us!

Security APIs in Mono

No wonder Mono is influenced based on .NET’s philosophy and C# language, but still it lacks many things when it comes to the core APIs, such as security API. It does not have a full package of the APIs in it. For example, on .NET framework the support has been increased to SHA256, SHA512 and more, where as on Mono there are not much flavors currently added and you only have to stick to either one of the provided, or you would have to manage the base algorithms and write your own implementation of the algorithms. Which, definitely, would be hard job! Until Mono introduces some new algorithms, let’s stick to the provided ones and learn about them, how to use them and what they can serve us with.

In Mono APIs, you get two namespaces for security algorithms. The algorithms can be for simple encryption and decryption or it may be for the password hashing purposes. Now, these two are different in many ways, however they are categorized under “Cryptography” in computer science.

  1. Encrypting/decrypting: is a process in which you encode the data in such a way, that a special secret key is required to bring the data back in its original form. It is used while securing the data from potential spywares, because each time you have to access the data, you need to pass a special secret key with it.
  2. Hashing: is a process, typically used for passwords, but is not only restricted to passwords. Hashing is a technique, in which data is encrypted, in such a way that it is impossible to be converted back to its original form.

Mono namespaces provide you with objects that allow you to work around with these functions and add a layer of security to your applications. Now, let us first of all, talk about password hashing and then we will get into the encryption and decryption techniques provided in Mono runtimes for developers.

During the article, I will only focus on the objects provided in System.Security.Cryptography, however you can still use Mono.Security.Cryptography, but the recommended one is the native .NET framework’s cryptography namespace.

Hashing the passwords

Hashing the passwords has been widely used in every network based application, or online application. Hashing is a process, that is not just restricted to the passwords, as I have already said, the hashing has been widely used to determine the file consistency. Most of the software packages are introduced with MD5 or SHA hash values, they are used to determine if the file is in its real form or if it has been tampered with on its way to your machine. This ensures that the software package that you are installing is actually the “safe” package and has not been mixed with any malware or spyware content. The code from open source communities, such as Ubuntu, Linux and other open-source projects are widely exposed to such attacks, and if you install such packages they make expose your private data and even ask you for some revenue, that happens in cases of ransomware, Linux.Encoder.1 was one of such viruses, that encrypted the user data and then asked them to pay revenue to get their data back. However, hashing is a very simple task in .NET framework at least.

Usually, there are many algorithms provided in every framework that can be used in your applications, most commonly used are:

  1. MD5
  2. SHA-128
  3. SHA-256
  4. SHA-512
  5. So on…

Now, before I move any further, I should warn that you should never ever use MD5 for hashing the passwords. MD5 algorithm is very weak and a simple rainbow table attack would expose the passwords. In many cases, you should use SHA-128, or SHA-512. But the recommended one is SHA-256, because of the digest that it creates and the security that it has. I would personally recommend that you use SHA-256, if you want to store a small size of digest (hashed password string; in hex), otherwise, my personal advice is to store SHA-512.

The benefit of having SHA-512 over SHA-256, is that you can minimize the chances of collisions  while generating the hashes for the passwords. A collision would typically occur when the hash results are similar for different values. The thing is that the hash function would return a hashed string to a limited size, but it can get an input of any size. Bigger files of larger byte arrays may result in a collision. So, to overcome the collision you may want to generate a hash of bigger size.

Now, talking of hashing the passwords, let me share how to hash the passwords in C#. The procedure is actually similar, if you have a code for .NET on Windows, same would be used on Mono on Ubuntu. Have a look below:

// Function to hash the passwords
public static string HashPassword(string message) {
   // Create a new instance of the SHA-256, 
   // you should use SHA256Managed instead of SHA256 object.
   using (var algo = new SHA256Managed ()) {
       var bytes = System.Text.Encoding.UTF8.GetBytes (message);
       var hashedBytes = algo.ComputeHash (bytes);

       // The hash has been computed, to convert those bytes to string
       // I will use the following code, you may use your own
       // code to convert the byte array to string
       System.Text.StringBuilder builder = new System.Text.StringBuilder ();
       foreach (byte bite in hashedBytes) {
          builder.Append (bite.ToString("x2"));
       }

       // Return it to the caller, to write it.
       return builder.ToString ();
   }
}

So, basically, what I have done is that I have just used that algorithm and I have got what I was expecting from it. Now, the way we call it defines how we use it. In this sample, I will be calling it to write the hash of it, to the screen and nothing else.

Console.WriteLine ("Enter the string to work on:");

// Get the message
string message = Console.ReadLine ();

// Hash the password.
string hashedStr = Crypto.HashPassword (message);
Console.WriteLine ("Hashed string is: " + hashedStr);

Basically, we have already created the function that does the thing for us. So we are only calling it in this code. So, if I run the above code it would be something like this…

Screenshot (5858)
Figure 1: Working of the hashing algorithm on the word, “Afzaal”.

You would store this hashed string in your database when you want to save it. Never save the passwords or sensitive information that you do not want to get back in the actual form, in plain-text form.

Adding some salt to the hash

Now since we are talking about hashing the passwords, it is necessary to add a specific string text to the actual string, which acts as salt to the data. The procedure is very much simple and straightforward, you simply add extra string to the actual string and then find the hash for it. Where you add the salt is your choice, you can append it, prepend it, or insert it at the medians or what-so-ever, that is your choice.

HashPassword (password + salt);             // OK
HashPassword (salt + password);             // OK
HashPassword (salt + password + salt);      // OK

But only thing that you should consider is that you should use the same method to get the hash again, because if you calculate hash differently, their hash value would be different.

2a3a25c485162eb7767a9ce20a52febf
Figure 2: Demonstration of the hashing a string message using salt.

When to use hashing?

You can use the following list items to determine when to use hashing functions on your data.

  1. When you want to secure your data from potential sights.
  2. When your data is valuable only for comparison and not required in its raw form. Passwords are a good example of this type of data.
  3. When you want to check if the file system is tampered with.

References:

If you want to learn more about hashing functions, you should go and read the following links:

  1. Security in .NET Framework
  2. System.Security.Cryptography namespace on MSDN
  3. SHA-2 on Wikipedia

Encryption and decryption of data

Now that we have already talked about the hashing of the passwords and the data, we can now continue to talk about the encryption and decryption of data in Mono using C#. Encryption and decryption techniques are used to hide the data from unwanted users. It can be shared with other users, and they can also view it, but any user who is not required to be using or viewing the information can be removed from the list of viewers.

r4VtMoZ
Image courtesy: This image demonstrates how encryption and decryption is done.

Now we will talk about the coding practices in encryption and decryption. The plain-image, pseudocode and algorithm is very much easy, however, the coding in .NET environment is also very much easy. In the coming sections, you will be shown and taught how to use .NET objects, to perform security restrictions in your applications.

As far as the algorithms are concerned, just like in case of hashing, there are a lot of encryption and decryption algorithms: AES, Rijndael, DES etc. All of them are used, but there are some problems with the later ones and that is why AES algorithm is recommended. However, in my case, I will use Rijndael algorithm, you can change it to AES (and you should change it to AES, I am only using it for demonstration purposes!).

What we do, is that we actually divide the process in a number of steps:

  1. Create the object for algorithm; Rijndael in this case.
  2. Case the memory stream to hold the data.
  3. Create a cryptostream for that memory stream.
  4. Create a stream writer/reader based on encryption or decryption process undergoing.
  5. Return the encrypted or decrypted text.

Each encryption algorithm would require you to pass a special “Key” that would be used for encryption and decryption. The key is the backbone. Without that key, data cannot be converted back to its original form. That is why, keys are kept secretly, in safe places so that potential hackers cannot get to the data. So for demonstration, let’s use the IDE to write some code in it.

1. Encryption function

First of all, let us write a function that encrypts the data as we mentioned in the steps above. A hash function would return an array of bytes, so we would define our custom function to do the same, so that later when working with the values, we can change the data in any form, or save it just the way that it is.

public static byte[] Encrypt(string data) {
    byte[] bytes = null;
 
    // Instantiate the algorithm
    using (var rjndl = new RijndaelManaged ()) {
       // Set up the properties
       rjndl.Key = key;
       rjndl.IV = iv;

       // Create the memory stream
       using (MemoryStream stream = new MemoryStream ()) {
          // Create the crypto stream
          using (CryptoStream cStream = new CryptoStream(stream, rjndl.CreateEncryptor(), CryptoStreamMode.Write)) {
             // Create the stream writer to write the data.
             using (StreamWriter writer = new StreamWriter (cStream)) {
                writer.Write (data);
             }
          }

          // Convert the stream of encrypted text, to array.
          bytes = stream.ToArray ();
      }
   }

   // Return the bytes.
   return bytes;
}

This function is enough,  this would encrypt the data and would provide us with the bytes of the data, in encrypted form. We can then convert those bytes to string, or save then in BLOB format or what-so-ever as required. I will demonstrate the usage in a later section, currently I just want to jump to the decryption part.

2. Decryption function

As name suggests, it is an inverse of the encryption function. The steps required are similar, only that we create a decryptor object for the cryptostream and then start reading the stream in a decryptor object using the same key that was used to encrypt the data in this bytes form. If you use a different key, results are “unknown”.

The following code does the thing for us:

public static string Decrypt (byte[] data) {
    string message = null;

    // Instantiate the algorithm
    using (var rjndl = new RijndaelManaged ()) {
        // Set up the properties
        rjndl.Key = key;
        rjndl.IV = iv;

        // Create the memory stream with the bytes of data
        using (MemoryStream stream = new MemoryStream (data)) {

            // Create the stream with the decryptors
            using (CryptoStream cStream = new CryptoStream (stream, rjndl.CreateDecryptor (), CryptoStreamMode.Read)) {

               // Create a stream reader for the crypto stream
               using (StreamReader reader = new StreamReader (cStream)) {
                   // Read the data to the end.
                   message = reader.ReadToEnd ();
               }
           }
       }
   }

   // Return the message.
   return message;
}

We now have the counterpart of our encryption/decryption algorithm or service (call it what you like!). Now that we have both of our functions ready, we can now test the function and see if it works in our cases for encryption and decryption.

I am going to enter my name, and then I will get the encrypted text plus the decryption function would be executed to get the data back.

Following is the main function,

Console.WriteLine ("Enter the string to work on:");

// Get the message
string message = Console.ReadLine ();
Crypto.Setup (); // Look at the code block below!

// Run the logic
var encrypted = Crypto.Encrypt (message);
var decrypted = Crypto.Decrypt (encrypted);

string encryptedStr = null;
StringBuilder strBuilder = new StringBuilder ();
foreach (var b in encrypted) {
   strBuilder.Append (b.ToString("x2"));
}

encryptedStr = strBuilder.ToString ();

Console.WriteLine ("Original text was '" + message + "', it was encrypted to: \n" + encryptedStr);
Console.WriteLine ("Decrypted text is: " + decrypted);

The output of this program was,

Screenshot (5859)
Figure 4: Encryption and decryption function on “Afzaal Ahmad Zeeshan” string.

Pretty simple, right? 🙂 So, finally we have encrypted and decrypted the text in Ubuntu using Mono Project…

Tips:

  1. Consider changing the Rijndael to AES.
  2. Keep a strong key, use the provided functions to generate a “strong” random key.
  3. Decrypt when needed.
Using Rijndael or AES?

Rijndael and AES can be confusing somehow. Don’t worry, I was also confused as to which is better and which is not. The thing is, Rijndael algorithm was developed along with numerous other algorithms, to come on top as “best algorithm for encryption and decryption“. Rijndael won, and was selected as AES algorithm.

Does that make sense? It should… If that doesn’t, read this blog post.

Points of Interest

This is another post in the series of “Programming C# on Ubuntu” articles. In this, I have talked about cryptographic programming in Mono Project on Ubuntu. The services are similar to what we have in .NET framework on Windows operating system. However, there are some other namespaces provided by Mono itself, but still, .NET namespaces rule them out. The services that you can find in .NET are amazing, and C# language itself is just perfect language to be used for any project! I am writing this guide, to share the beauty of C# on cross-platform environments too, for those who are unaware of this currently.

In this post, you were given a few tips and you were shown how to perform cryptographic functions on your data, including hashing the passwords, encrypting and decrypting the data on your machine. Cryptography can greatly influence your application’s performance, and your users would like the privacy and other services that you have for them, such as encryption and decryption of the data, using which they can save their data from unwanted users, and yes, hackers!

In later post, I will talk about NuGet package managements, and then I will head over to writing a guide, in the form of a book itself. See you in the later posts. 🙂

Guide for building C# apps on Ubuntu: Project files and output

Introduction and Background

In the previous posts for the series I talked about the IDE itself, I talked about the tools provided in the MonoDevelop and the Mono Project for C# developers that would help them do their jobs quickly. You may want to read those posts first and then continue to read this post, or the either way as I have tried to abstract the posts enough.

  1. Guide for building C# apps on Ubuntu: MonoProject Introduction
  2. Guide for building C# apps on Ubuntu: Language quickies

Later, you can continue to read this post. This post has a primary focus on the project files, compiled assemblies and the executable files generated after the build process. So, although this would be a very short guide, I would try to explain every aspect of it. You can however, do let me know if you find something missing here.

I assume that you already have an idea of C# project files, typically they are:

  1. One solution file (.sln)
  2. A folder for the project itself.
  3. Properties files
  4. Binary and object files folder.

You will find this template for a project of C# everywhere, from Console to any graphical application that you may be using. The template is chosen to make sure you can always skim through the file system and find the required item there. So now let’s talk about these items in detail…

Project files and output locations

If you have ever programmed in C# on Windows, using Visual Studio you may know the common folders and locations for the project and the generated binaries. For each of the project that you create, Visual Studio creates a quite similar project directory and puts the source code, project settings files, and others in that directory.

MonoDevelop does the same for you! MonoDevelop would ask for a location to create the directory for the project and would then use that location to create new files, and to place the compiled executables. We are going to talk about a few of these locations and the files generated there.

1. Project directory itself…

First of all, let us talk about the project directory that gets created. This location is chosen by you, you are given full permissions to chose a location to select the directory at. You can enter the location and then MonoProject would use the same location to perform the actions, like creating and adding new files, resources and source files, also the same location is used to generate and place the binaries and object code files. So, this directory is used throughout the project life, chose it wisely.

So, for example, when we created the project (in the previous sections), we entered the following location to be selected as the project directory.

Screenshot (5241)
Figure 1: Creating the project and entering the location for the project directory. 

Have a look at the “Location” field in the above window. We can change it from here, we can also browse for a new location and well, you get the idea that we can create the directory anywhere that we find it helpful and easy to be found!

Remember: Projects is also a manual location in Ubuntu, by default the home folder for users do not contain a folder named Projects.

Once we create the project, the files are generated at that location and the project window opens. However, we are only interested in viewing the directory itself and not the project code. The files that are generated here, are very much similar to Visual Studio’s files, it also contains the solution file, Solution files typically hold the information for the project, files and other settings and configurations that you make in the project; like architecture support. Only these files are provided along with the templates because IDEs use a special project file to determine the configuration and the files for the project.

By default, the directory has 1 sub-directory and 2 files:

Screenshot (5708)
Figure 1: Root level of the project, one folder and solution and preferences files in the directory.

As already discussed, the directory is used to hold the files and references for the projects and also holds the generated binaries and executable files. However, before diving any deeper. Let us talk about the files that we can see right here. These files contain the settings for the project and for the user sessions.

Solution file

First of all, let us talk about the solution file itself. The solution file is basically the settings and overall configurations that you make to the project itself. The project is what you create when you start Mono and go ahead creating something. Things that you create in a project are files, resources and source code files etc.

We can open the file up in the text editor, the code in this file is simply commands and settings that would train the environment to set up the configuration for build and a few others, like the name of the project (obviously!)

This file contains the information about:

  1. Project itself.
    • Name
    • Package identifier. Sometimes a GUID.
  2. Build configurations.
    • They are written in the global scope for the environment.
    • Active build configurations for debug and release mode.
    • Extra configurations.
    • CPU architectures used.
  3. Project details file name and other minimal files used for project management.

So, this file is created and is maintained throughout the project. You can also start the project by double-clicking the file for C# project in the same directory (make sure you do not open it in text editor itself). For more on Solution files please refer MSDN, as they describe the file in a much better way: Solution (.Sln) File.

User preferences

Ever wondered how does your IDE know where to start and which line you were previously working on? This file holds the information for that, this file holds the information for currently active file, currently active line and even the column where your cursor was!

So, basically this file holds the information for your currently active session and when you reload the IDE and the same project, your IDE would know where to get you started from. This saves a lot of time of developers as the source code file and the line is already active, they can just continue to work from where they left it.

This file also keeps a hold of your breakpoints. So, everything and every change that you make in the files (not the project!) is saved here. This file is checked against when a new instance is starting so that your sessions are started without any trouble.

This ends here. I think the purpose of these files is pretty much clear. The next step is to go inside the folder and look there… Next I will simply just talk about the files, and the output folders where you would find your assemblies being generated.

2. Inside the project directory

Inside the project directory, the required files for the project building procedure are available. The source files, project building libraries, executables and other binaries are all managed and collected to be placed here. Each new file that you create is created here, and the project knows which files you currently hold and which files that you have removed. So overall the directory is just to hold the files for the project. This directory is used as the location for the files and resources when the build process starts.

Screenshot (5710)
Figure 2: Inside the project directory.

Now these are the entire files required to run our sample project! The project files, solution files and user preferences are all found here and… Well, there is another a simple Program.cs file found too. All of these files are used to generate the assemblies (which are later placed in the bin folder, displayed above). Technically, if either one of these files are missing (the ones that are required at the compile-time), your project cannot compile. You will get errors and you would either have to create a new project, or edit the profile itself to make sure that the errors are minimized. So it is recommended that you do not tamper with these files and let the IDE do what it is intended to do.

Properties

This is another folder in the project itself and well technically it contains the properties for your project. The properties are of the assembly, the information about the assembly, versioning etc are found here. Currently, this folder contains just one file, “AssemblyInfo.cs”.

Screenshot (5835)
Figure 3: Properties folder.

This file is used when referencing the assemblies in the projects. You can get more information from MSDN or any other resource that talks about Assembly Information in C# applications.

bin and obj folders

These folders are used when IDE has finished building a project. They are used to maintain the executables for the project. However, they are not required to be there. Your IDE would itself create these folders when you run the build process, if you have deleted them before.

Just for the sake of demonstration, please see the following image, the executable can be found in the following folder:

Screenshot (5836)
Figure 4: Debug executable found in the bin folder.

This “.exe” file can be used to execute the code that we just wrote in the application. But remember, if you previously deleted the folders, you still need to build the project again to find the executables here. Otherwise, the folder would be empty.

Points of interest

This is another post in the series of Programming C# on Ubuntu. In this post, I have talked about the overview of the project file and directory structure. Where are your executables placed, what files are provided in the templates and which are optional locations.

This was just an introductory post and that is why is much concise. In upcoming post, I will talk about cryptographic services provided by MonoDevelop for C# programming on Ubuntu. So, stay tuned for the next publication.

Guide for building C# apps on Ubuntu: MonoProject Introduction

Introduction and Background

Actually, I was willing to write a book on this topic, “Programming C# on Ubuntu!” but I think for the overzealous crowd, I may just write a small blog post for the upcoming book of mine! C# has been one of the favorite languages of mine ever since I started programming and Ubuntu is another interesting software piece that I love! I did write a post talking about cross-platform programming using C# and it did cover most of the things a C# programmer should know when it comes to writing a project that needs to be executed on multiple platforms and frameworks. In this post, I will talk about a few of the things that developers usually require when they are building applications in C#. Many things, like

  1. Syntax highlighting.
    • I don’t doubt that high-level programmers and their efficiency is related to the syntax highlighting and the color of their code!
  2. Project and solution management.
  3. Compilers and builders.
    • Usually, Ubuntu or Linux environment don’t come shipped with a “full-featured” IDE like Visual Studio, that most C# programmers are fond of.
    • I will talk about the “full-featured” IDE, which has everything!
  4. Debuggers.
    • You don’t want to publish the buggy code to public now, do you? 🙂
  5. Rest of the stuff in C#!

Although this is just a short snippet of “content” that I actually want to write, it would still have enough juice for you to get started programming applications in C#, in no time. But first things first, did you go and read my article about cross-platform programming in C#? If no, please go and read it at, Using C# for cross-platform development. In that post I talked about C# itself and how C# would be intuitively executed on the Ubuntu environment. In this post I will talk about the IDE, features and services and then I will talk about a few core concepts of programming using C# or managed environment. In a managed environment, most of the hard-work is left to the IDE and developers are left to “just” think about the logic. That is what I am going to talk about in this blog!

Settings up the environment…

I did talk about the environment setup in the previous post, so anyways just to continue from there. The process is a bunch of small code blocks and snippets to be executed in the shell (terminal in Ubuntu terms). What we are going to install, is Mono Project’s IDE and the package includes everything that we may need to develop a C# program for Ubuntu.

Following sections would contain the resources and help tips for C# developers who want to port their applications on Ubuntu. Currently, just install the Mono Project and… Remember to install the Mono Project’s IDE, they are two different things.

First steps first, open up the terminal in your Ubuntu, (it may be different in your Ubuntu as Ubuntu itself has multiple flavors and distros).

Screenshot (5228)
Figure 1: Terminal emulator in All applications dropdown.

I am using Ubuntu Studio so it looked something like that, yours may be on the left-side or at the bottom or what-ever! Open it up and enter the following commands to install and setup the environment for C# programming on Ubuntu.

The first step would be to add the repository to your Ubuntu system, because initially Ubuntu doesn’t know about the location to capture the Mono Project from. So you need to set up the repositories first.

sudo apt-key adv --keyserver hkp://keyserver.ubuntu.com:80 --recv-keys 3FA7E0328081BFF6A14DA29AA6A19B38D3D831EF
echo "deb http://download.mono-project.com/repo/debian wheezy main" | sudo tee /etc/apt/sources.list.d/mono-xamarin.list
sudo apt-get update

Add your password to the stream and continue. This would add the repository to your system, plus it would check up for the repository packages for any updates (won’t install!) This is just the start…

Got a different Linux?

Mono Project is available on Linux (of course, that is why we are using it on Ubuntu!) and that is why, any Linux distro can use it. If you have a different Linux distro you may just want to visit the attached link (below), because different Linux distros would definitely have a different flavor of syntax for their terminals and shells.

Install Mono on Linux

Step 2 is to install the Mono Project itself. Mono Project is a collection of C# compilers, Mono packages, dependencies and other tools, like command-line instructions and debuggers. Mono Project has a very handy command to install, entire set of components and binaries on the system. Just execute the following apt command.

sudo apt-get install mono-complete

This install the Mono Project and the required components, not just the compilers and “teeny tiny” stuff around. At this step, you have Mono installed, but only through command-line and terminal. If you want to make use of a full-featured IDE, continue to the next command. It is also recommended to use Mono Project’s IDE, as it would be much simpler and handy while using the IDE instead of the command-line.

sudo apt-get install monodevelop

This would take a (very long; depending on your machine and internet connection) while. Once this finishes, you can start the IDE and start using it for C# programming. To run the IDE, you can either select the symbol from the list of Applications installed:

Screenshot (5229)
Figure 2: MonoDevelop and Mono Documentation in the list of All Applications under Development category on Ubuntu Studio.

These are two different things! Let me talk about these two things separately.

MonoDevelop

MonoDevelop is the IDE (Integrated development environment) used to build, edit and deploy the C# applications. It is what we are usually going to use here.

Mono Documentation

Ever stumbled upon a hard task? Ever visited MSDN for help? This is the MSDN in Mono edition here. It contains the documentation about the assemblies, languages (specifically C# language) and other required information. You would usually look in this to get help.

Coming back to the thread itself… You can also start the IDE from the command-line, to start the IDE just execute the following command in your terminal:

monodevelop

Remember? This is the IDE for Mono! The IDE would look like this,

Screenshot (5230)
Figure 3: MonoDevelop IDE active on Ubuntu Studio.

This is it for this section, read the rest of the post for the discussions about different features of this IDE for C# programming. In many ways, MonoDevelop is similar to Visual Studio, but wait up guys, Visual Studio is Visual Studio! MonoDevelop has successfully bridged the cross-platform development using C#, I would give them this. Their environment is also great, and the performance this has is also amazing. You would love to use MonoDevelop on Ubuntu, if you are a C# fan.

Discovering the MonoDevelop

MonoDevelop is an IDE containing many tricks up its sleeves used regularly by developers ranging from small tools like text-editors, to very powerful tools like profilers and debuggers. All of these tools are used by C# developers to fine-tune their programs. In this section, I am going to demonstrate the use of MonoDevelop for C# programming on Linux environment, using Ubuntu Studio distro. This is not about programming, I will cover that in a later post, instead in this post I will cover the typical software features available for C# developers in this package.

Learning the interface is the first step toward any essential programming environment. If you are unaware of the tool that you are using or the services that you are going to get while using the tool, chances are that you are not going to get that much efficiency while programming in that particular tool. And this is the very common factor that makes (or forces) the companies to select a particular tool over another and so on. C# programmers are primarily focused on Visual Studio (and personally, I also enjoy using Visual Studio only because that is one of the greatest IDEs out there). C# programming is however not bounded to the Windows itself, since it can be programmed on multiple platforms then it should be also possible for the developers to be able to use the tools there. C# was not officially declared to support cross-platform support and in those days, Mono Project stood out and started to compile the C# programs based on ECMA standards for the Linux environments and then on the Mac OS itself. This led developers to write their C# programs, which would “surely” run on multiple platforms, before C# this would be a job to Java programs, whose bytecode would be transferred in the Jars to multiple platforms and then it would be executed on those platforms using the Java’s virtual machine support on those platforms.

Roughly speaking, all of this was just the ideology that led the Mono Project to be successful, because at least in my opinion, C# is much better programming language and the .NET framework is much more extensible, flexible and portable framework to be programmed for as compared to Java programming language or the core Java APIs.

The main page of Mono Project says,

Screenshot (5233)
Figure 4: Mono Project’s home page.

Now, counting the few of the many features that Mono Project would provide you with.

1. Creating a new project

Creating a new project in MonoDevelop is a very smooth and easy process. You just need to select a template, enter a few details and you are done! The main page for creating a new project in MonoDevelop is something like…

Screenshot (5236)
Figure 5: C# project templates.

Yes, you have seen it. MonoDevelop also supports ASP.NET web application development and I will cover that in a separate post, in near future. Just for the sake of a preview, have a look at the following templates, that are provided:

Screenshot (5237)
Figure 6: ASP.NET application templates.

MonoDevelop also supports C and C++ programming, but that is not the talk right now. For this blog, we will simply select C# and a Console application as the template. We simply need to add a few details like:

  1. Name of the project.
  2. Location for the project.

Screenshot (5241)
Figure 7: Configuring the project.

Then we’re done! We will then get our project open, and we can continue exploring the rest of the stuff there.

2. Solution explorer

First and foremost thing that a developer would stumble upon is the solution explorer. Solution explorer typically contains the project files, resources and other references and properties for the project that you are currently working on. The solution explorer in MonoDevelop is similar to what we have in Visual Studio in many ways…

Screenshot (5243)
Figure 8: Solution explorer in MonoDevelop.

This resembles Visual Studio in many ways, we have a solution name, a project name. Not just that, we are provided with:

  1. References
    • Used to manage the references in our project.
    • Can be used to add new references and assemblies to be called using the “using” directive.
  2. Properties
    • Used to configure the properties about the project, a few compilation and build-time editions and so on.
  3. Program.cs
    • This is our main program in the project.

So far, we have just viewed it. What about the options? The options are also (very much) similar to what we have in Visual Studio. We can add new items, manage the tools, manage extensions and much more all in the IDE itself.

Screenshot (5244)
Figure 9: Menu in the project context of the MonoDevelop IDE.

I am not going to talk about the new files, but I will definitely talk about NuGet package management, but in coming sections later. We can use these options provided here to perform many actions, like building the project, cleaning it or to add more files and resources to the project.

3. Running the project

Running the project can be categorized in two different sections:

  1. Debugging
  2. Releasing

MonoDevelop has tools for both of these settings, you can debug your application as well as run the application in release mode. In debug mode, a debugger is attached to the process for catching the exception and to set breakpoints in the applications.

Screenshot (5245)
Figure 10: Debug and Release mode for executing the program.

You can select either one of these configuration and then run the application by pressing F5. Although, I had to talk about the properties and configurations of the project a bit later, but anyways you can change the configurations, add them, remove them from the project by opening the properties and then altering the settings there:

Screenshot (5246)
Figure 11: Editing the configurations for the project. 

You can then run the project in that mode, typically you can edit the CPU architecture that your program would run on; x86 or x64 editions.

4. Managing the references

One of the most important, most used and most critical part of C# programming is the references to the assemblies. Without most assemblies, your program won’t run, simply! Managing the references is a very easy task in Visual Studio as well as in MonoDevelop. Initially, our program just includes the reference to the System assembly,

Screenshot (5247)
Figure 12: Assembly reference window in MonoDevelop.

On the left side, a list of the assemblies from project or from packages or from .NET are available. While on the right side, currently selected assemblies are shown. If we include more references, more items would be shown in this list. So, let us include the famous Newtonsoft.Json assembly and see what happens.

Screenshot (5248)
Figure 13: Selecting a new reference from the references window.

A new reference can be seen in the right side and we have just selected the assembly reference in the left side. Once you click select, it would be added to your project.

Screenshot (5249)
Figure 14: Newtonsoft.Json assembly reference added to the project.

Pretty easy, though. You can include more reference from the projects too. That is not it, if you pay attention, you can see that you add web references too, you can manage NuGet packages too, all in the IDE itself!

Screenshot (5250)
Figure 15: Options to add references to your project.

You can use them to manage the references in your project.

5. Configuring the IDE and Project settings

Finally, I would like to talk about the IDE configurations, compiler settings and a few other editor settings that you may be interested in, just to make sure you feel at home! By default the look and the feel of the IDE won’t be suitable, and if you want to edit the look and feel of the text, you can “surely” change it.

You can manage the compile time settings, you can also sign the assembly in these settings. The settings are something like below:

Screenshot (5251)
Figure 16: Project options window.

The settings are categorized further. You can manage and edit the settings under each category.

  1. Build
    • Holds the configuration for the project. Like running unsafe code.
    • Holds the configurations for running the project.
    • Holds the tools to sign the assembly digitally.
  2. Source code
    • You can alter the look and the feel of the code editor.
    • Allow to perform intelligent code editing features.
  3. Rest of the deployment and running stuff.

You can also manage many other things like the location of the project, where does the compiled binaries get places on the machine. You will find most of the settings right here. Then you can edit them and manage your project to run in multiple scenarios.

Points of Interest

This is one post in the series of articles for C# programming on Ubuntu operating system. This post covers the usual scenarios, tools and features that C# programmers typically look for in an IDE. The post doesn’t cover much about programming, but tools used in programming.

This was just the introduction post for C# programmers who want to start up programming C# on Ubuntu operating system. In upcoming posts, I will talk about:

  1. C# language “quickies”
  2. C# project management and deployment.
  3. NuGet package management.
  4. Tips for refining the code and so on.

Stay tuned, there is a lot more to come… I will also publish a book, “Programming C# on Ubuntu” and, well, that’s it for now. 🙂

Using C# for cross-platform development

Introduction and Background

I wrote a bunch of articles about C# programming, but all of them were Windows or .NET oriented. I want to write an article about C# programming on multiple platforms. C# is a very powerful and strong programming language with a very solid foundation over programming concepts. The language is indeed designed to work on high-level applications and initially it was designed to run for .NET applications only, but as time passed it got introduced to other platforms and applications too.

In this article, I will share a few things that you can do on Windows and Linux. I don’t own a Macintosh so I won’t be able to share that concept but I guarantee the procedure to program a Mac application in C# is also similar to this one! Cross-platform itself means to be able to do everything that you can do one platform, on another one too. C# is able to do the same, on every platform. The concept only requires to modify your compilers to be able to accept new environments, same thing applies to C++ and Java and other similar high-level programming languages. C# also works in a similar manner. The concept of C# compilation is that the code doesn’t compile down to machine code. Instead C# code is compiled down to a bytecode, which is later assembled and translated to machine code by the virtual machine; .NET’s virtual machine! That is what makes C# programming language very powerful and at the same time flexible and portable programming language.

If you are a “diagram” lover, please view the following image:

IC15013
Image from MSDN article: Introduction to the C# Language and the .NET Framework

The assemblies are sent to virtual machine, who then translates the code using their metadata and other stuff all the way down to the metal. That is exactly, why it is possible to execute the same C# code on every machine, every platform and every architecture (x86 and x64). Although the instructions are different, but bytecode helps C# to be executed on any machine! In this article, I am going to use the same concept (and a tool) to help you write native applications on other platforms, too.

References:

If you want to learn more about C# or cross-platform, you may read the following contents,

  1. Cross-platform programming: An open-source overview
  2. Introduction to the C# Language and the .NET Framework

Cross-platform tools for C#: Mono Project

If you started programming on Windows, you might have used Visual Studio as your first IDE and specifically, chances are that you started programming using C# programming language. C# is widely used, that it managed to get attention of developers from other platforms and systems too. Mono Project is one of such products which came up not in a near future, but had been known since a while. Mono Project was started to provide C# developers a cross-platform experience. Mono Project can be installed on the following platforms:

  1. Windows
  2. Linux
    This counts any of the distro of Linux kernel, Ubuntu, Red Hat and so on.
  3. OS X

Mono Project can then be used to compile the C# projects as a native application on that platform. In my opinion, that is pretty much self-explanatory, each platform has the resources and architecture information and the related binaries used to target the platform, Mono Project uses those resources and compiles the project down to bare metal components.

In this post I am going to use Mono IDE, not Visual Studio, because Mono is a cross-platform C# development environment, whereas Visual Studio is a Windows-only tool. But C# can be used on other platforms, all thank you to Mono Project! Using Mono Project you can build,

  1. Console applications in C#
  2. Graphical applications using C#
  3. ASP.NET web applications

Mono Project also allows you to use VB.NET, but I won’t be talking about that, instead I am going to cover C# only.

Getting starting…

First of all, you may want to install the Mono on your environment. If you are using Windows, then (in my opinion), you should consider using Visual Studio. You can get Visual Studio Community for free if you are a student, learner, open-source developer or a small team. That’s the beauty of Visual Studio. But, if you are going to develop applications using C# where Visual Studio is not supported, you should consider downloading and installing Mono Project, which includes everything starting from the Mono documentation, Mono IDE and the compilers for the languages.

I did say, that you should try Visual Studio on Windows but if you want to learn other environment on Windows, you can for sure install Mono on your Windows environment too. It would give you a much better experience to program C# applications on non-Windows environment and all by just using terminal or command-line commands to compile and use the application. I have learnt a lot of things by using the terminal in Linux environment, so I would also recommend you guys to give it a try!

Installing Mono

Installing the Mono is different on different environments, on Windows and Mac it is pretty much same. All you have to do is to download the installer and run it. It installs everything for you. But on the environments, like Linux you have to create repositories and then start installing the packages. That takes a bit of time. I will show you how to do that on all of the environments!

1. Installing on Windows/OS X (Mac)

The procedure to install on Windows and Mac is similar. Just download the package and then go install it, by executing the installer. It would install the Mono project including all of the dependencies, files and executables. You can then use your Mono project to build C# applications on platforms, other than .NET themselves.

Install Mono on Windows
Install Mono on Mac OS X

2. Installing on Linux (or Linux distros)

Now the things here get complicated. In Linux, you are going to use the terminal and then execute the commands to build the repository systems and then install the packages, for every Linux distro, it is different process so that may also cause a trouble and that is why I won’t be sharing a single script “to rule it all”, instead I will be providing you with a link that contains all of the scripts that you should execute to get your job done! In the Linux environments, you can execute commands differently to have your job done! Head over to this page to find out which command set would work on your environment. That page would give you the commands that you can execute to set up the environment. Rest assured, now you can execute the following command in your own environment to install the Mono assemblies.

sudo apt-get install mono-complete

This command may also differ based on the environment, some may use yum, some may use rpm or others. Please refer to your own installer commands.

Wait, I cannot find the IDE. Where is it?

Correct, until now, you have only installed the binaries and assemblies required to make Mono workable. You have not yet installed the IDE. Until now you just installed the compilers and binaries. To install the IDE, execute the following command:

sudo apt-get install monodevelop

Now, head over to your IDE that was recently installed and start it! You are going to love it, and well, the folks have seriously put some great efforts in it.

Screenshot (1547)
Ubuntu Studio showing the list of IDEs.

Screenshot (1549)
Hello world project opened in Mono Project.

In the next step, I will share a few example of using C# to build cross-platform applications. Head over to the next step!

References:

I am attaching a few good links in this section too,

  1. Visual Studio Community
  2. Mono Project — Official Website
  3. Install Mono

Building the applications

In this section, I will show you three sample codes for C#, which you already do know in .NET environment. The samples are not to give a new task in C#, but rather just a simple code, to help you understand how C# can be used to execute commands on different environments, different platforms and so on.

Hello world from Linux

First of all, I want to make my application greet me, from a Linux environment, using the same code that you would use on .NET environment. You all are already aware of the following code,

using System;
using System.Net.Http;

namespace HelloWorld
{
   class MainClass
   {
        public static void Main (string[] args)
        {
            Console.WriteLine ("Hello, who's there?");
            string name = "";
            name = Console.ReadLine ();
            Console.WriteLine (string.Format("Hello {0} from Linux using C#.", name));
        }
    }
}

Aren’t you? Yes, it’s the same “elementary” C# code to greet someone! This time, running on a non-.NET environment. This would just prompt me for some input and then continue to do what it was intended to do.

Screenshot (1550)

Pretty simple, right? But notice that this code now runs on native Linux environment. There is no underground .NET frameworks supporting it. In real, it is the Mono Runtime that actually does the processing underground. Please read the reference to Mono Runtime in the references below.

C# programming using collections

Collections are a great resource in any application, you can accept a long record of user data in a single object, that is of type: Collection. C# has been providing generic programming objects, for collections. Collections are much better than arrays, because collections are mutable, unlike arrays. In this section, I will show you how to write an application that consumes the collections.

I created a class object, to hold the values of the people. Then I created a list to hold “some” people and then printed their values. It is also a similar code.

using System;
using System.Net.Http;
using System.Collections.Generic;

namespace HelloWorld
{
    class MainClass
    {
        public static void Main (string[] args)
        {
            // Create the list of the people.
            var people = new List<Person> ();
            people.Add (new Person { Name = "Afzaal Ahmad Zeeshan", Age = 20 });
            people.Add (new Person { Name = "Sofiya Zeeshan", Age = 19 });
            people.Add (new Person { Name = "Daniyal Ahmad Rizwan", Age = 15 });
            people.Add (new Person { Name = "Eminem", Age = 43 });

            // Printing the details for people.
            foreach (var person in people) {
                Console.WriteLine (person);
            }
        }
    }

    class Person {
        // Provide the attributes.
        public string Name { get; set; }
        public int Age { get; set; }

        // Override the default ToString
        public override string ToString ()
        {
            return string.Format ("[Person: Name={0}, Age={1}]", Name, Age);
        }
    }
}

How this code actually ran, please see below.

Screenshot (1551)

It just prints everything and then terminates. These were a few things that were basic. Let’s try out if C# still has the same power or not, why not try out Internet access in C#?

Using C# to access online resources

Now in this section, I will be referring an online API of my own to access the data. This may make things a bit tough, if you have never worked with System.Net namespaces in .NET framework. I will be using an object from these namespace and then I will call the functions to actually download the data from an online API and then I will print it.

Linux also provides the similar manner to use the TCP/IP protocol that is why C# code written for Windows would work in a similar manner with Linux and other Mac’s OS X system.

In the following code, I have also used another concept in C#, asynchronous programming. Mono supports async models of C#, and you can avail the services right in the IDE, just like Visual Studio. The code I have used is like the one below,

using System;
using System.Net.Http;
using System.Collections.Generic;

namespace HelloWorld
{
    class MainClass
    {
        public static void Main (string[] args)
        {
            downloadAndPrint ();
        }

        private static void downloadAndPrint() {
            System.Threading.Tasks.Task.Run (async () => {
                using (var client = new HttpClient()) {
                     Console.WriteLine ("Downloading the data...");
                     var message = await client.GetStringAsync("http://afzaalahmadzeeshan.gear.host/api/sample");
                     Console.WriteLine();
                     Console.WriteLine(message);
                }
            }).Wait();
            Console.WriteLine ("Exiting the function..");
        }
    }
}

The above code simply downloads the response as string and prints it. This shows, that C# not only just works in the console, but it also works perfectly with the protocols on different systems. All of this is managed by the Mono Runtime.

Screenshot (1552)

So, I guess this is enough to demonstrate how C# can be used.

References:

A few topics that you should consider reading:

  1. The Mono Runtime
  2. HttpClient Class
  3. List<T> Class
  4. Asynchronous Programming with Async and Await

Points of Interest

In this article, I have demonstrated how you can use C# to develop cross-platform applications. There is no need to learn multiple languages to target multiple frameworks and application systems. You can use one single programming language, even C#, and write native applications on multiple platforms.

Although C# doesn’t execute natively, even on those platforms. Mono Runtime is responsible for executing the applications on those platforms. Just like .NET’s virtual machine or Windows Runtime executes C# code on Windows environments. On other platforms (and including Windows if compiling and using Mono), you can use Mono Runtime to target the platforms and make use of .NET libraries and lightweight programming model of C# programming language.

I hope you like this article, wait up for the next articles, or write back to me to get more. 🙂